
1
Design and Visual Communication
| Task | Summary | Example | Template | ||||||||||
|---|---|---|---|---|---|---|---|---|---|---|---|---|---|
|
Experimentation Portfolio page 1 More info |
|
|
Link to Kit Bash Template | ||||||||||
|
Developing a Brief Portfolio page 2 More info |
|

|
[Template link] | ||||||||||
|
Bubble Diagram & Floorplan Portfolio page 3 More info |
|
|
[Template link] | ||||||||||
|
Ideation and Iteration Portfolio pages 4 & 5 More info |
|
|
[Template link] | ||||||||||
|
Floorplan Design Portfolio pages 6 & 7 More info |
|
|
[Template link] | ||||||||||
|
Final Floorplan Portfolio page 8 More info |
|

|
[Template link] | ||||||||||
|
Design Development & Materiality Portfolio pages 9 & 10 More info |
|
|
[Template link] | ||||||||||
|
Instrumental Drawings Portfolio pages 11, 12, 13, 14 & 15 More info |
|
|
[Template link] | ||||||||||
|
Evaluation Portfolio page 16 More info |
|
|
[Template link] | ||||||||||
For more detailed information, see the page below |
|||||||||||||

3
Experimentation
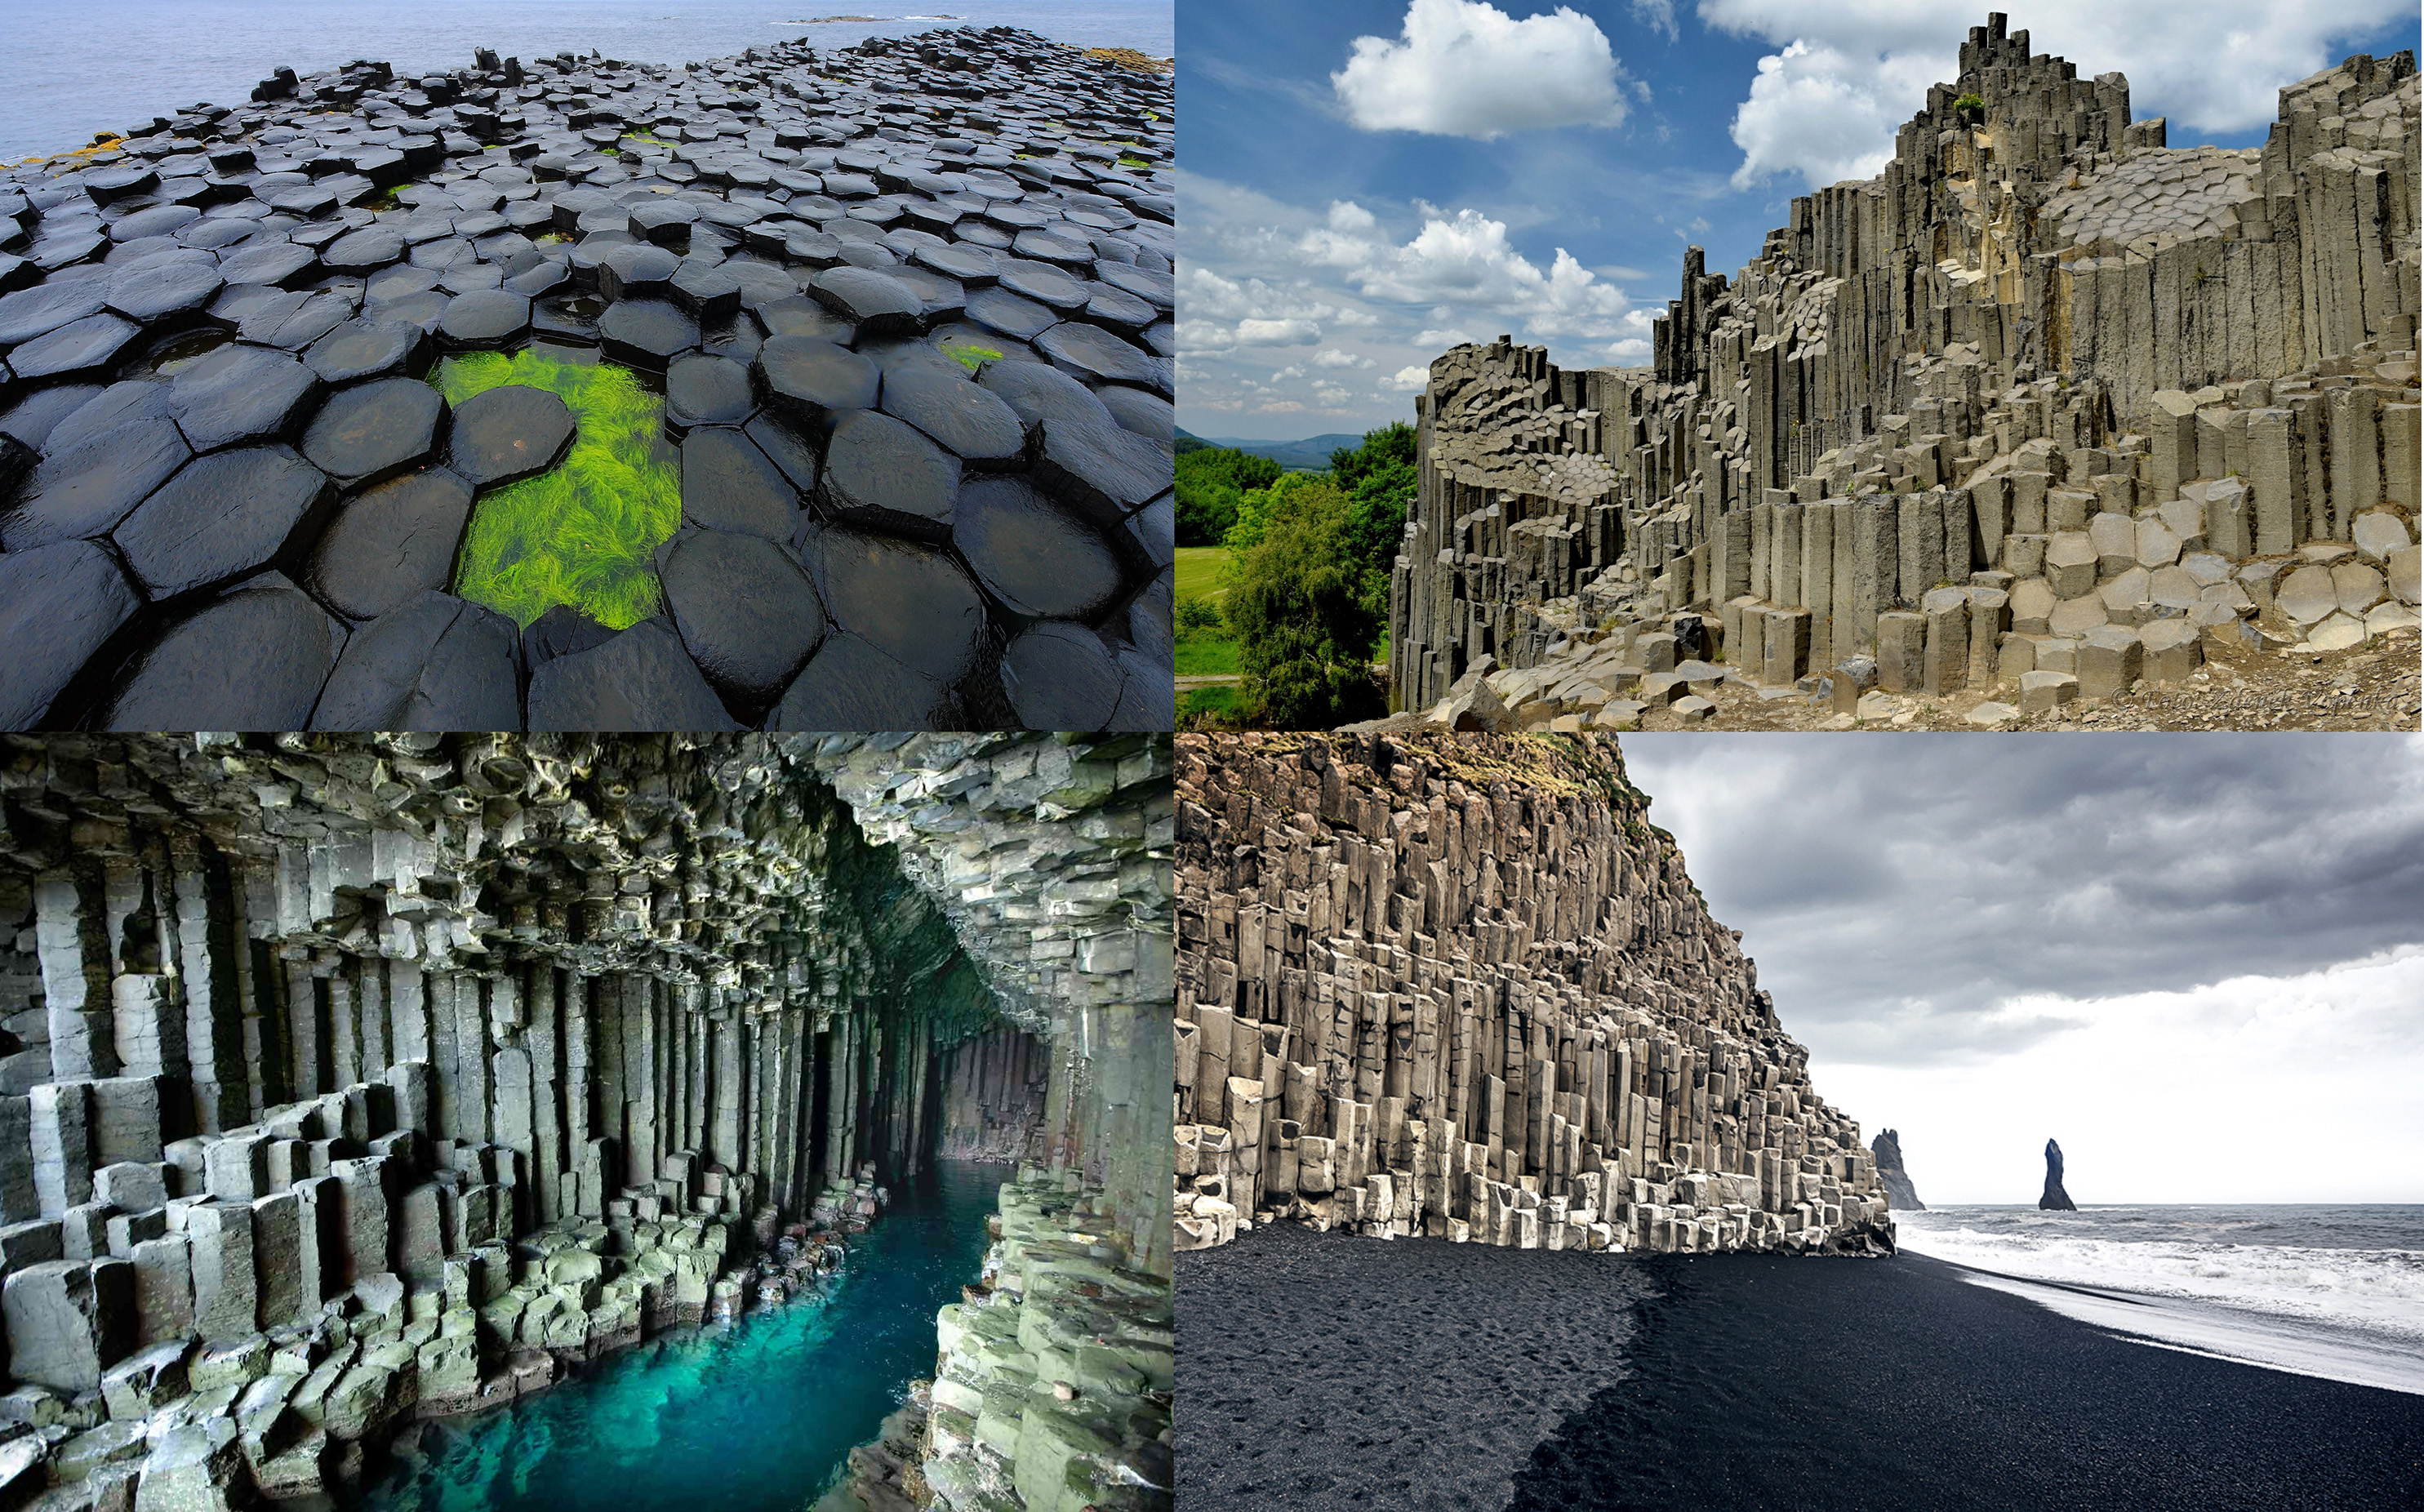
1 Model basic shapes |
Start by creating simple forms from nature or everyday objects, based on the examples below. |
2 Document |
Make notes to show how you have changed the forms, i.e. from flat, initial shapes can be extruded, stacked, rotated, mirrored or modified into preliminary 3D architectural forms. |
3 Choose 3 examples |
Choose from the table below to develop your own ideations. You can also find your own examples, but these are a good starting point. |
4
Experimentation


|
Examples
5
Developing a Brief
Designing a Disaster Relief Center
1. Project Context and Purpose |
|
||||||
2. Scale and Site Selection |
|
||||||
3. Functional Requirements |
|
||||||
4. Environmental and Resilience Design |
|
||||||
5. Material and Structural Considerations |
|
||||||
6. Aesthetic and Conceptual Inspiration |
|
6
Developing a Brief
Designing a Virtual Space for a 3D Videogame or Animation
1. Project Context and Purpose |
|
||||||
2. Scale and Site Selection |
|
||||||
3. Functional Requirements |
|
||||||
4. Environmental and In-Game Lore Design
|
|
||||||
5. Material and Textural Considerations |
|
||||||
6. Aesthetic and Conceptual Inspiration |
|
7
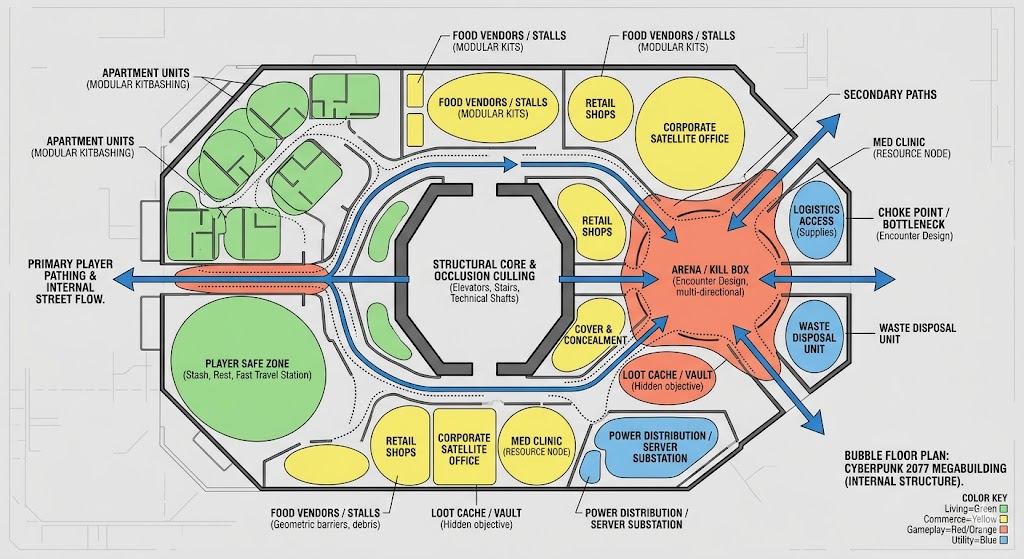
Bubble Diagram & Floorplan
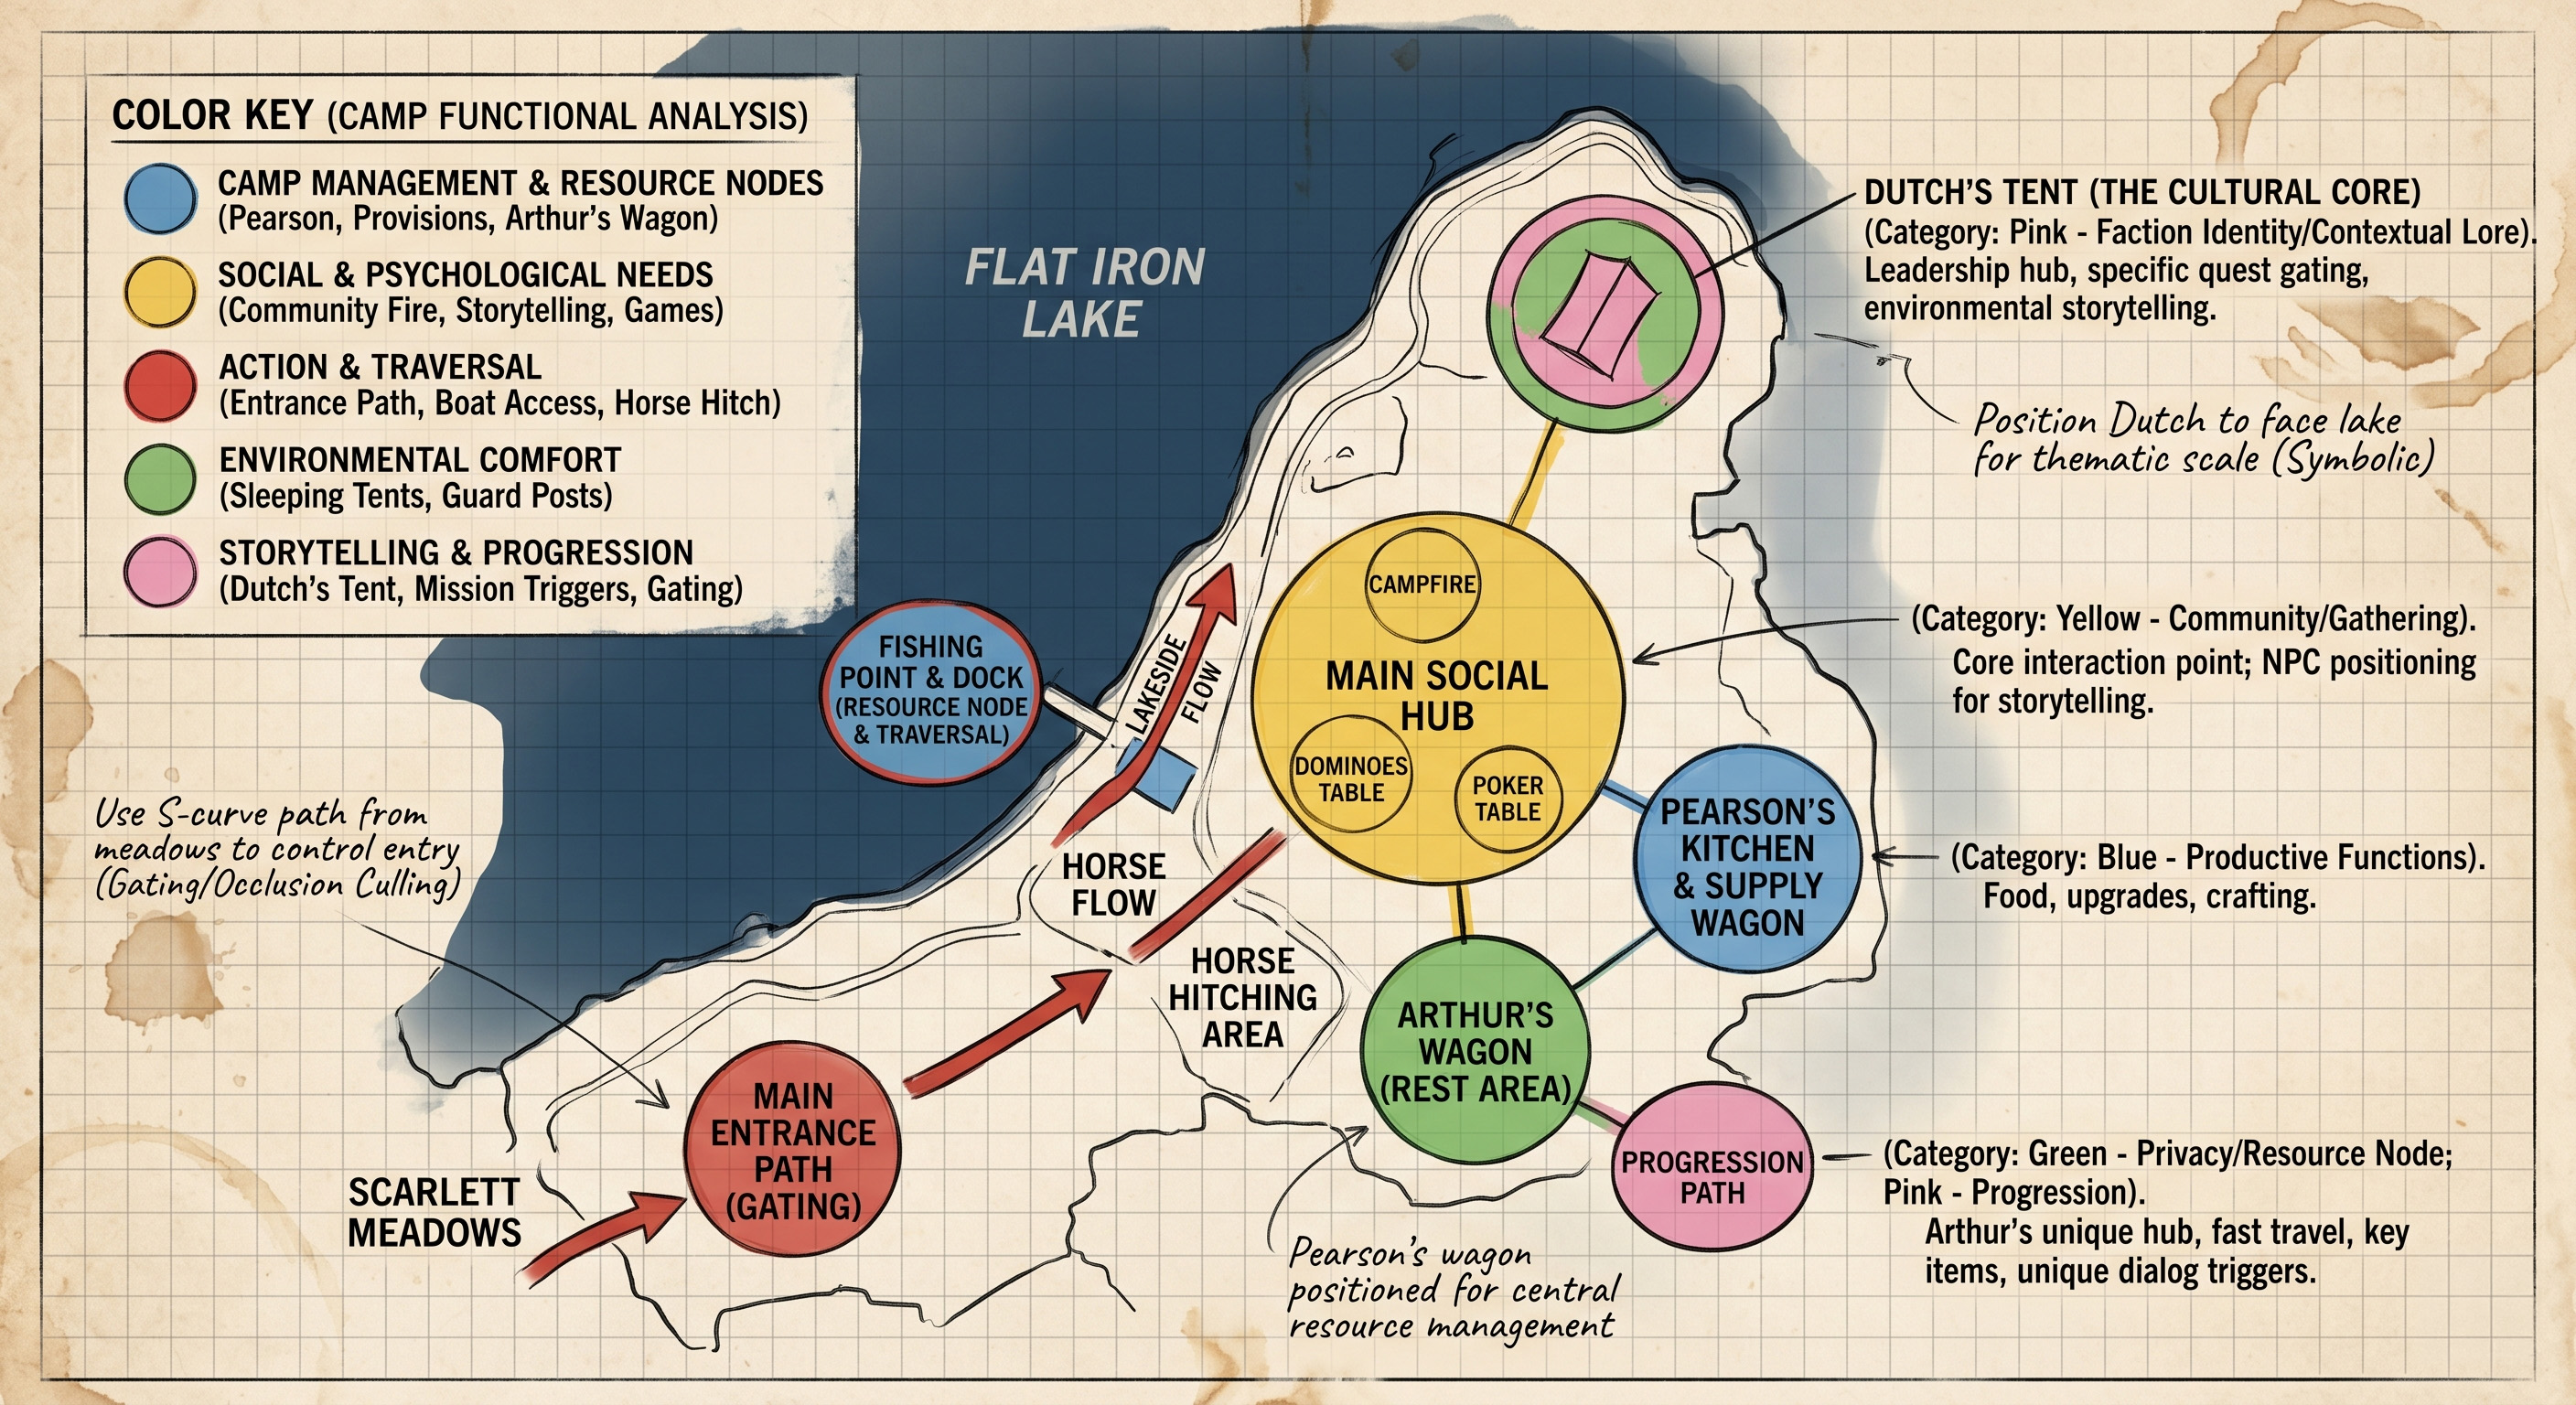
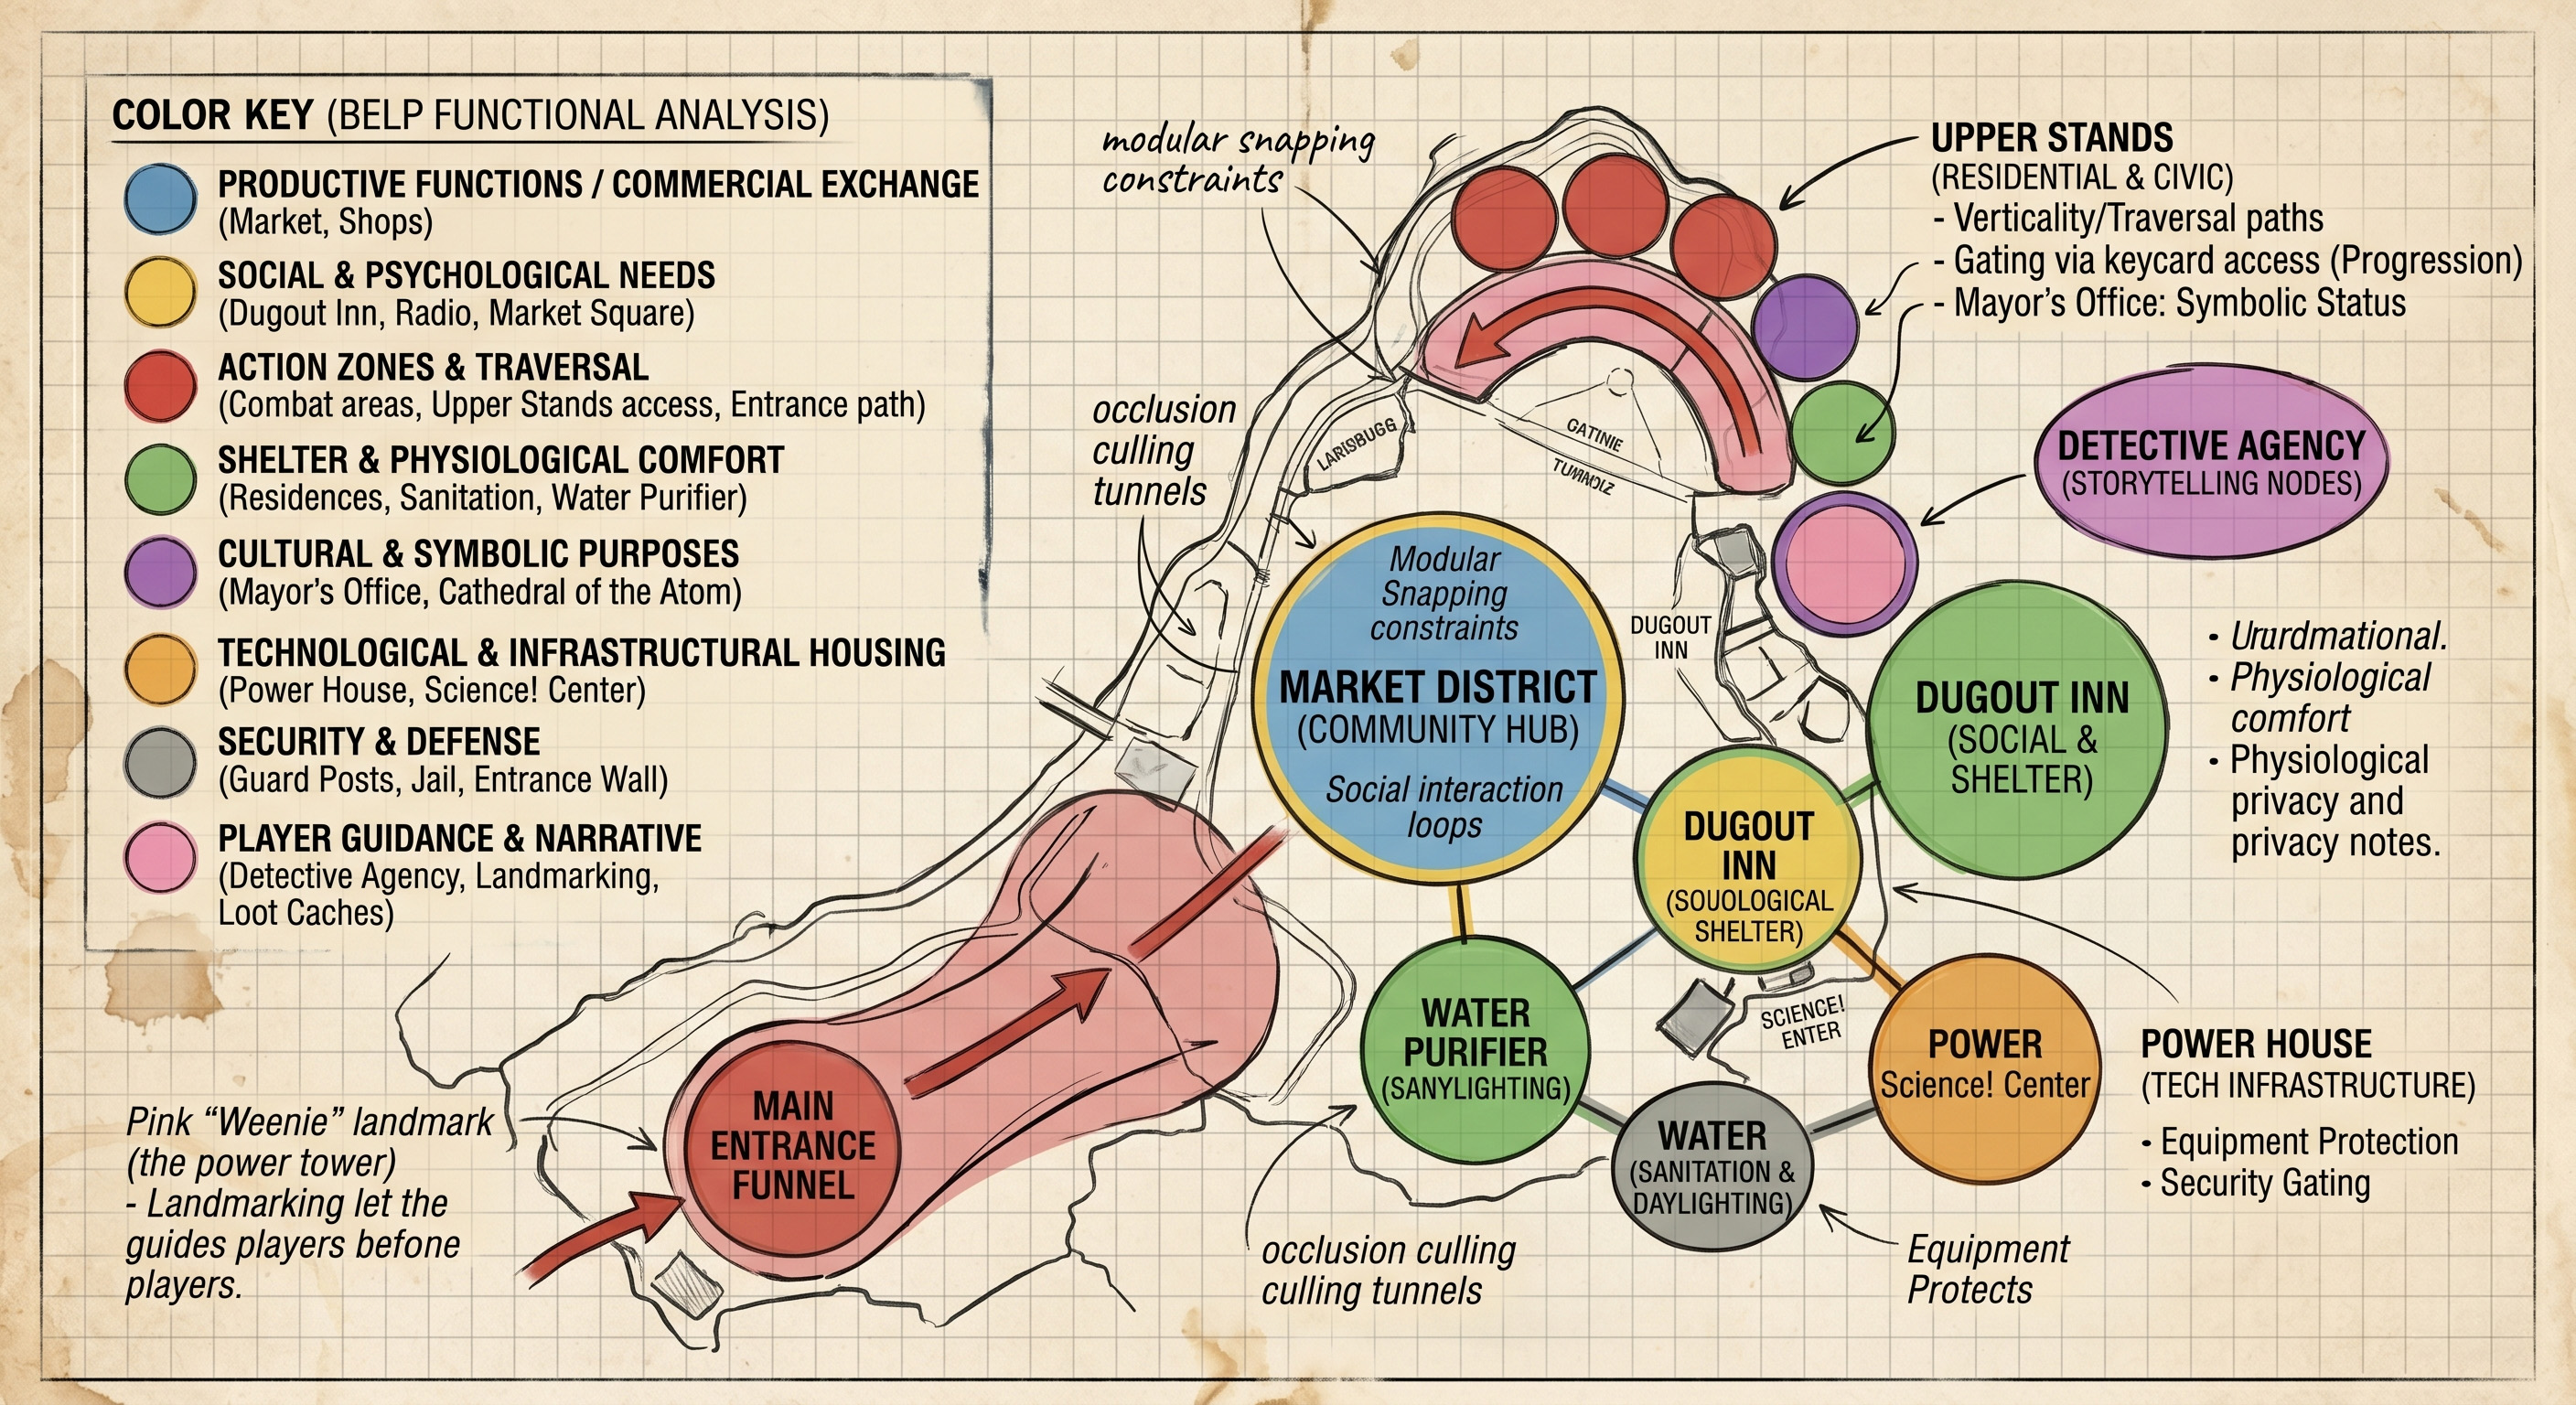
How to Build Your Color-Coded Bubble Diagram
A bubble diagram is a visual mapping tool used in architecture and level design to plan out the spatial relationships, flow, and functions of a space before drawing actual floor plans. By assigning a specific color to each major category, you can quickly visualize how different areas of your design interact, where they should be placed, and how users (or players) will move between them. |
Here is how to apply these categories to your design:
1 Assigning Colors to Primary Categories |
To keep your diagram readable, assign a distinct highlight color to each of the overarching "Macro" categories. For example:
See more Detailed information about the categories further down the page. |
|||||||||||||||||
2 Drawing the Bubbles (Sizing and Placement) |
Draw by Proportion: The size of each bubble should roughly represent the amount of square metres that sub-category needs. A "Commercial Exchange" (Blue) bubble will be much larger than an "Equipment Protection" (Orange) bubble. |
Start with the Core: Begin by drawing the most important, central functions of your design first. If you are designing a fortress, start with "Security and Defense" (Grey) or your main "Arena" (Red). |
||||||||||||||||
3 Establishing Adjacencies (Connecting the Bubbles) |
Once your core bubbles are drawn, use them to dictate where the subsequent categories must be placed.
|
|||||||||||||||||
4 Layering Level Design over Architectural Function |
Notice that your list contains both real-world building functions and game-level design functions. You can overlap these to create highly realistic playable spaces!
|
|||||||||||||||||
5 Using the "Invisible Functions" |
Some categories represent invisible functions that are crucial for the practicalities of implementing a game level, such as lighting, sound, and NPC AI navigation. This section is worth knowing, but not particularly important in the context of this assessment. Invisible functions indicate technical boundaries with dashed lines or specific border colors. Use Occlusion Culling or Loading Zones as transitional corridors. These are areas between levels, between entering a large 3D space in video games, where significant loading or processing occurs. These corridors are often drawn as long, thin S-curves connecting two massive, unrelated clusters of bubbles to ensure the game engine has time to load the next area smoothly. |
|||||||||||||||||
Use this Illustrator Template to get started

8
Design - Spatial Considerations
What will the space be used for?
A basic example of a Bubble Diagram

A few more examples:
9
More Detailed Information - Realworld
Productive Functions |
|
|---|---|
Workplace Facilitation |
Organizing space to optimize specific tasks, whether it is an open-plan office for collaboration or a specialized laboratory for research. |
Commercial Exchange |
Creating environments structured for the display of goods, the facilitation of transactions, and the flow of customer traffic (retail stores, markets). |
Storage and Logistics |
Safely housing goods, vehicles, or materials in an organized, easily accessible, and often climate-controlled manner (warehouses, garages). |
Resource Management |
Acting as an economic asset that generates value through leasing, operation, or long-term appreciation. |
Shelter and Physical Protection |
|
Weather Resistance |
Shielding occupants from rain, wind, snow, and extreme external temperatures. |
Thermal Regulation |
Providing a controlled internal climate (heating and cooling) for human survival and comfort. |
Security and Defense |
Creating a physical barrier against unauthorized entry, theft, or physical threats. |
Acoustic Isolation |
Blocking or mitigating disruptive external noises (like traffic) to create a manageable auditory environment. |
Disaster Resilience |
Protecting occupants against natural events such as earthquakes, floods, or high winds through specialized structural engineering. |
Physiological and Environmental Comfort |
|
Ventilation and Air Quality |
Facilitating the circulation of fresh air and the removal of stale air, odors, and indoor pollutants. |
Daylighting |
Capturing and directing natural sunlight into interior spaces to support circadian rhythms and reduce artificial lighting needs. |
Sanitation |
Housing the plumbing systems required for clean drinking water, bathing, and safe waste disposal. |
Ergonomic Support |
Providing spatial dimensions (ceiling heights, corridor widths) that comfortably accommodate human proportions and movement. |
Social and Psychological Needs |
|
Privacy |
Offering enclosed, visually and acoustically isolated spaces for personal retreat, rest, or confidential activities. |
Community and Gathering |
Providing open, accessible spaces (like plazas, dining halls, or living rooms) designed to foster social interaction and group cohesion. |
Wayfinding and Orientation |
Using spatial sequencing, lighting, and sightlines to help users intuitively navigate through complex environments without confusion. |
Aesthetic Enjoyment |
Delivering visual pleasure and psychological stimulation through proportion, materiality, light, and architectural form. |
Cultural and Symbolic Purposes |
|
Representation of Status |
Projecting wealth, power, or prestige through monumental scale, expensive materials, or prime location (corporate headquarters, palaces). |
Religious and Spiritual Practice |
Creating atmospheres that inspire awe, reflection, or congregation tailored to specific theological rituals (churches, mosques, temples). |
Historical Continuity |
Preserving cultural memory and heritage by maintaining architectural styles, materials, or literal historical structures. |
Civic Identity |
Serving as recognizable landmarks that define a city's skyline or a community's shared identity. |
Technological and Infrastructural Housing |
|
Equipment Protection |
Providing specialized, highly controlled environments for sensitive machinery (data centers, server farms, electrical substations). |
Transit Facilitation |
Managing the flow, boarding, and ticketing of large volumes of people moving between different modes of transportation (airports, train stations). |
Energy Generation |
Integrating systems like solar panels or wind turbines directly into the building envelope to produce power for the occupants or the grid. |
10
More Detailed Information - Videogames
Action Zones |
|
|---|---|
Cover and Concealment |
Providing physical barriers (low walls, pillars, rubble) that break enemy line-of-sight and offer the player a tactical advantage during combat. |
Choke Points and Funnels |
Narrow corridors or doorways that force enemies or players into tightly packed areas, controlling the pacing and density of an encounter. |
Arenas and "Kill Boxes" |
Wide, open interior spaces (like a warehouse or courtyard) specifically scaled to allow for dynamic, multi-directional combat or boss fights. |
Verticality and Traversal |
Providing structural elements (balconies, exposed beams, stairwells, grappling points) that allow the player to move upwards, offering vantage points or alternative stealth routes. |
Safe Zones |
Clearly defined, easily defensible areas where combat is disabled, allowing the player to rest, organize inventory, or interact with NPCs without threat. |
Player Guidance |
|
Landmarking (The "Weenie") |
Serving as a massive, distinct visual anchor on the horizon that constantly orients the player and draws them toward a primary objective (e.g., a towering citadel or a glowing spire). |
Pathing and Leading Lines |
Using architectural geometry, lighting, or structural damage to subtly guide the player's eye and movement toward the critical path, avoiding the need for literal arrows. |
Thresholds and Pacing |
Using doors, airlocks, or tight crawlspaces to force the player to slow down. This builds psychological tension and separates different types of gameplay zones. |
Gating |
Acting as a physical barrier that requires a specific key, skill, or narrative progression to unlock, ensuring the player doesn't access late-game areas too early. |
Rewards and Progression |
|
Loot Caches and Vaults |
Hidden or heavily guarded interior spaces specifically designed to reward the player for exploration or overcoming a difficult challenge. |
Resource Nodes |
Functional areas that house crafting benches, healing stations, or ammunition dumps, integrated logically into the environment (e.g., a triage tent in a military base). |
Spawn and Respawn Points |
Logically placed, safe entry points where the player (or enemies) generate into the level out of the direct line-of-sight of active combat. |
Storytelling & Narrative |
|
Contextualizing Lore |
Designing spaces that explain the history of the world without using text. A collapsed ceiling, barricaded doors, or improvised sleeping areas tell the story of the people who inhabited the space before the player arrived. |
Faction Identity |
Using specific shapes, materials, and spatial arrangements to visually communicate which group controls a building (e.g., sharp, brutalist metal for a militaristic faction versus organic, woven structures for a nature-based faction). |
Scale and Psychology |
Manipulating the size of the space to make the player feel specific emotions—towering, oppressive ceilings to make the player feel small and vulnerable, or tight, claustrophobic corridors to induce panic. |
The Invisible Functions |
|
Occlusion Culling (Line-of-Sight Blocking) |
Using large, solid structures specifically to block the player's view of distant areas. This allows the game engine to "unload" those hidden areas and save processing power. |
Modular Snapping |
Designing spaces on a strict grid system so that standard kitbashed pieces (walls, floors, doorways) fit together seamlessly without gaps or texture tearing. |
Collision Framing |
Keeping the player within the playable boundaries of the map using believable architectural barriers (like locked gates or collapsed rubble) rather than breaking immersion with invisible walls. |
Loading Zones |
Using "S-curve" corridors, elevators, or long hallways to buy the game engine a few seconds of time to load the next massive area into memory in the background. |
11
Concepts: Modularity & The Vertical Micro-City |
|
|---|---|
Real-World Functional Zoning: Le Corbusier & Unité d'Habitation (Marseille, France) |
|
 |
Link to a deeper reading of the history surrounding the Architect, Building, City etc. |
The Context and Purpose |
Le Corbusier was a pioneer of modernism who designed the Unité d'Habitation in response to the WWII housing crisis. He viewed a house as a "machine for living." His goal was to provide high-density, standardized community housing while preserving green space. |
Functional Zoning Analysis |
The building packers all city functions-living, commerce, transit, and social services-into a single vertical footprint. The spatial layout relies on mathematically rigid modularity (using 'The Modulor' system). The functional zones are strictly defined by interlocking L-shaped modules slotted like bottles in a rack, connected by "internal streets" to foster community access and resource distribution. |
Real-World Considerations |
Your design must negotiate similar technical constraints: efficient circulation for large populations, equitable access to daylight and ventilation (thermal comfort), and integrating service infrastructure (plumbing, power) within a strict modular skeleton. |
12
Concepts: Modularity & The Vertical Micro-City |
|
|---|---|
Videogame World Functional Zoning: Cyberpunk 2077 Megabuildings (Night City) |
|

|
Link to Cyberpunk2077 - Principal Artist Krysztof Olborski's Artstation |
The Context and Purpose |
Game developers in Cyberpunk 2077 utilized the architectural concepts of high-density urban living (e.g., Unité d'Habitation and Kowloon Walled City) to create massive, self-sustaining megabuildings that tell a narrative story within Night City without using explicit text. |
Functional Zoning Analysis |
The developers implement strict vertical modularity to pack commerce, safe zones (player apartment), and interaction loops within a single structure. Functional zones rely on an "internal street" layout (a marketplace), but expanded to vertical hierarchy. Crucially, the massive, permanent brutalist concrete shell acts as the structural skeleton into which small, interchangeable, repeating modular kits are plugged, such as apartments, food stalls, and signs. |
Game Considerations |
Your digital asset must optimize for engine efficiency by utilizing the thick structural shell and internal blocks to facilitate occlusion culling, designing standard modular kit parts that snap seamlessly to a grid scale, and managing rapid vertical circulation through elevators. |
13
Concepts: The Architecture of Surveillance |
|
|---|---|
Real-World: Jeremy Bentham & The Panopticon |
|
The Context and Purpose |
The Panopticon is not just a building; it is a profound psychological control mechanism designed by English philosopher Jeremy Bentham. It was intended for institutional environments, like prisons or factories, where a single authority figure controls a large population purely through the psychology of constant, unseen observation. |
Functional Zoning Analysis |
The zoning uses sightlines as the primary functional weapon. The design features a circular perimeter ring of individual cells, each backlit by an exterior window, ensuring the occupant is always visible. The guards are centralized in a shadowed observation tower using blinds. Inmates, never knowing *when* they are being watched, are forced to self-regulate behavior. |
Real-World Considerations |
You must consider how spatial hierarchy enforces control in high-security zones: optimizing line-of-sight occlusion (blocking vision), implementing technical surveillance zones, and designing exposed outer rings that force vulnerability upon occupants while maintaining visual and tactical dominance from a secure center. |
14
Concepts: The Architecture of Surveillance |
|
|---|---|
Videogame: Control - The Panopticon Sector (The Oldest House) |
|
The Context and Purpose |
In Control, developers literally built a high-tech Panopticon to house dangerous supernatural artifacts, weaponizing Bentham's historical architectural theory to create tension, safety, and narrative intrigue in equal measure. |
Functional Zoning Analysis |
The layout forces the player to instantly feel danger and vulnerability. The space is a massive circular central core designed with distinct high-security containment bubbles and technical access shafts. Sightlines are weaponized: the central observation tower controls the environment through CCTV links and centralized communication, while the dangerous contents (objects of power) are backlit and exposed in external containment cells. |
Game Considerations |
You must consider how spatial hierarchy enforces control during stealth encounters or boss fights: defining clear visibility limits through occlusion culling barriers, designing boss arenas that allow multi-directional fire and dynamic cover placement, and implementing verticality with catwalks and balconies to optimize tactical advantages. |
15
Concepts: Pacing & Spatial Hierarchy |
|
|---|---|
Real-World: Dover Castle |
|
The Context and Purpose |
Fortresses, such as standard Norman keeps, were designed to physicalize the lord's absolute power and deter aggression. The architecture creates a filter, ensuring the visitor must experience a specific social hierarchy before accessing the throne room or inner sanctum. |
Functional Zoning Analysis |
Spatial logic relies on mediating thresholds. A visitor does not just walk up to the lord. They must navigate heavily guarded outer walls (the Bailey), public lower halls, and long, echoing stairwells. Finally, in the Great Hall, the throne (dais) is situated at the furthest possible point from the door and elevated, making the final approach long, exposed, and intimidating. |
Real-World Considerations |
Your real-world high-security or prestigious sites must utilize these concepts: designing sequential thresholds, implementing defensive geometry (choke points) that control movement and density, and optimizing cover points that allow defenders to overlap visual safety fields. |
16
Concepts: Pacing & Spatial Hierarchy |
|
|---|---|
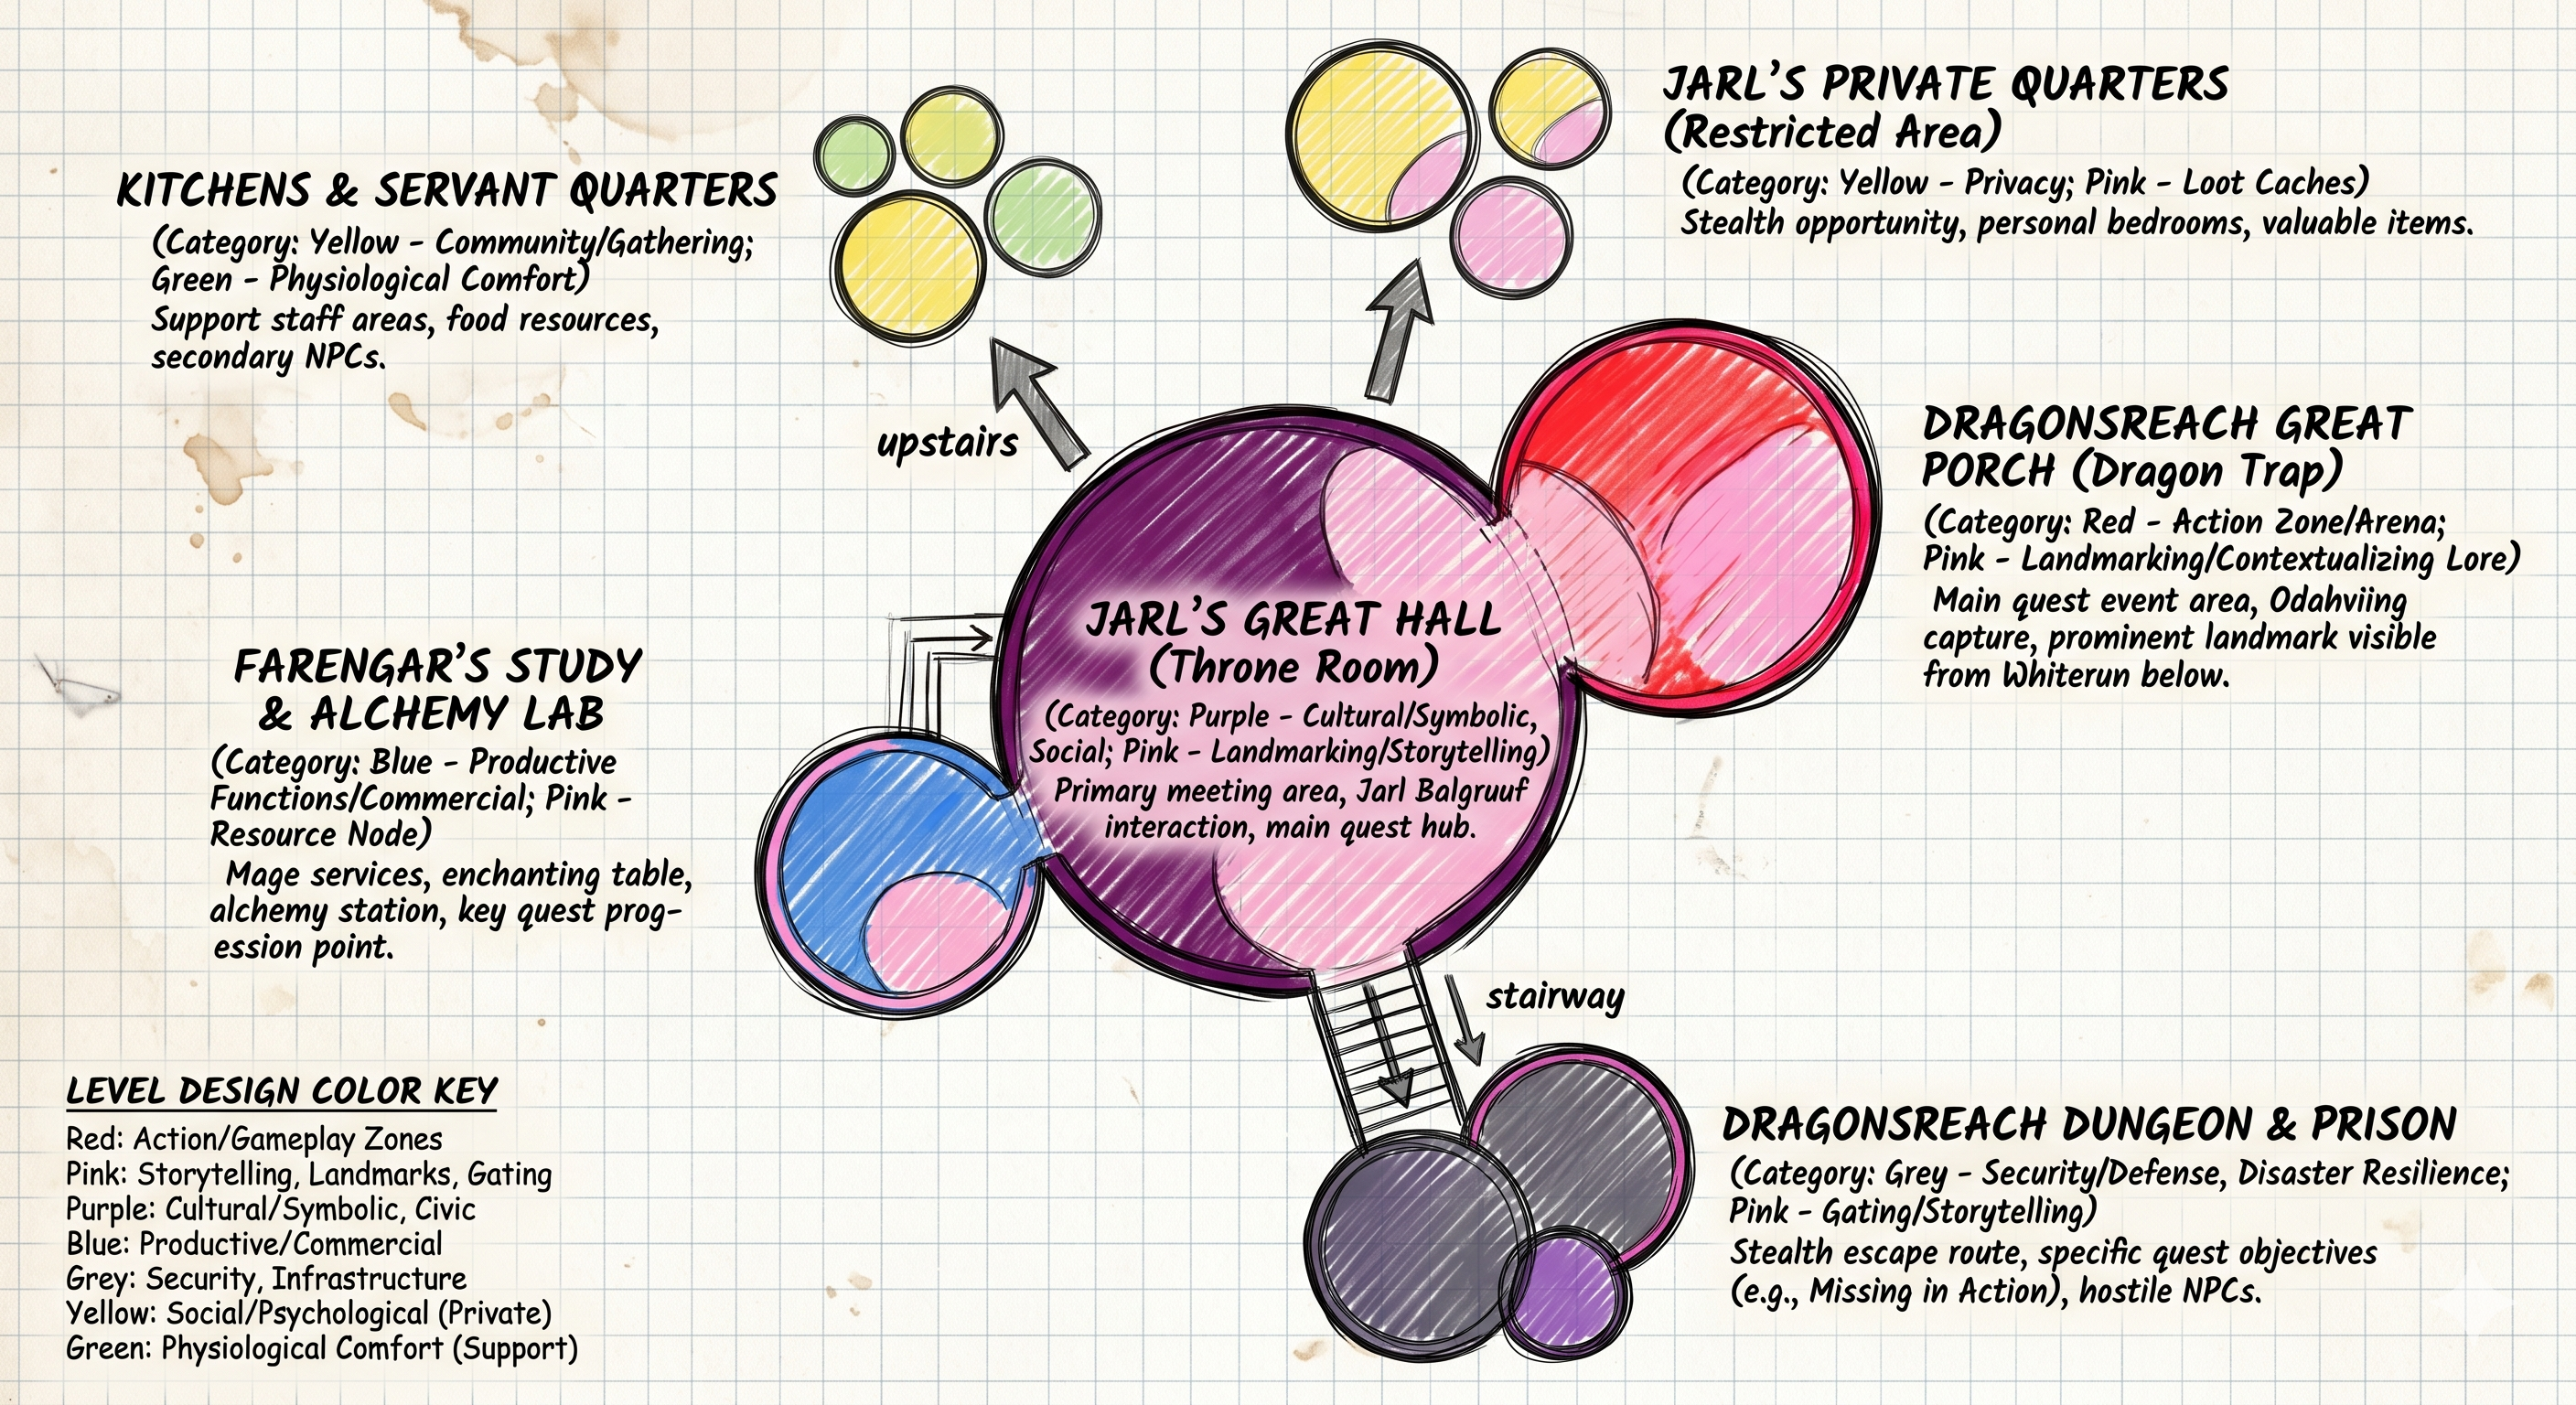
Videogame: The Elder Scrolls V: Skyrim (Dragonsreach) |
|
The Context and Purpose |
When the player first enters Dragonsreach, the Jarl's palace in Skyrim, the architecture forces them to experience the Jarl's power. The space utilizes standard castle hierarchy, combined with game pacing principles, to build anticipation. |
Functional Zoning Analysis |
Dragonsreach's interior utilizes multiple mediated thresholds. You do not place the final objective, the Jarl, or a complex encounter right at the front door. Instead, the architecture uses leading geometry and visible pathing to guide the eye toward the core objective, forcing the player to walk past the central fire pit and dining tables (communal zone) before ascending a grand staircase to reach the Jarl, lounging on an elevated throne (authority zone) furthest from the door. |
Game Considerations |
Your game-based authority zones must manage pacing and flow by utilizing leading lines and technical engine limits like S-curve loading corridors to hide technical loading zones, implementing sequential gating that requires specific player keys or skill progression to access high-security zones, and optimizing clear navigation (wayfinding) so players can intuitively locate critical objectives without immersion-breaking literal arrows. |
17
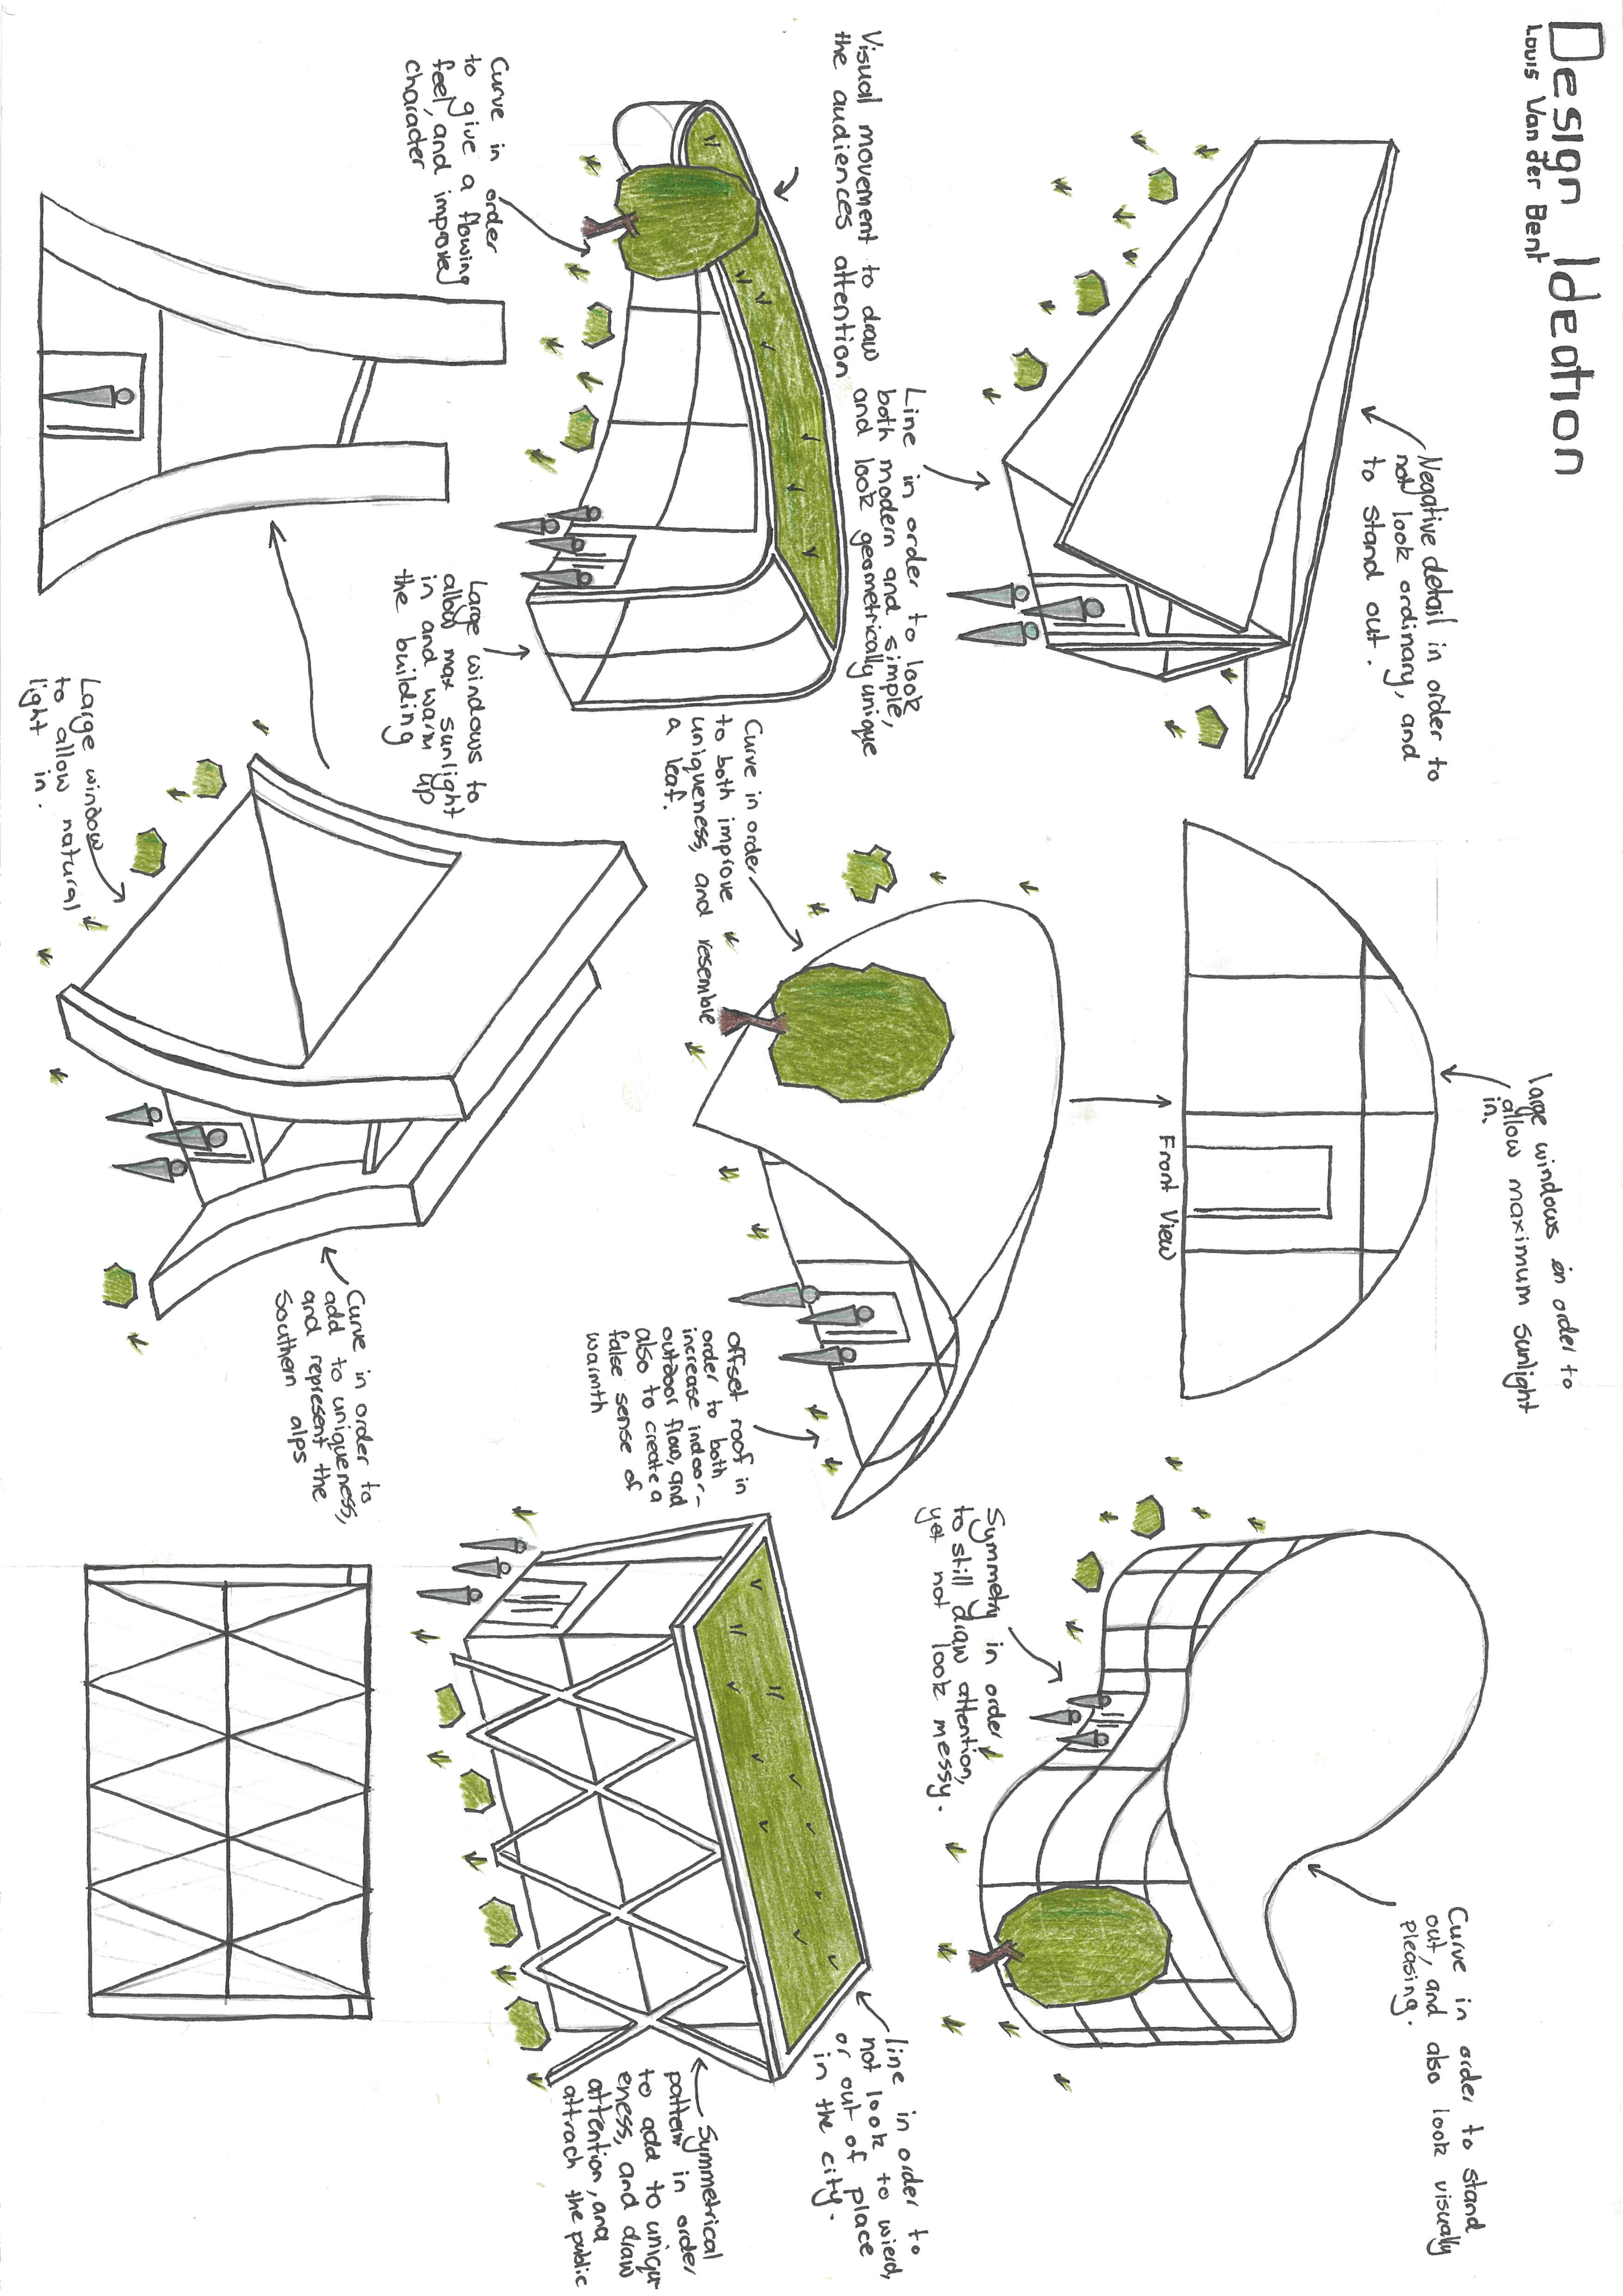
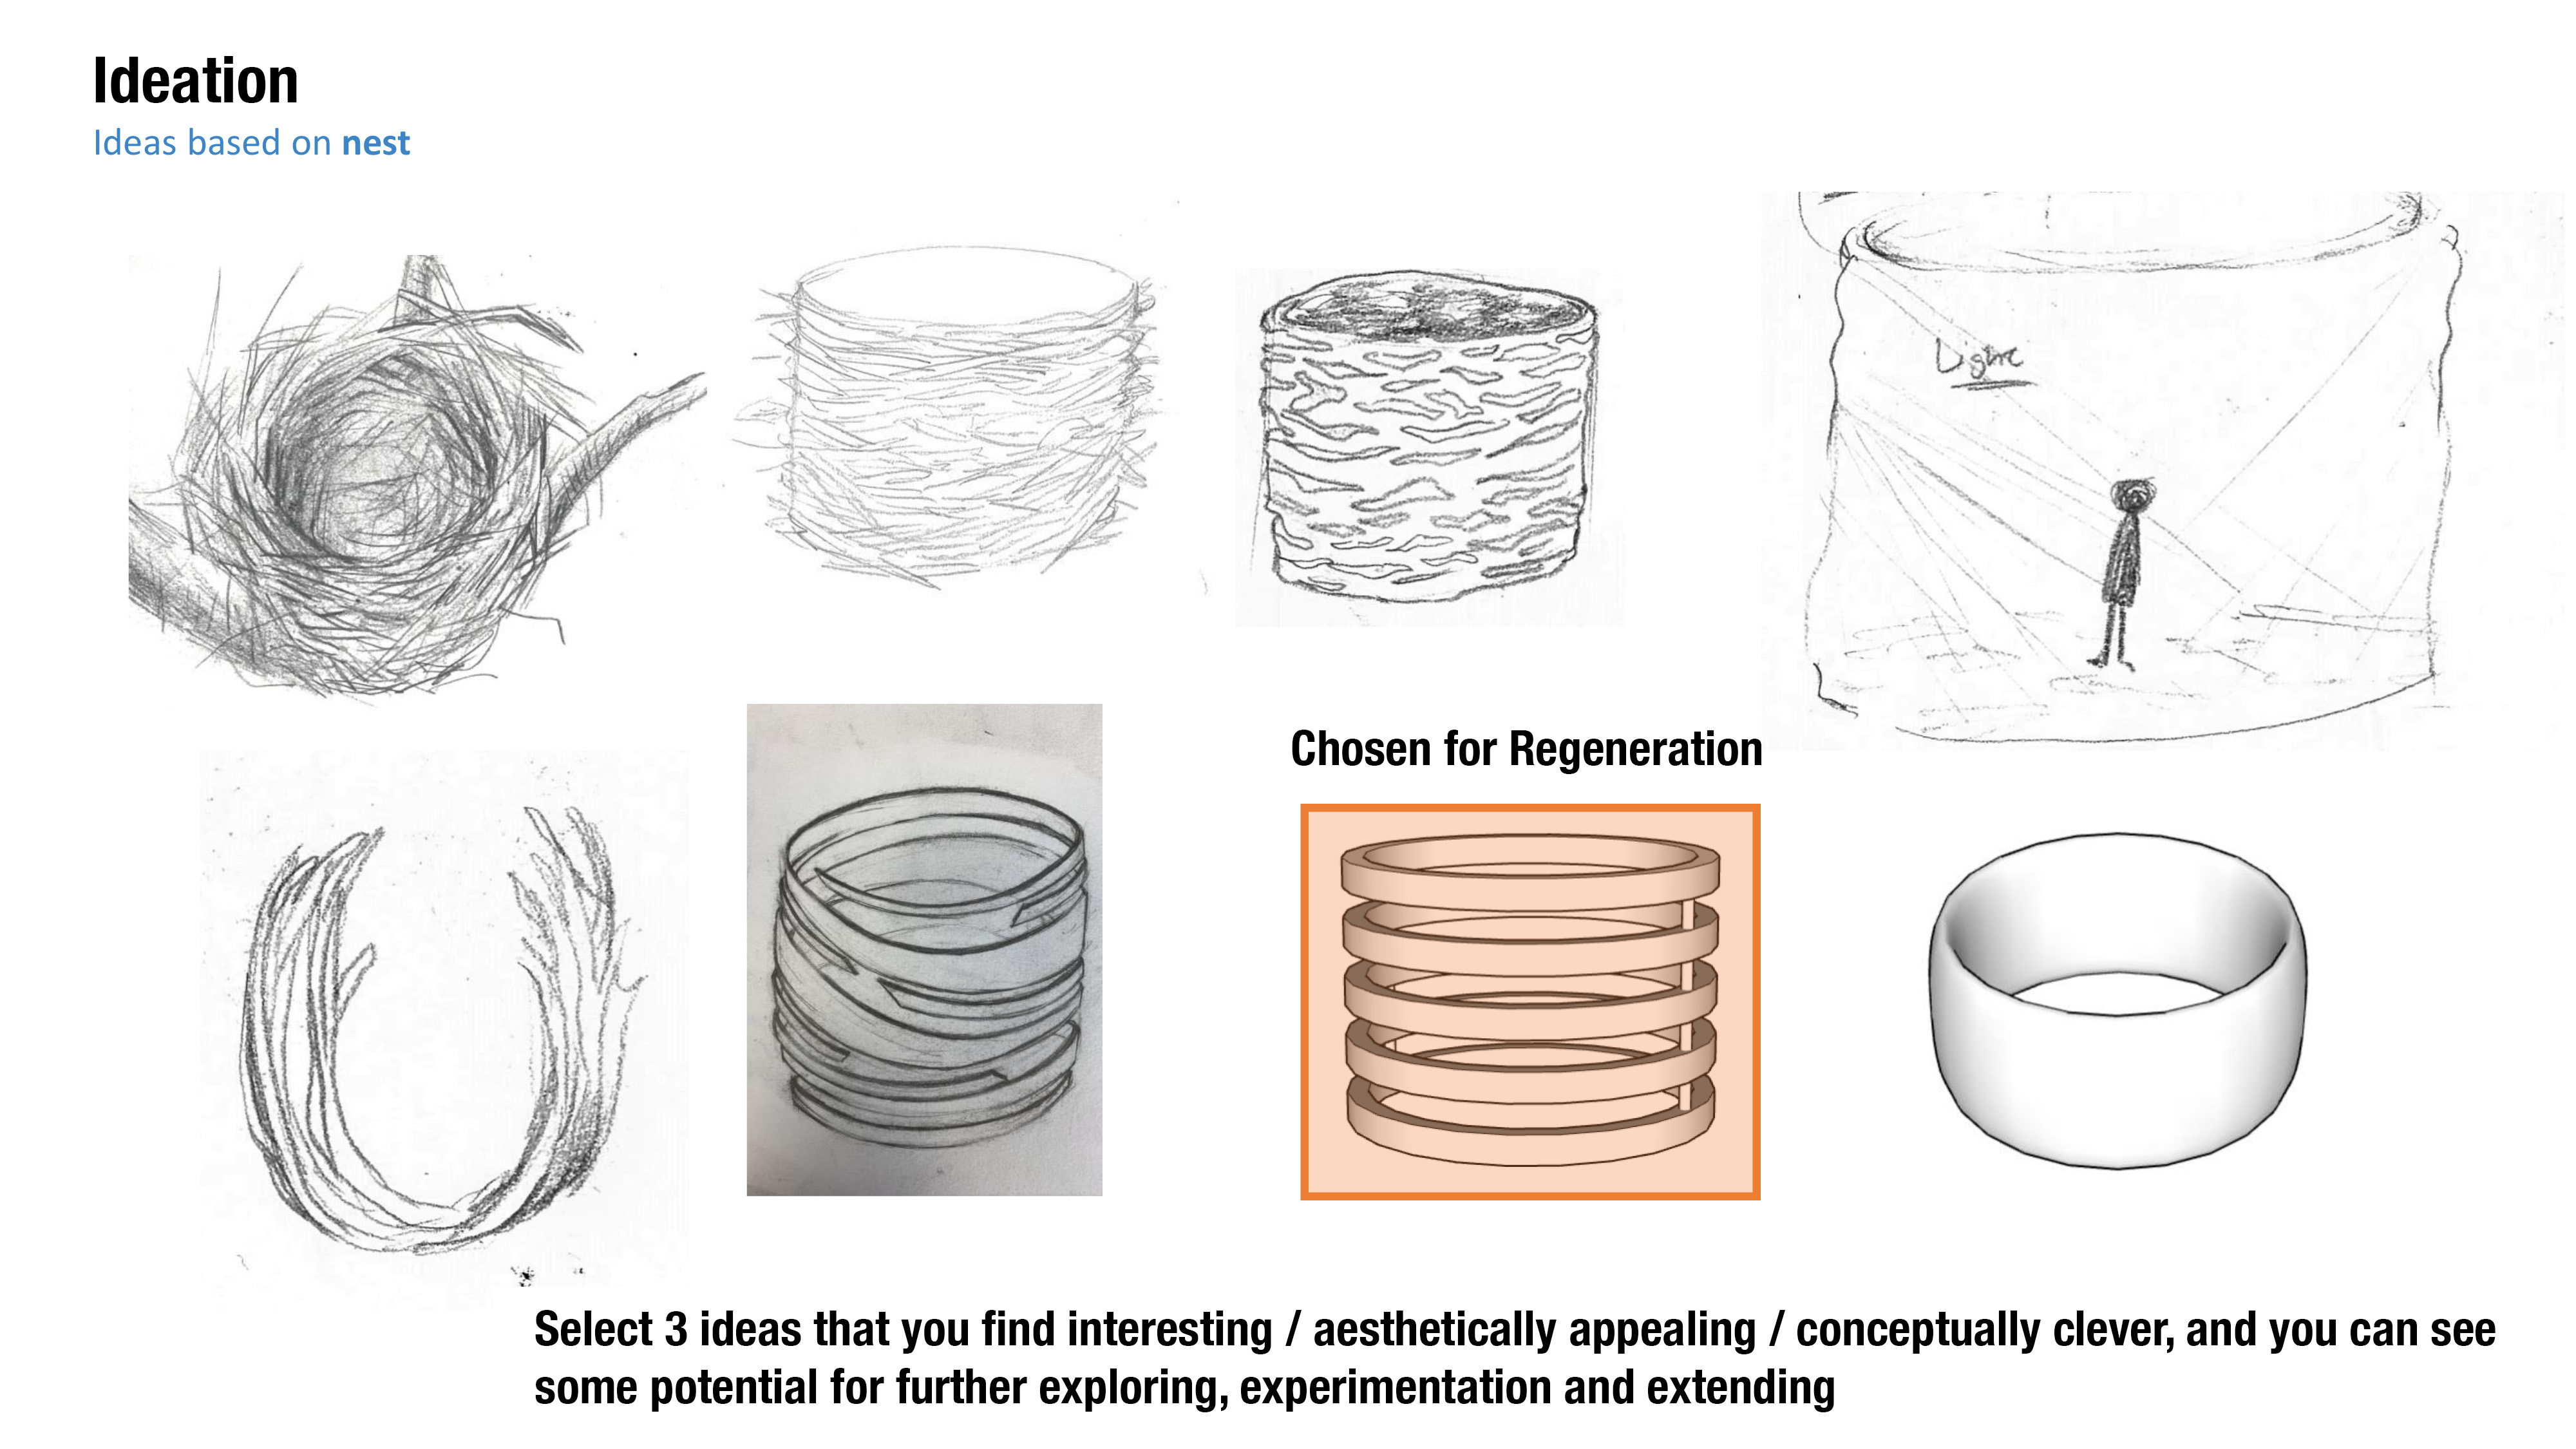
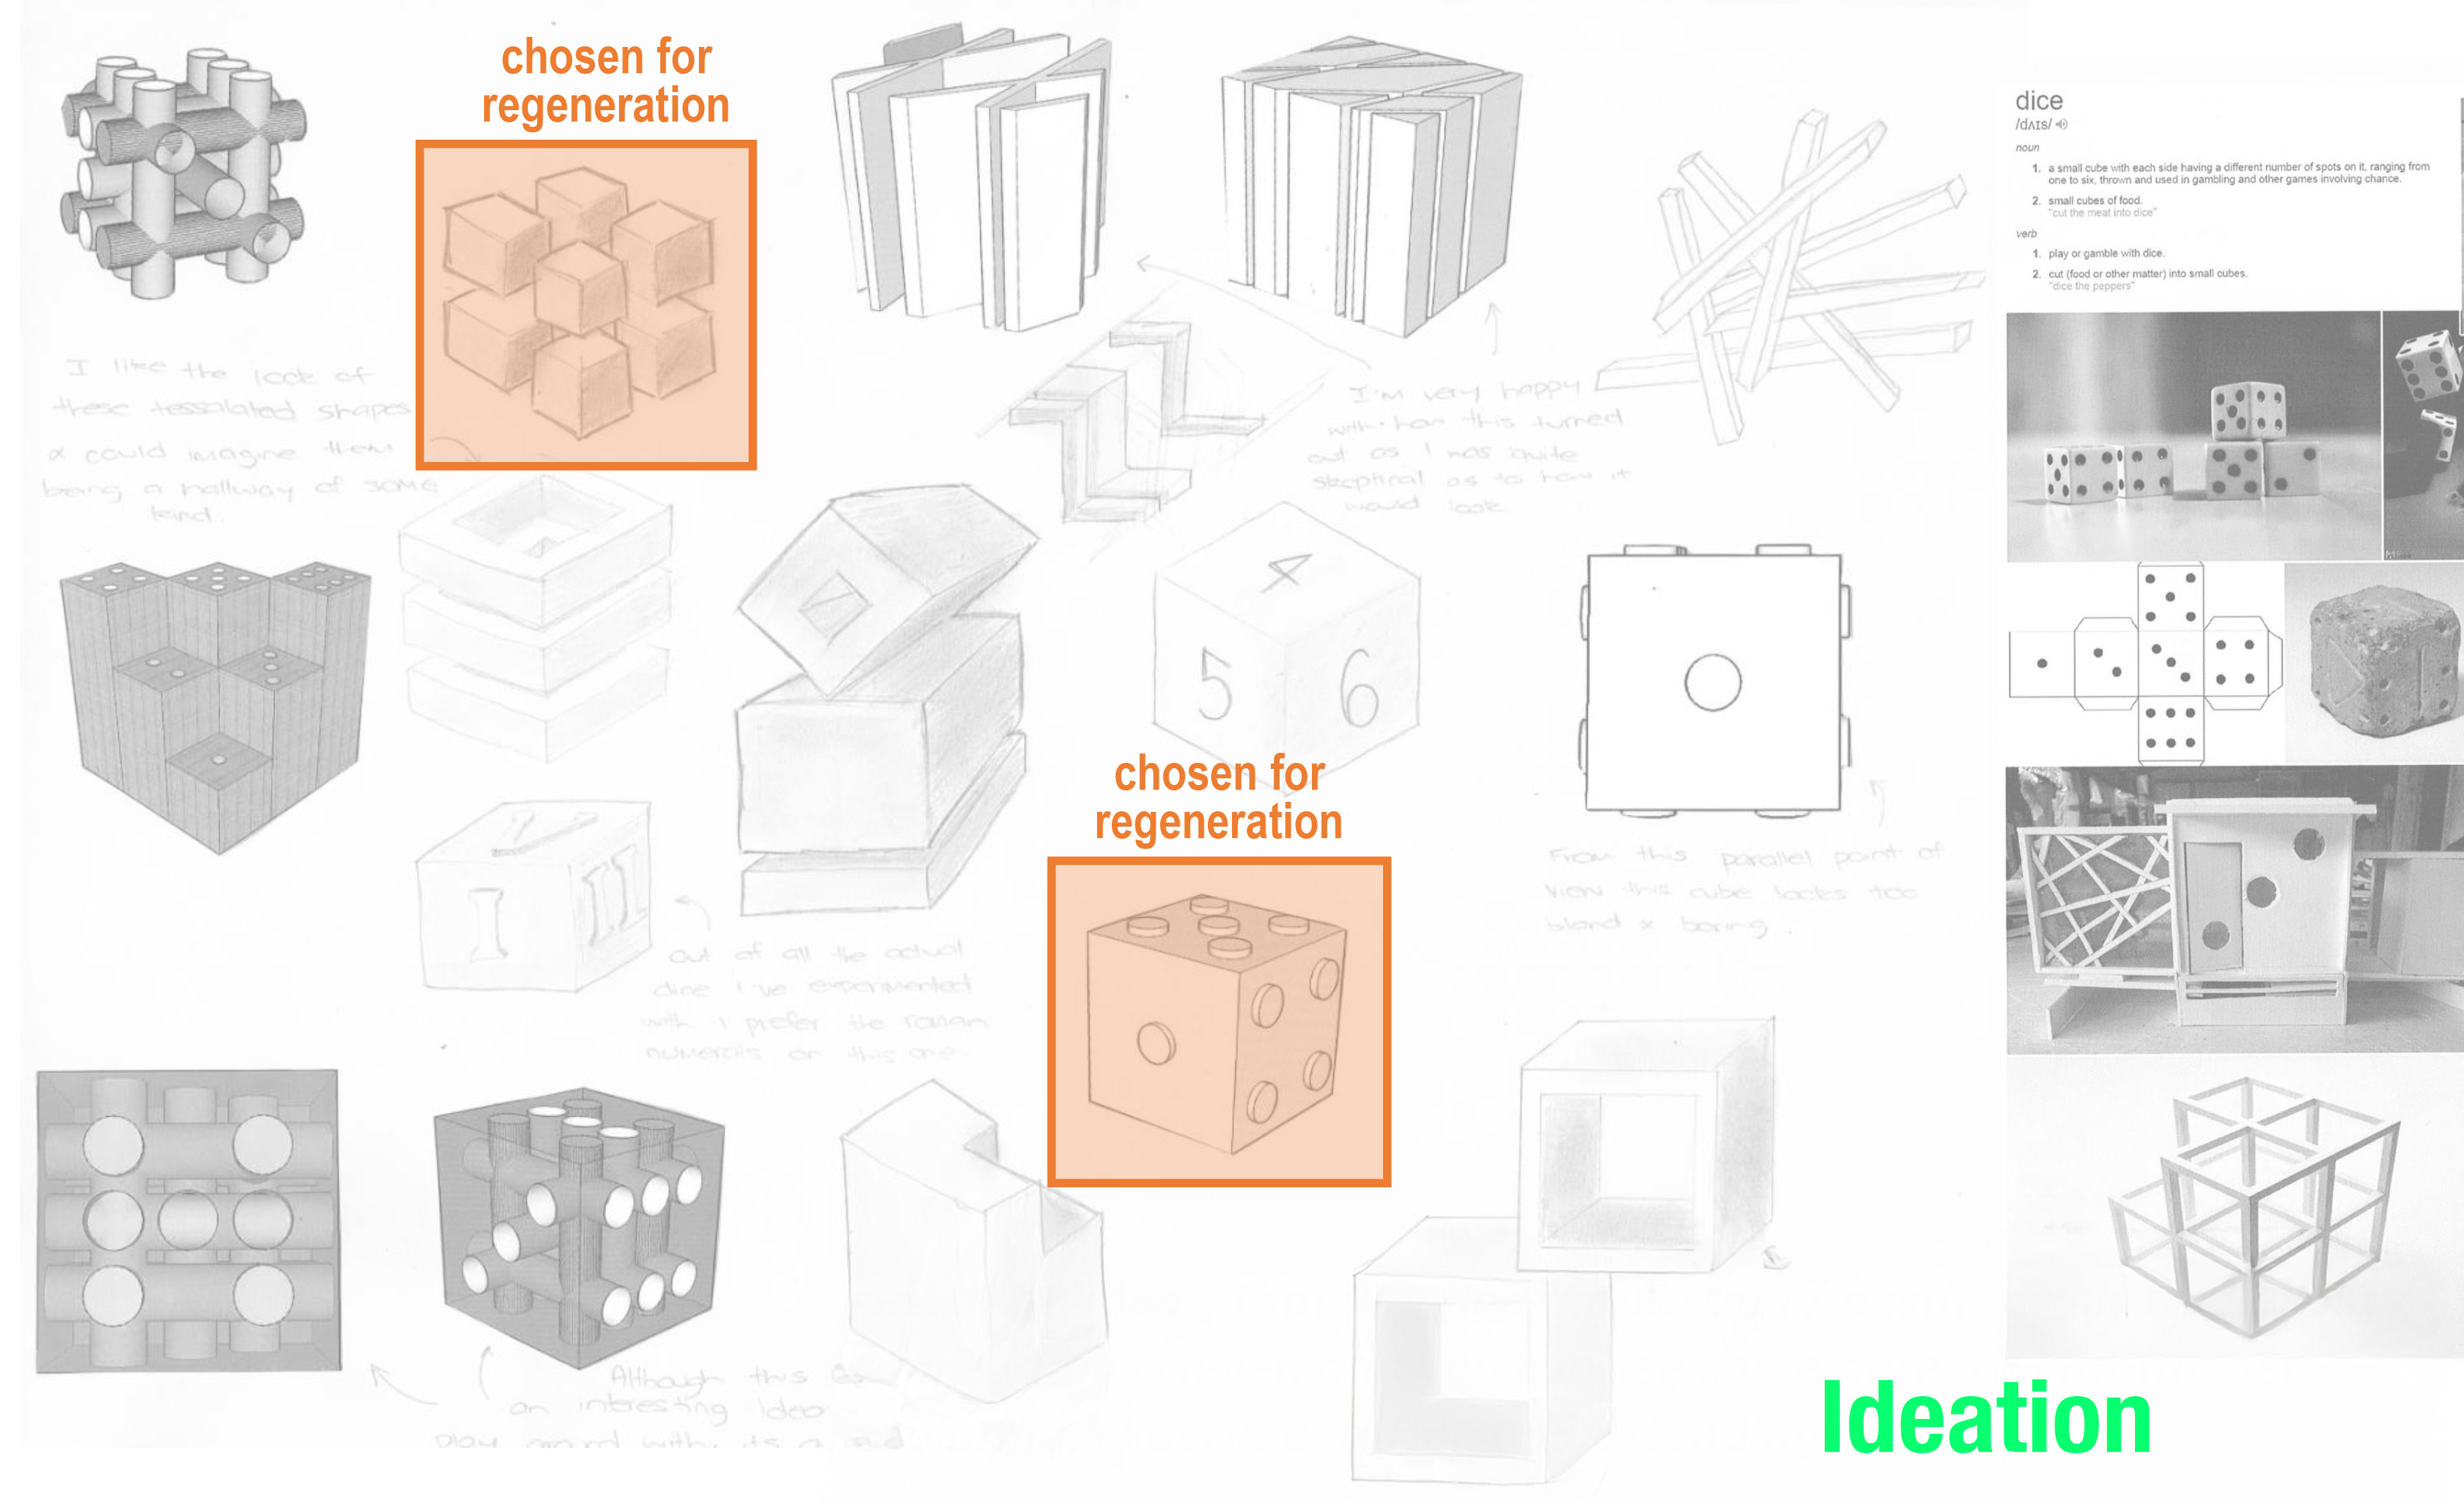
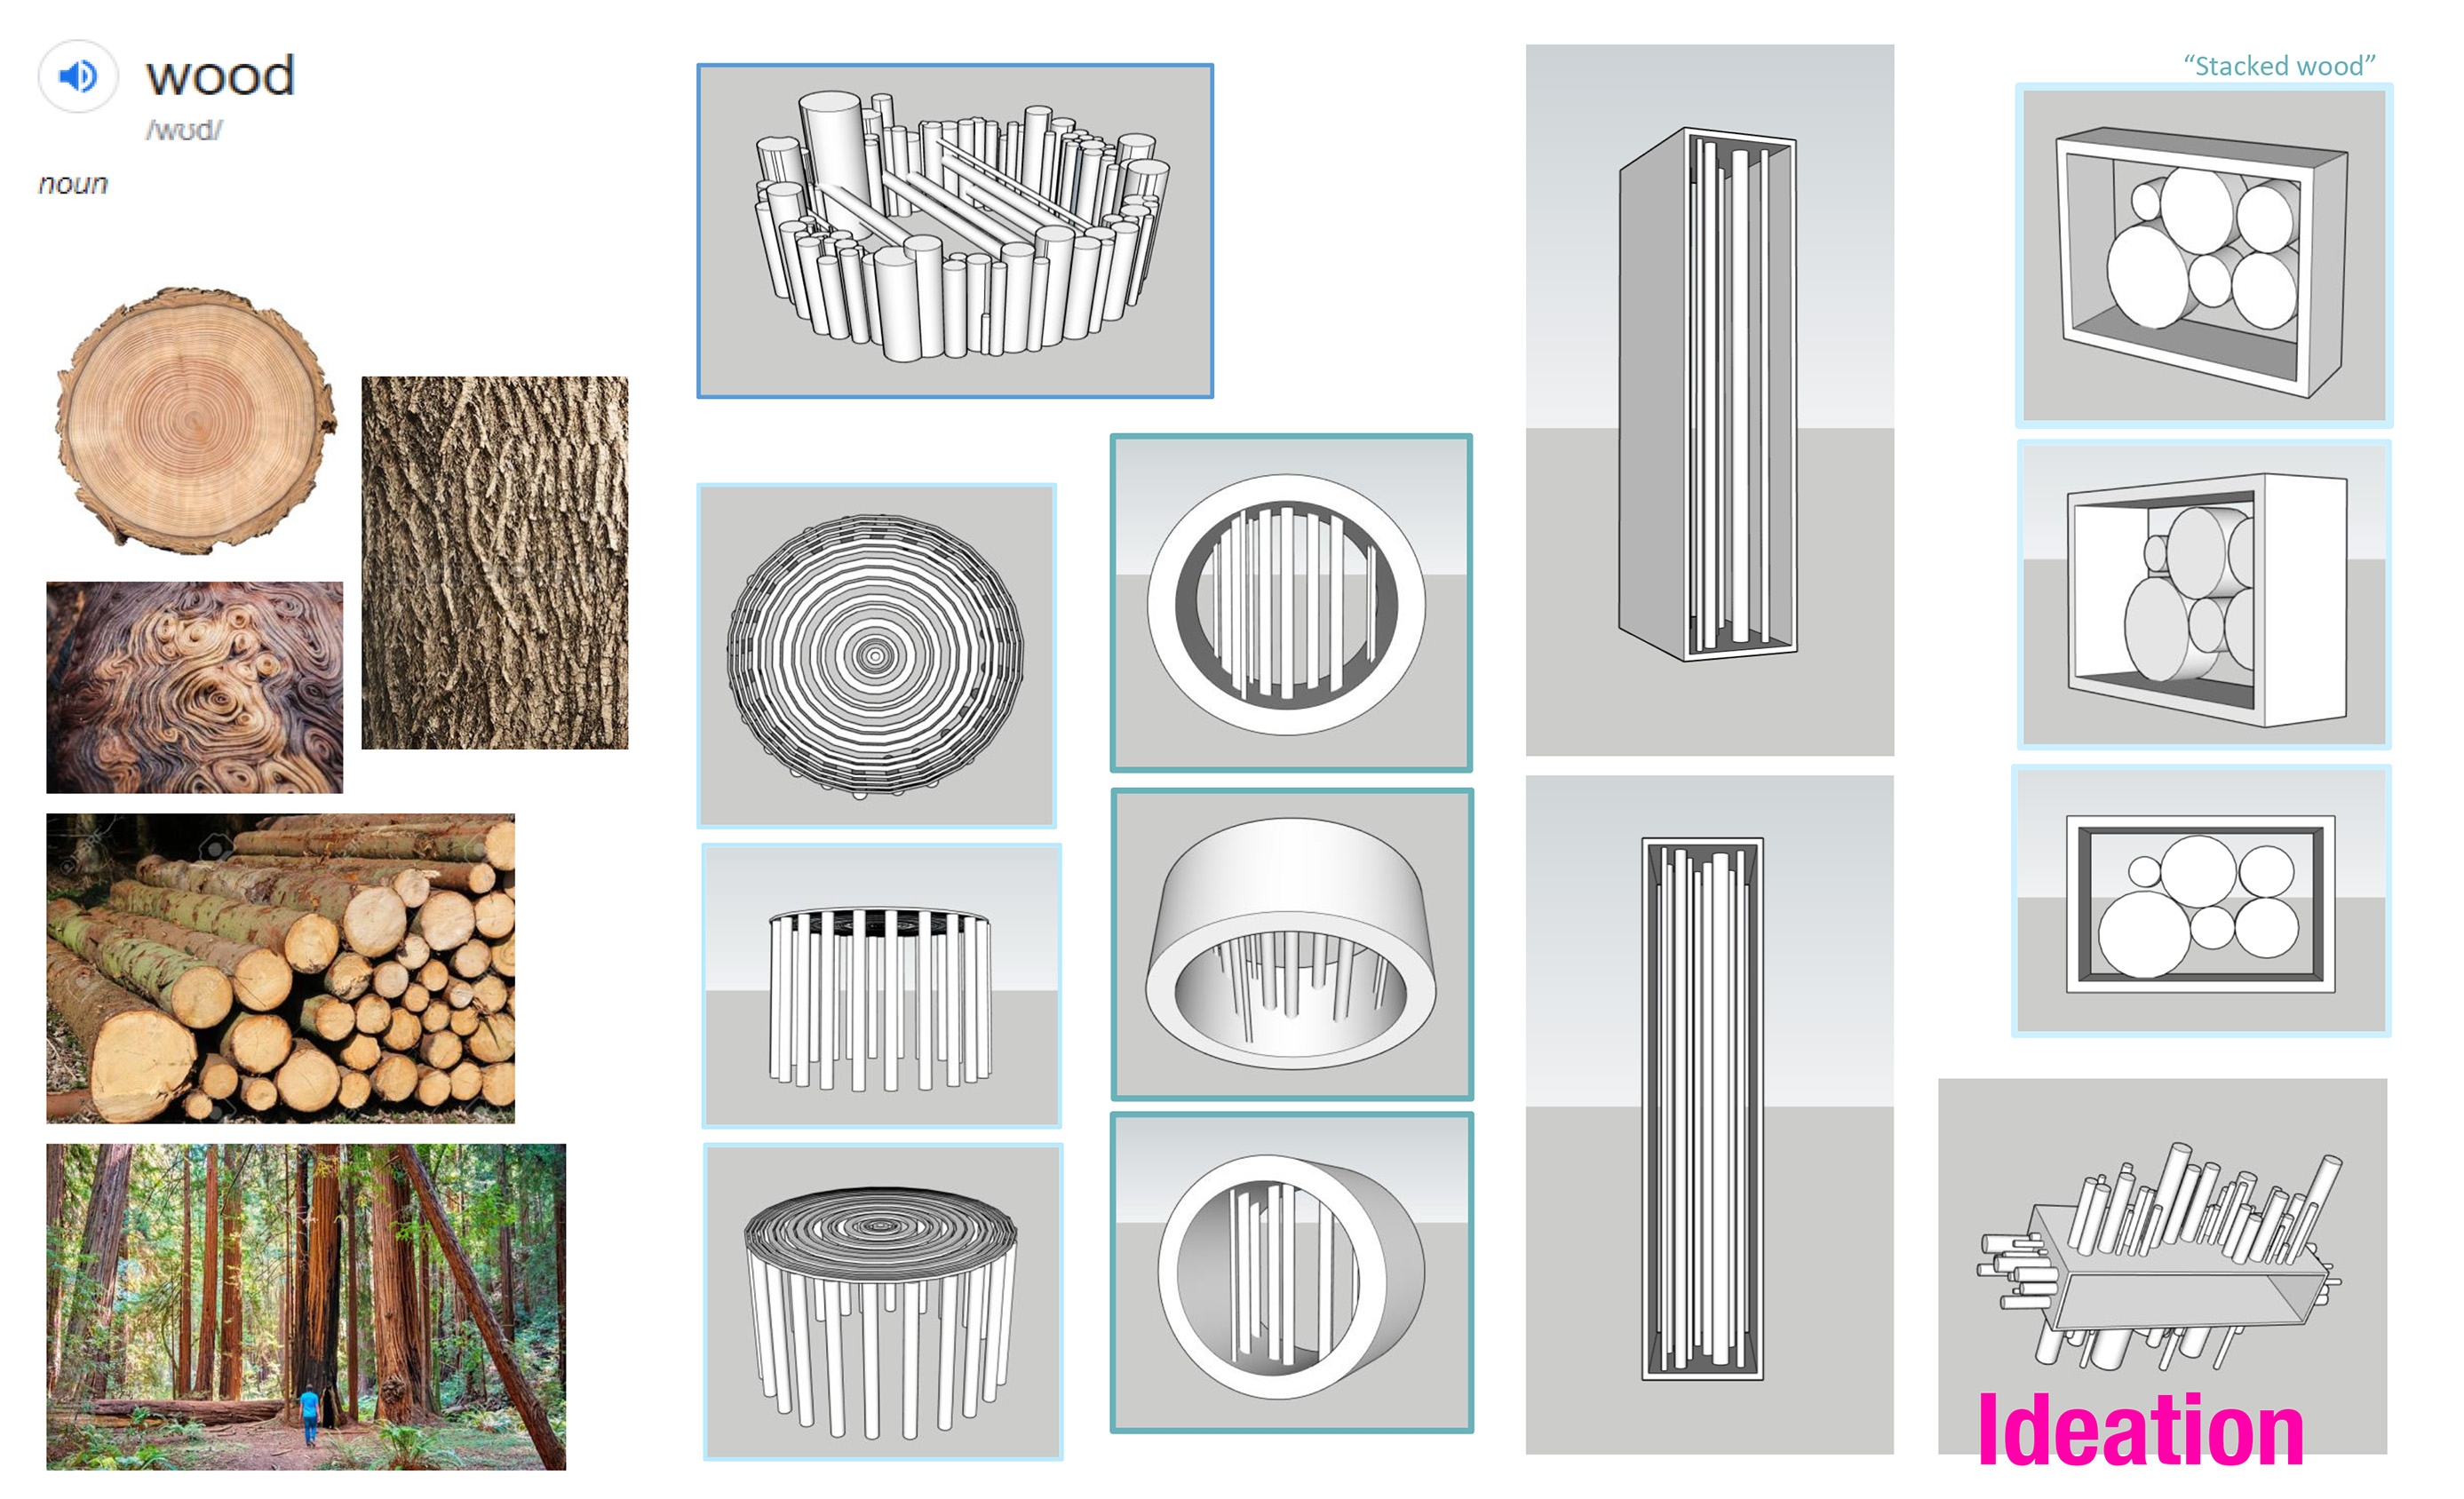
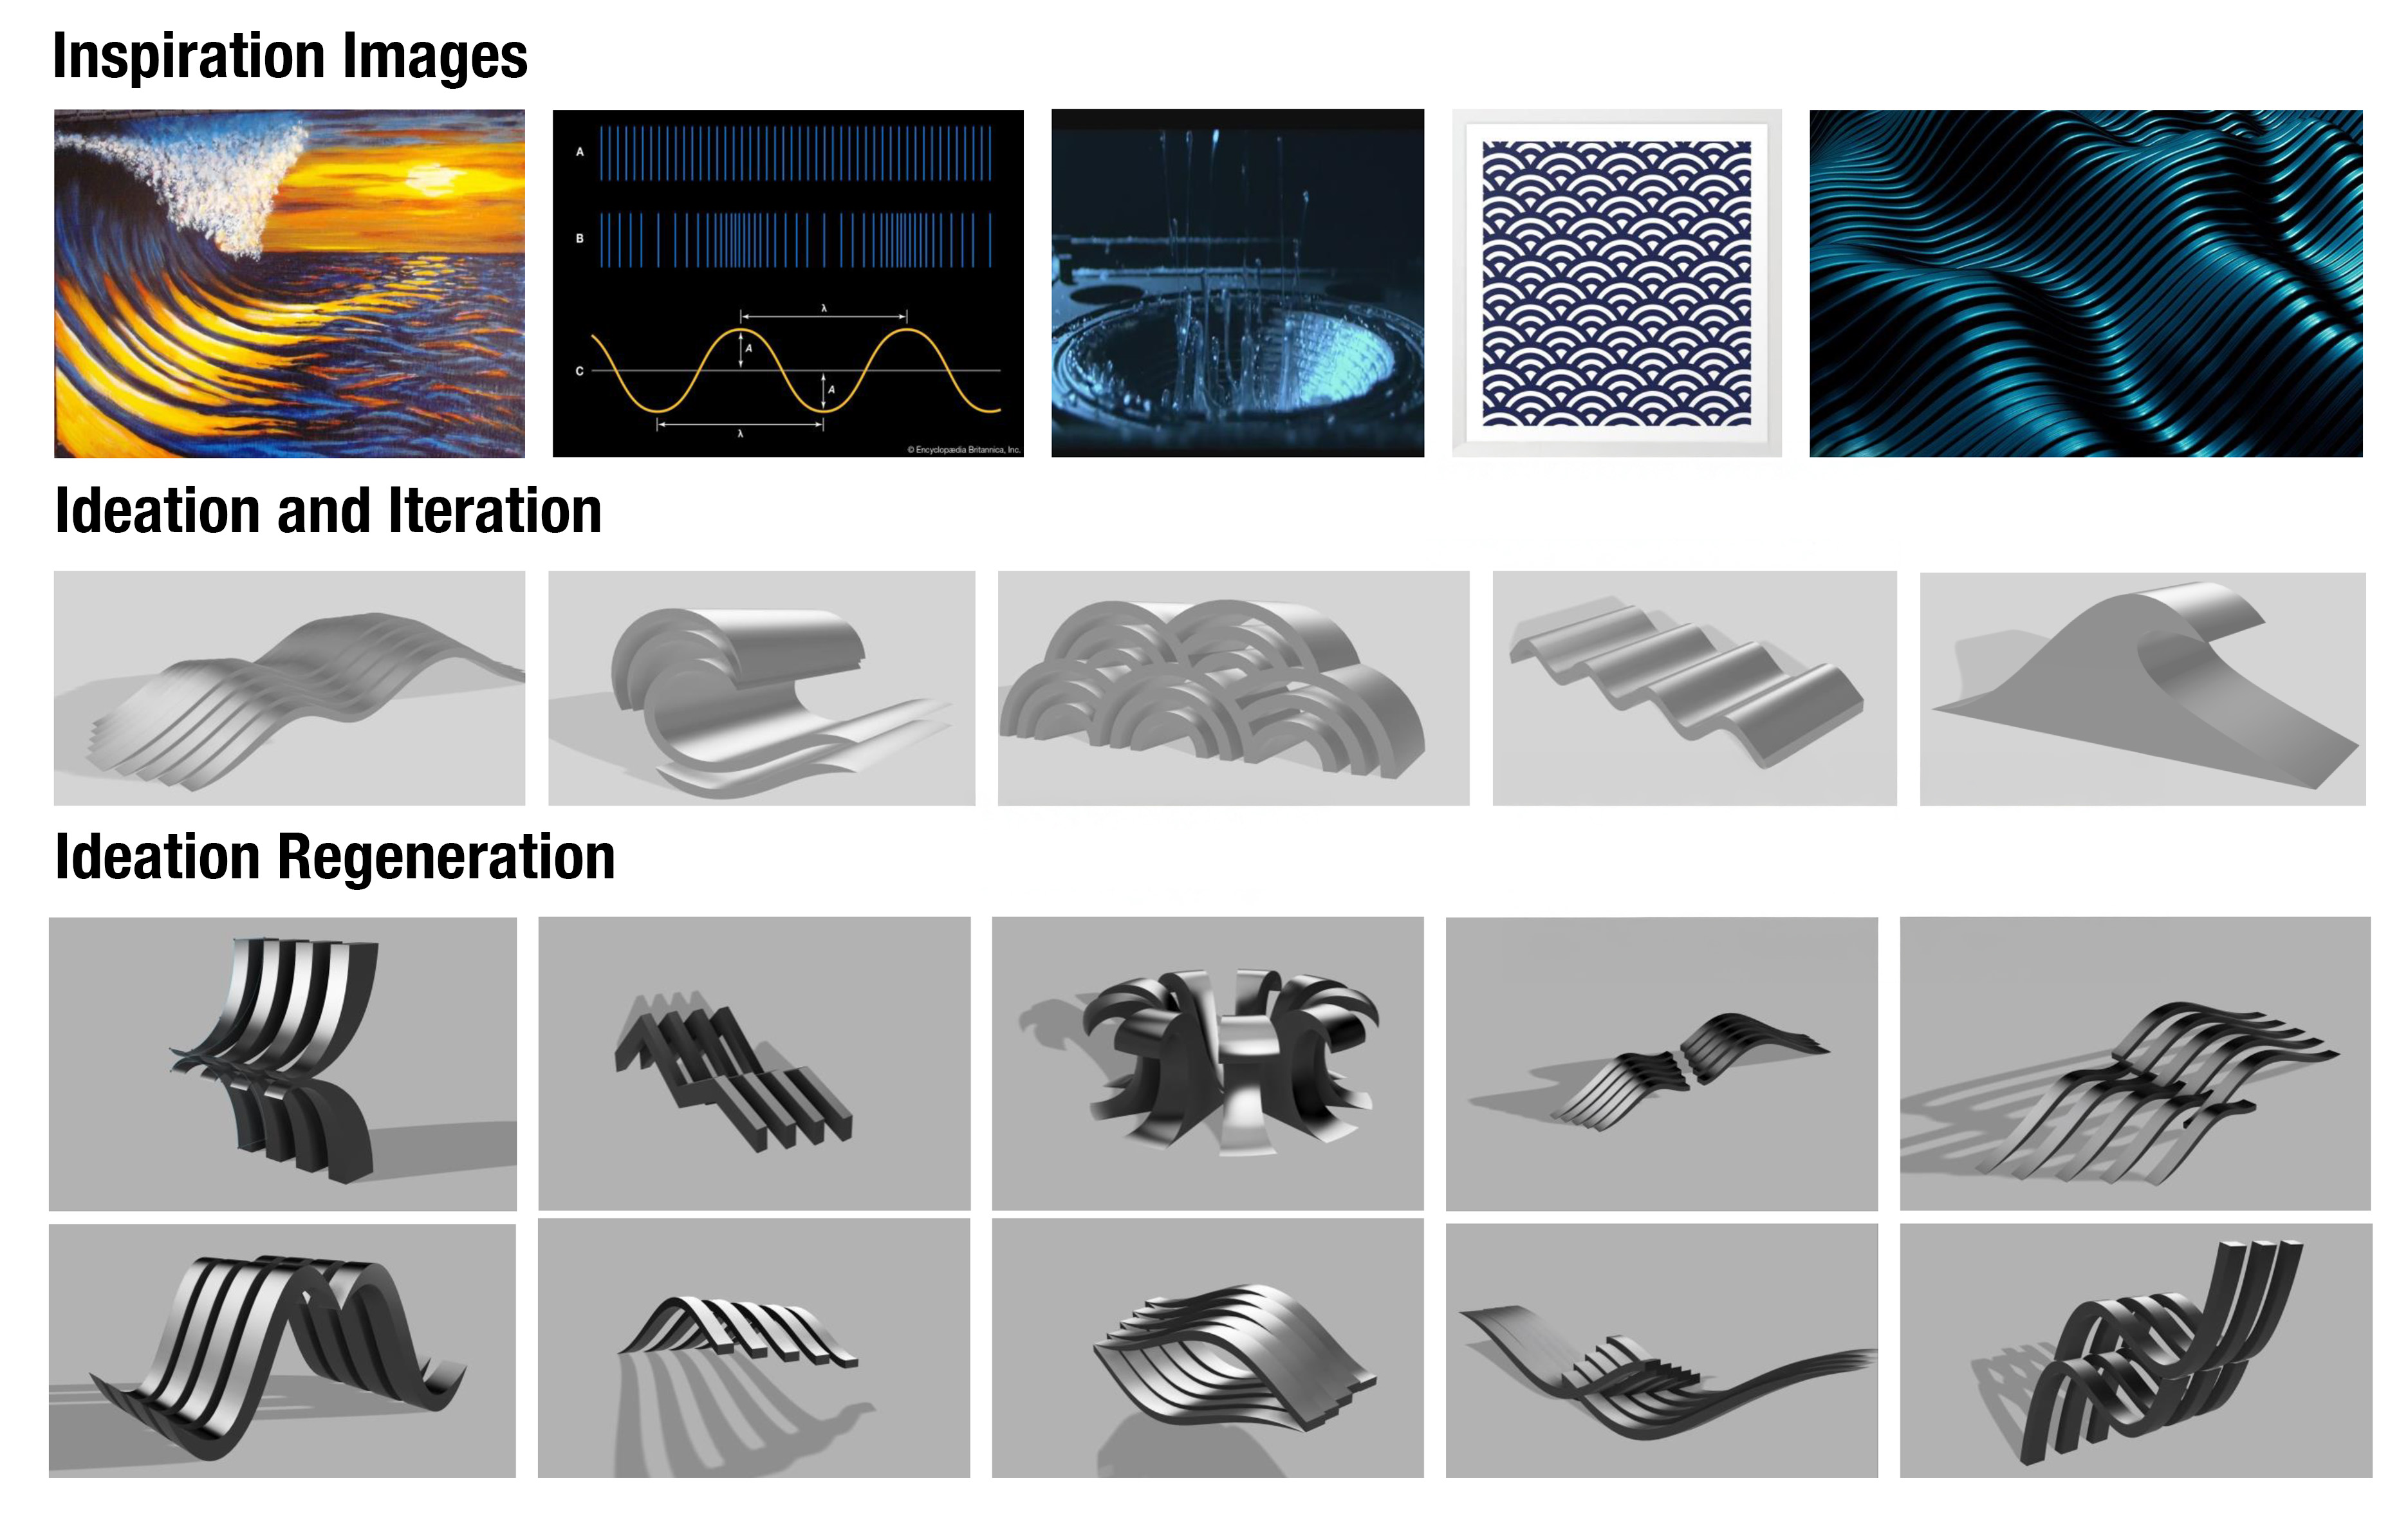
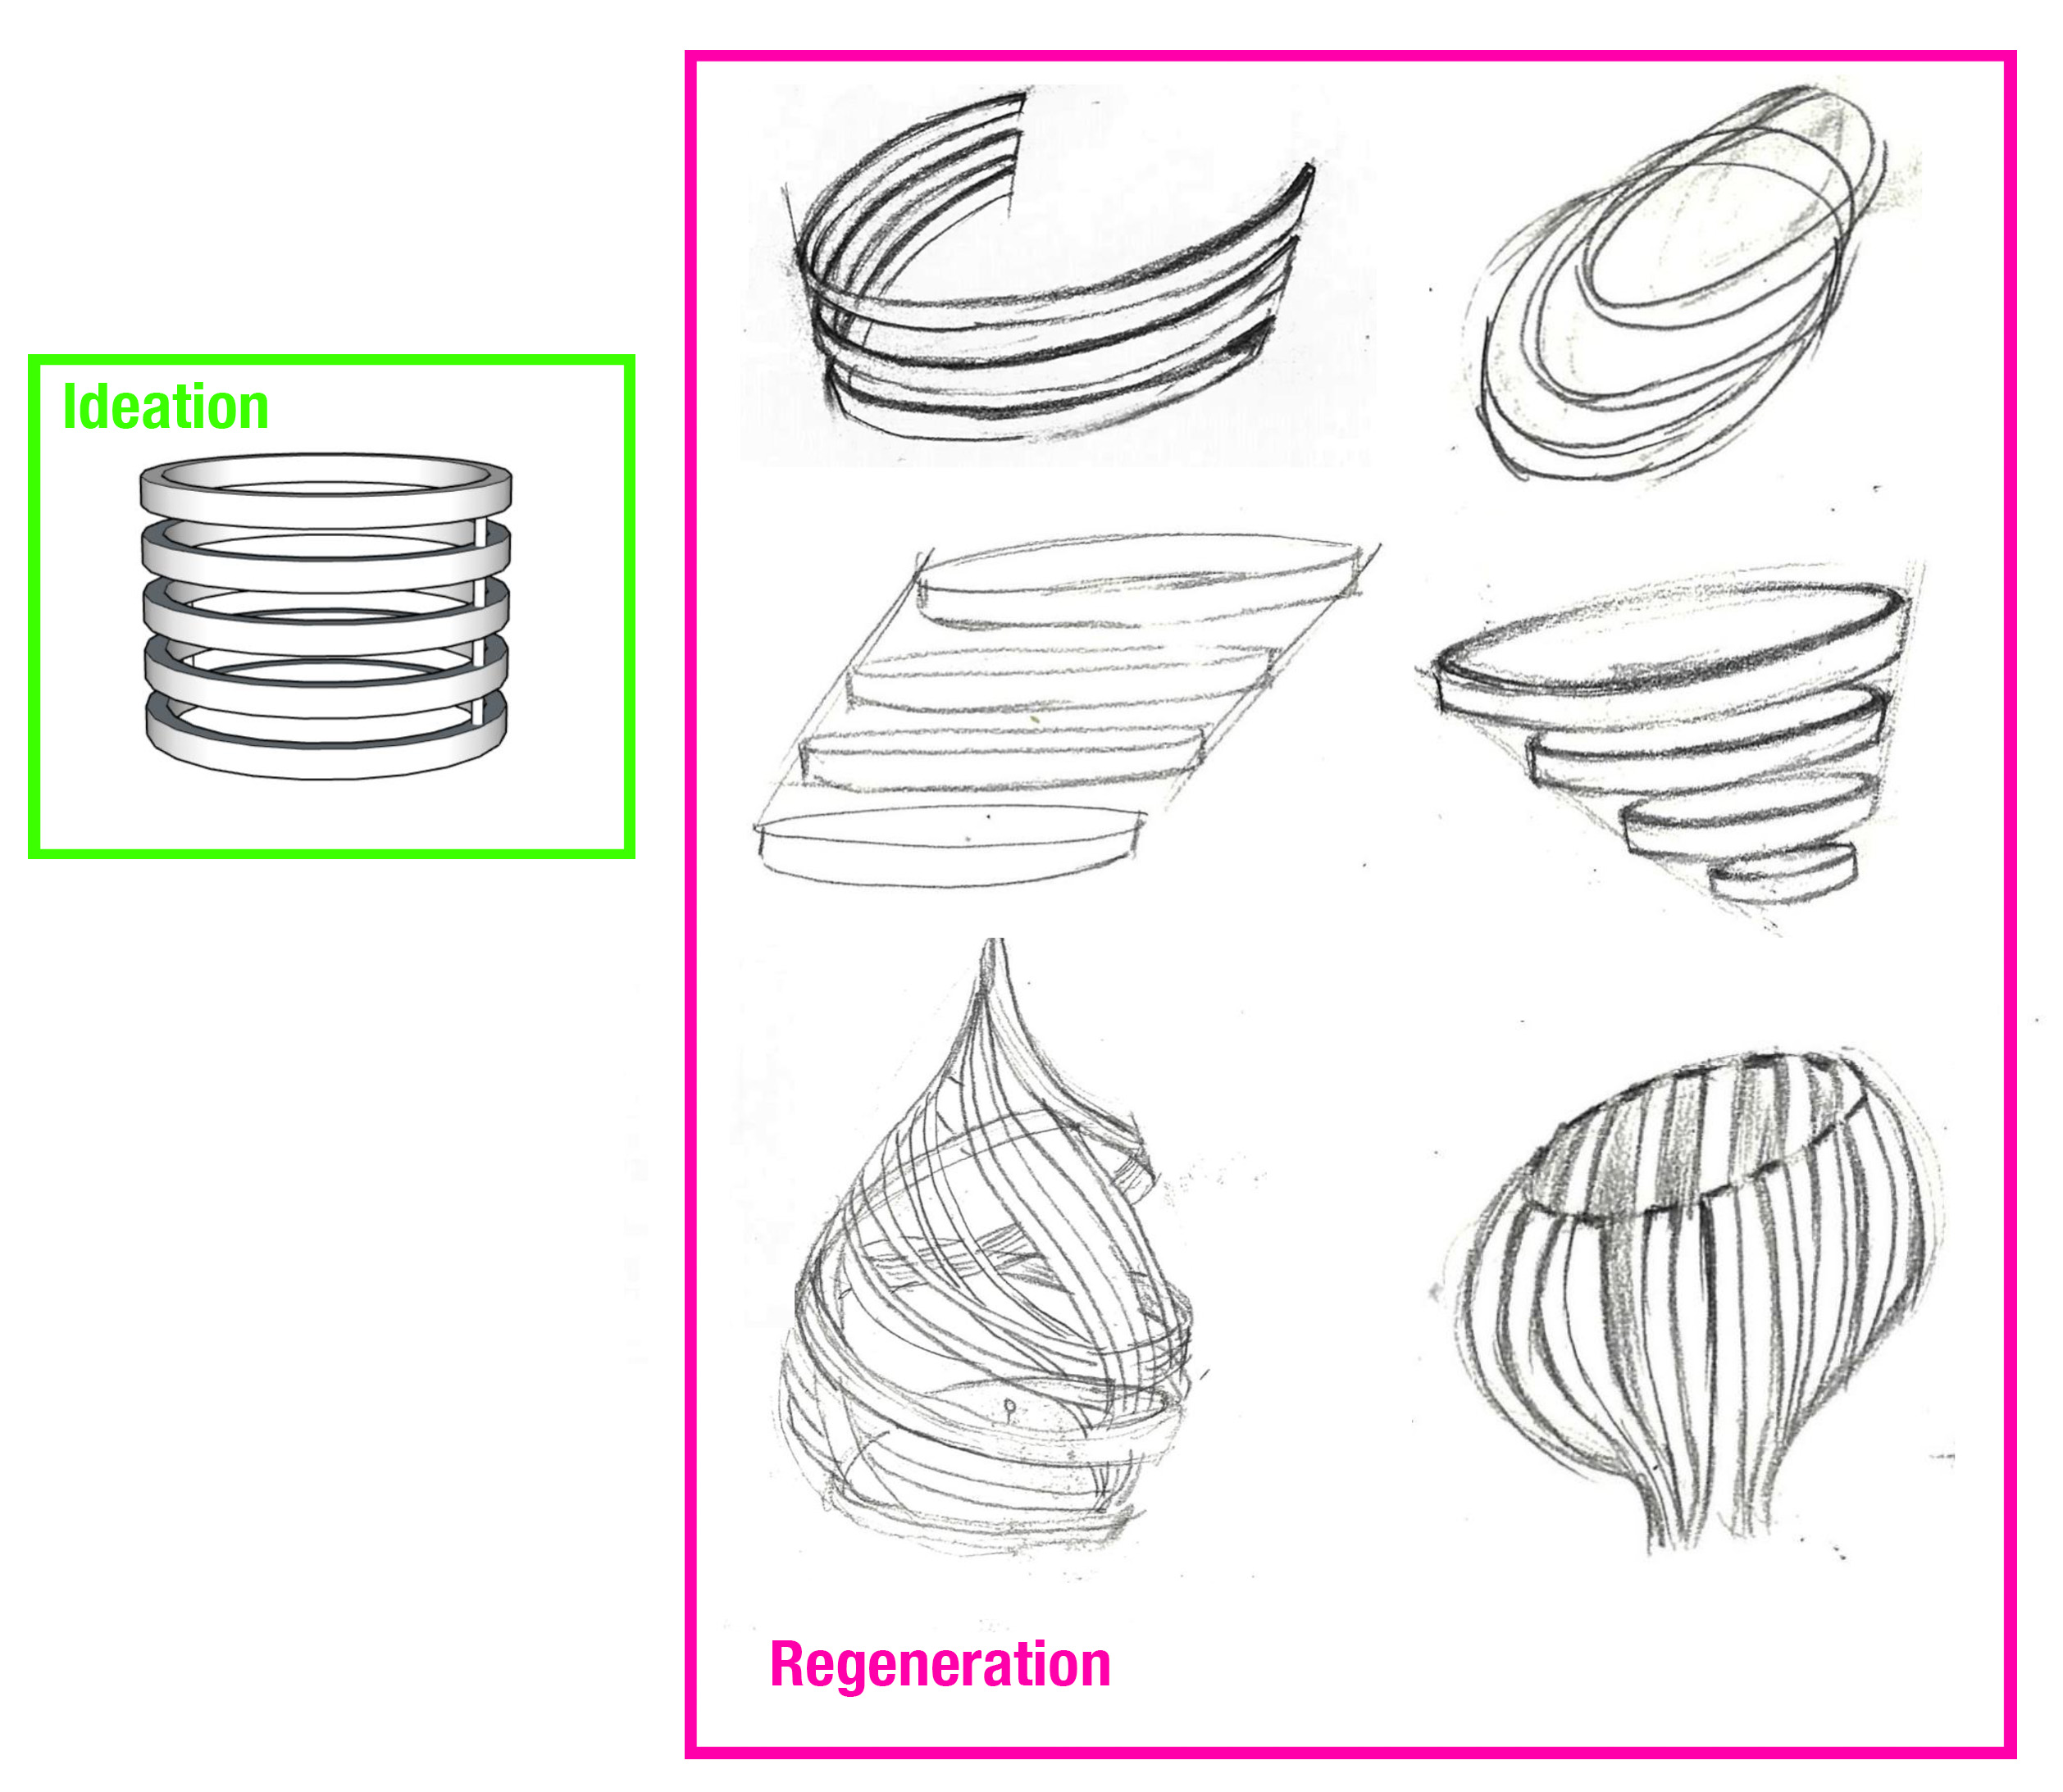
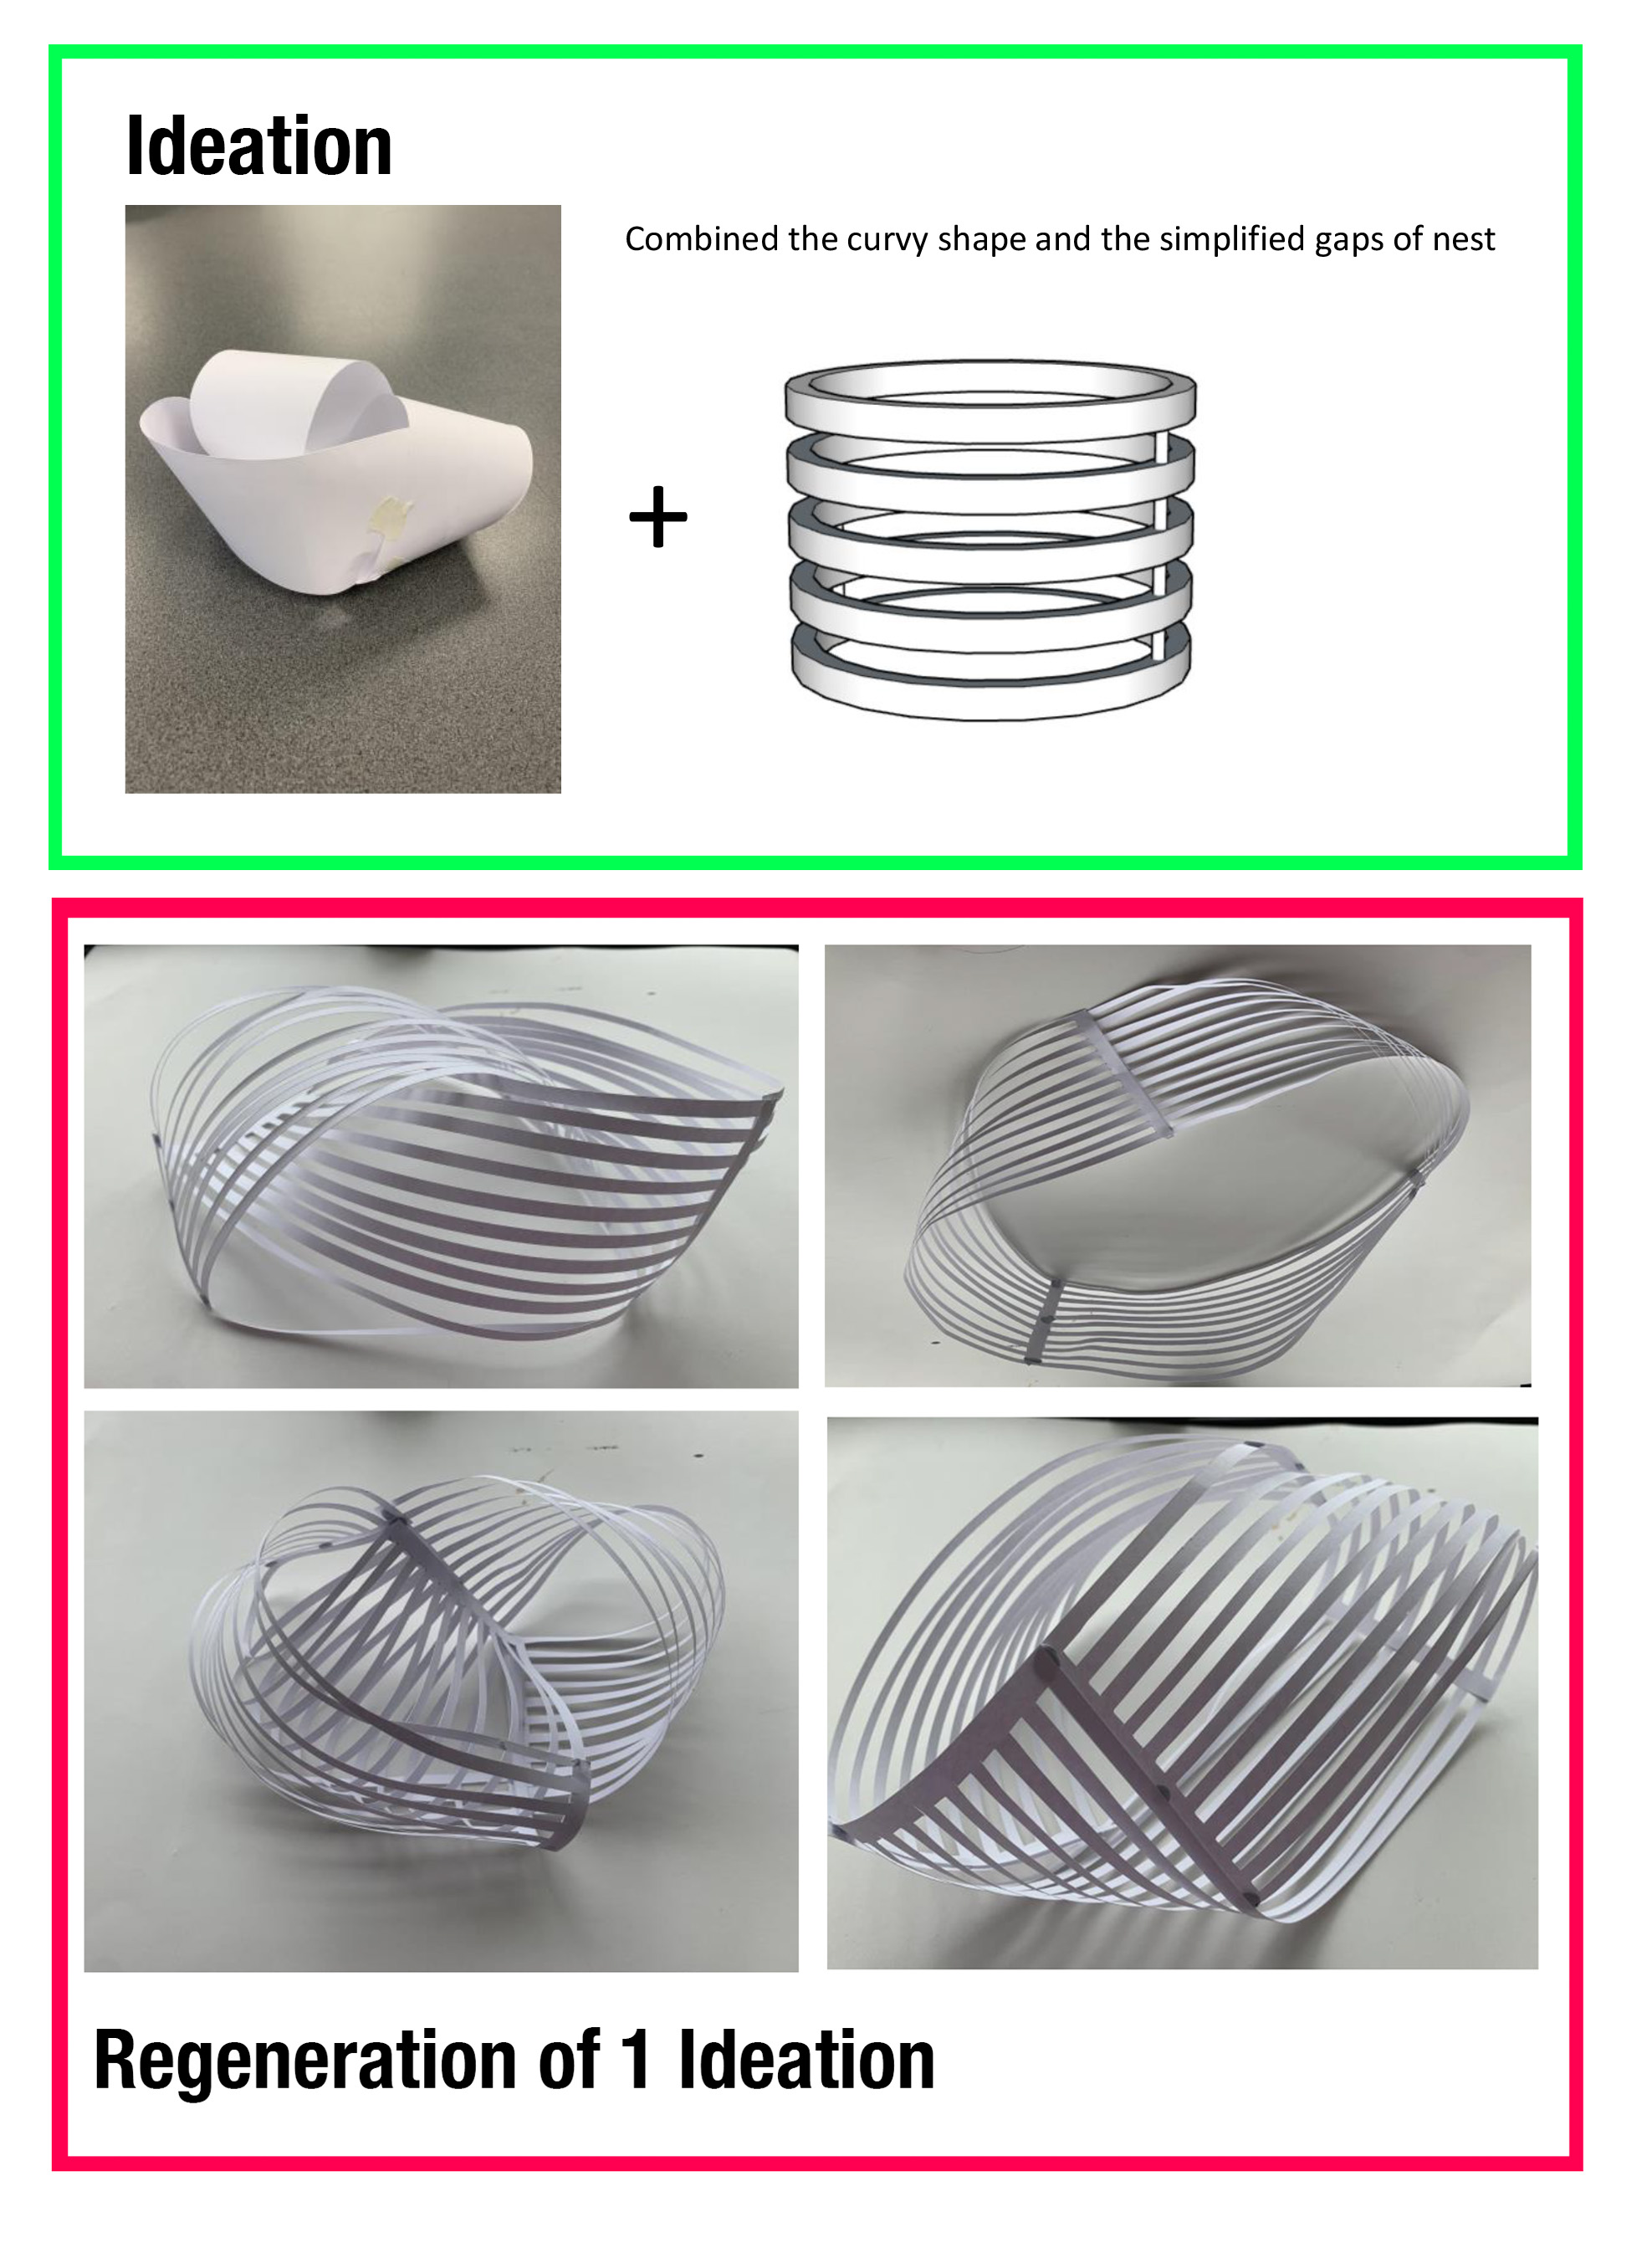
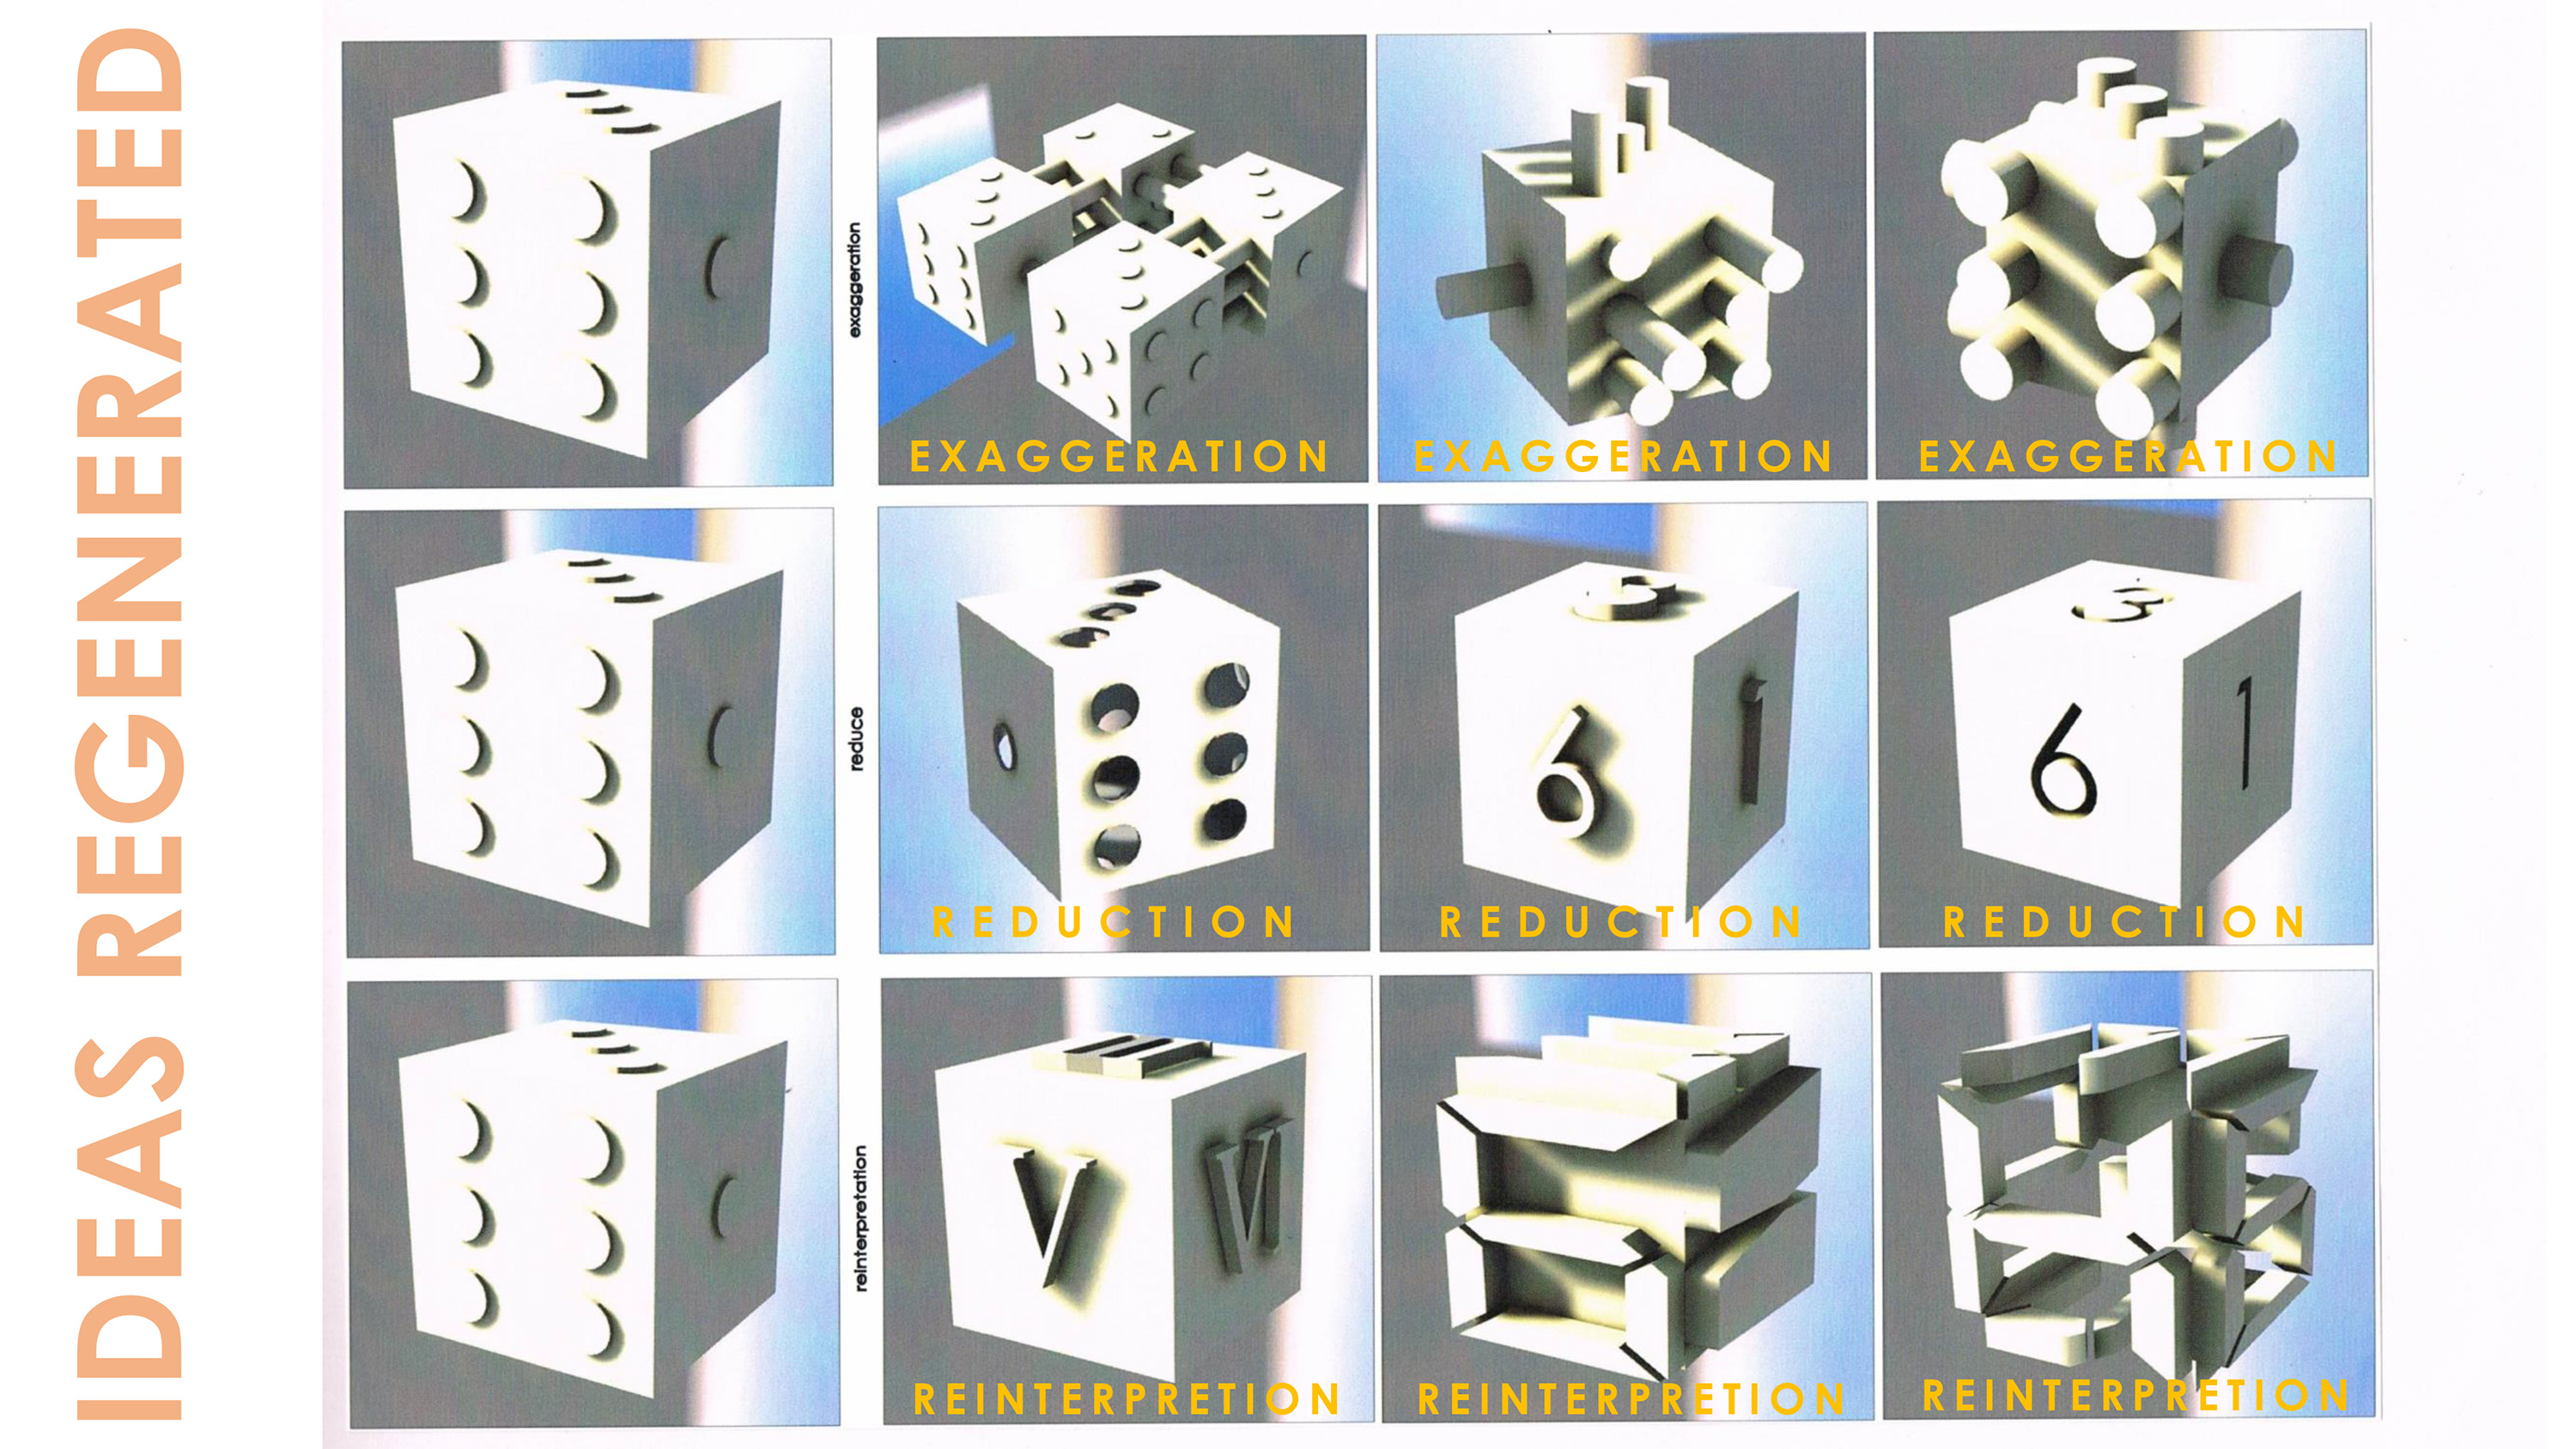
Ideation and Iteration
Ideation & Iteration |
Regeneration |
Evolution |
||||||||||||||||||||||
|---|---|---|---|---|---|---|---|---|---|---|---|---|---|---|---|---|---|---|---|---|---|---|---|---|
|
|
|
||||||||||||||||||||||
19
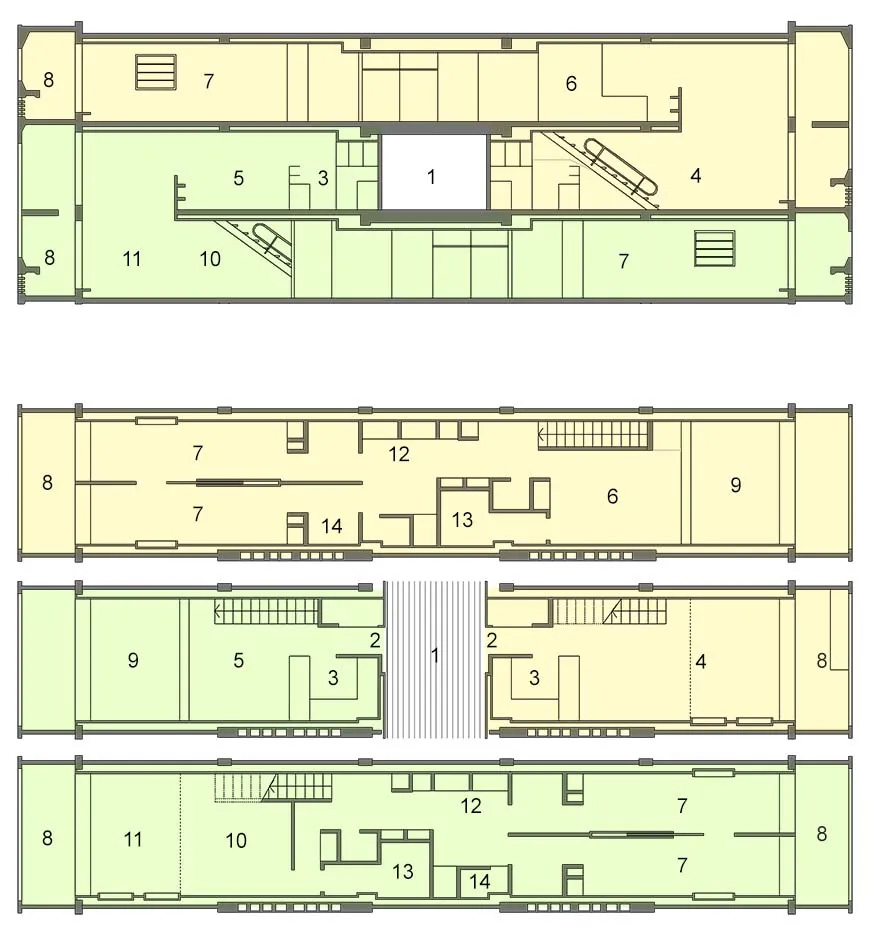
Design - Plans Rough
Design - Plans Rough |
Design - Plans |
Design - Finalising |
Design - Finalising |
||||||||||
|---|---|---|---|---|---|---|---|---|---|---|---|---|---|
|
|
|
|
21
Rendering, Materiality & Aesthetics
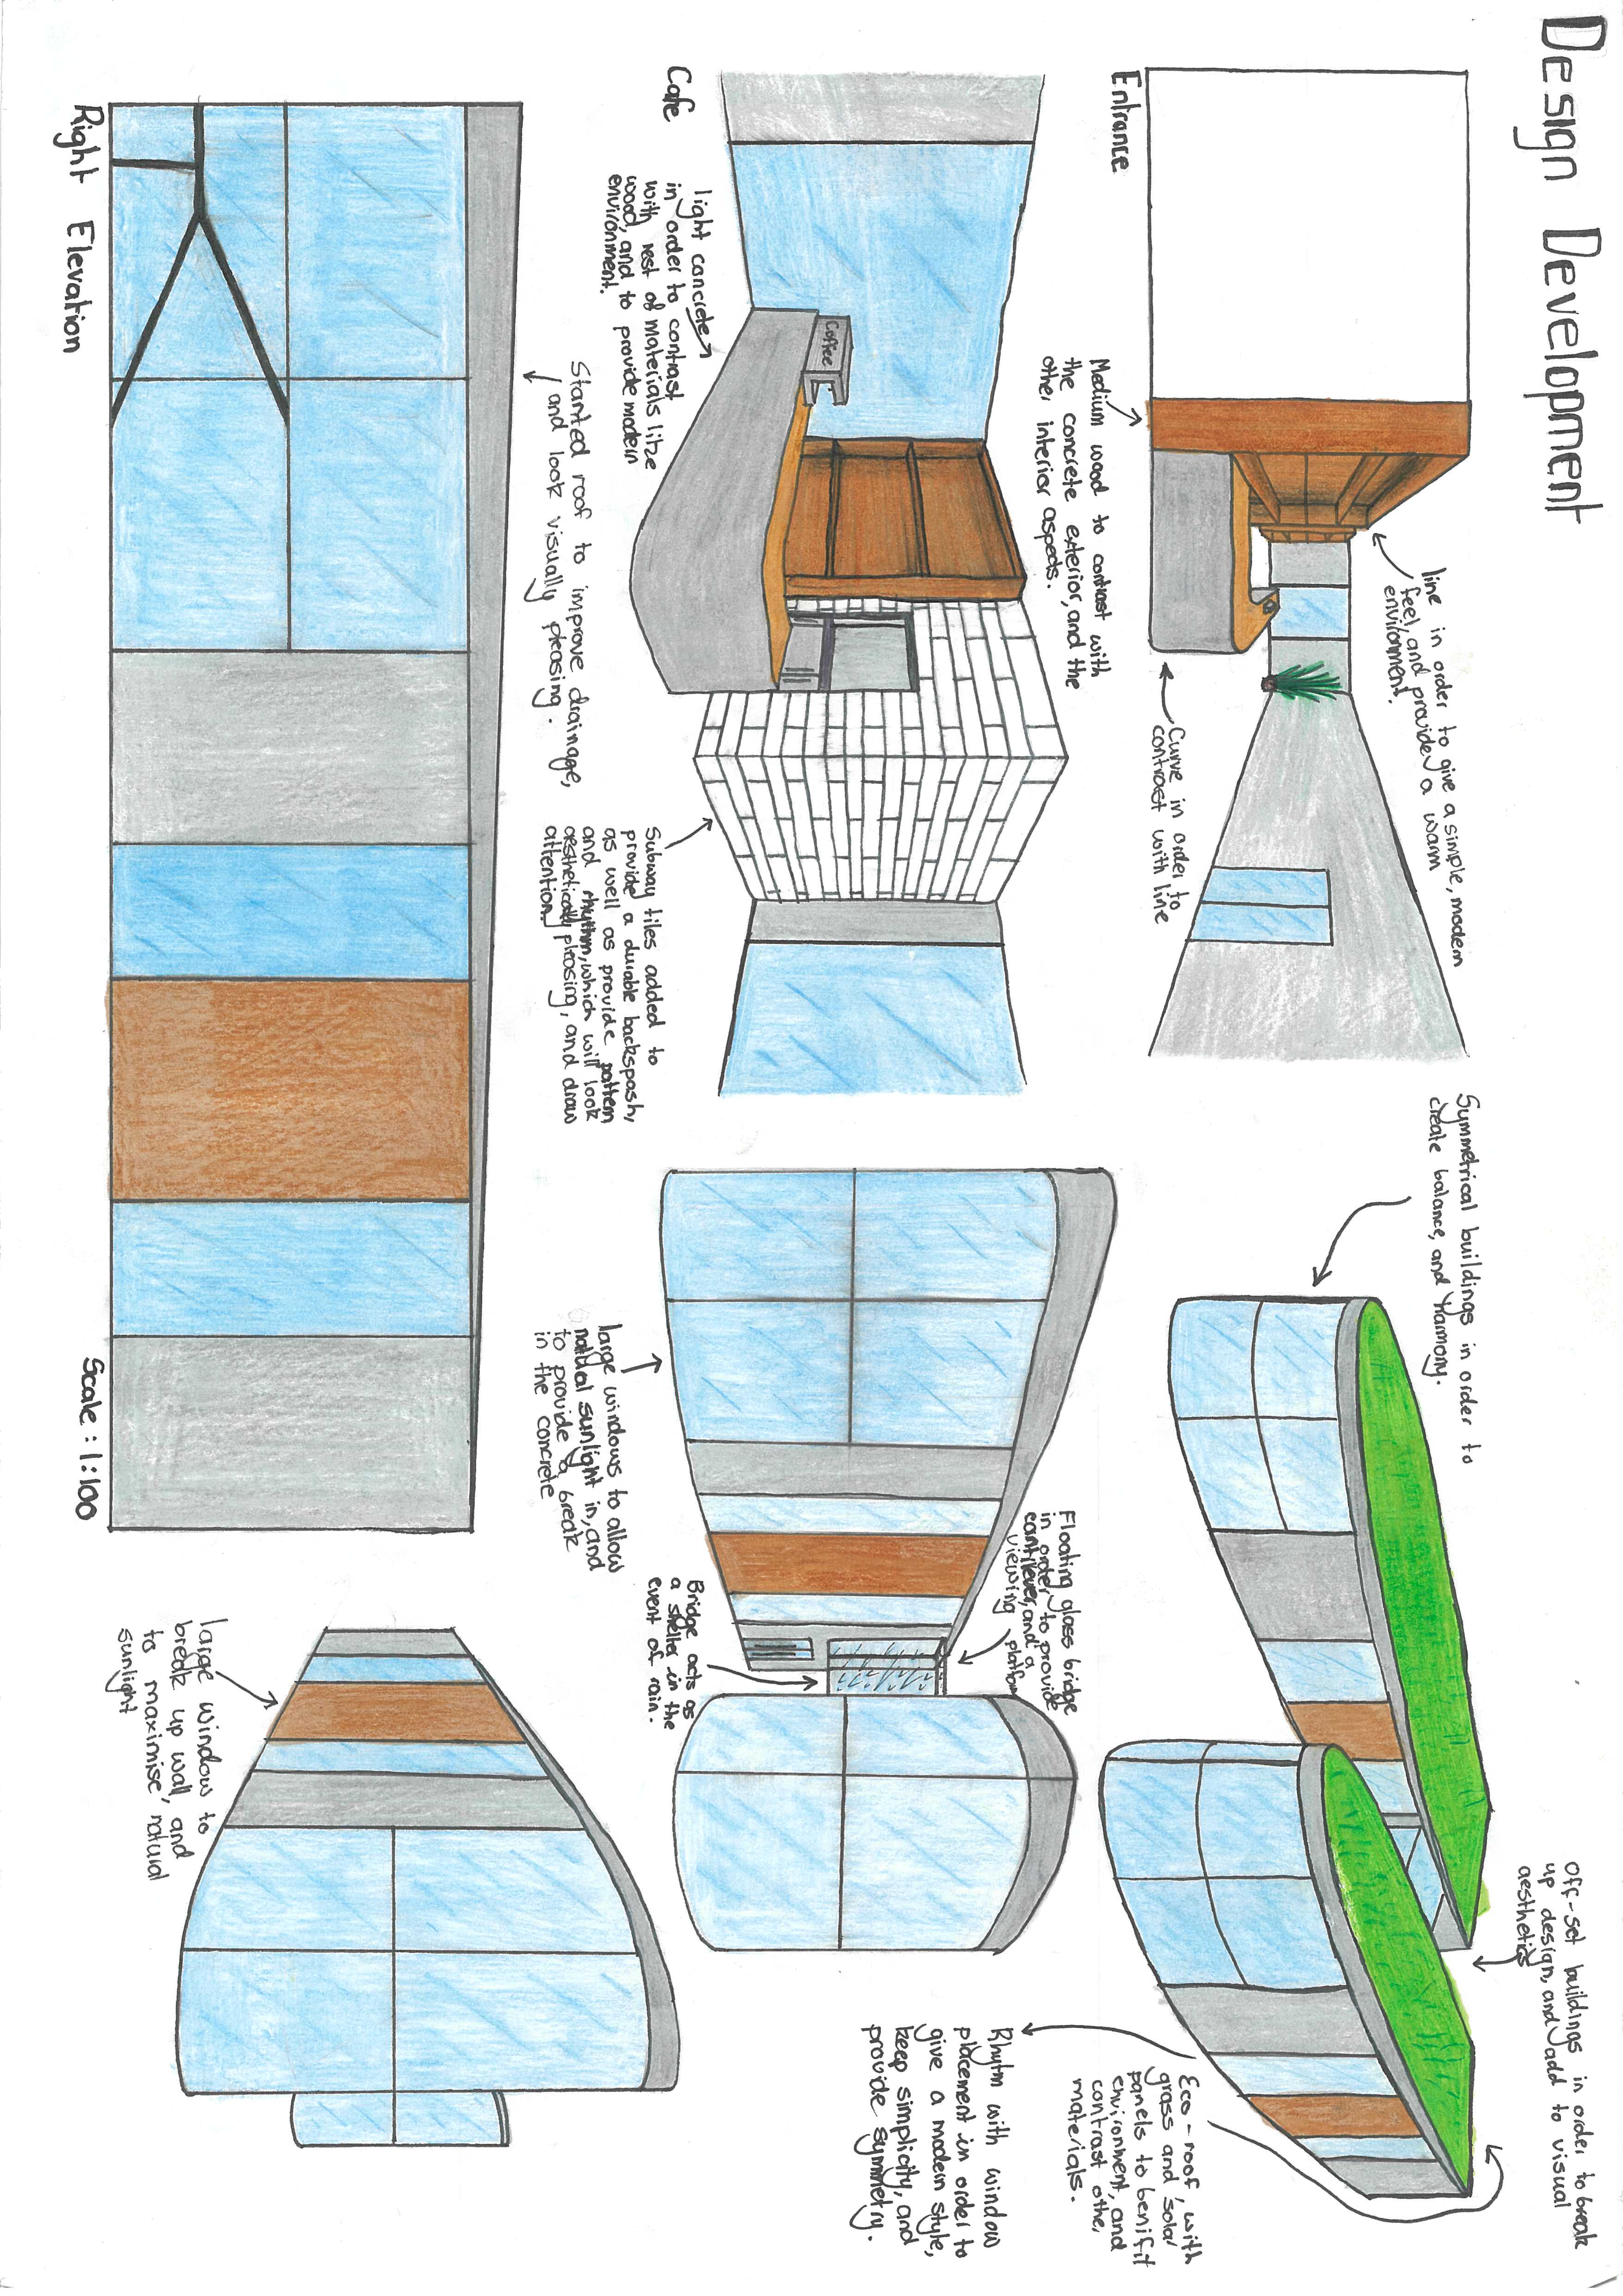
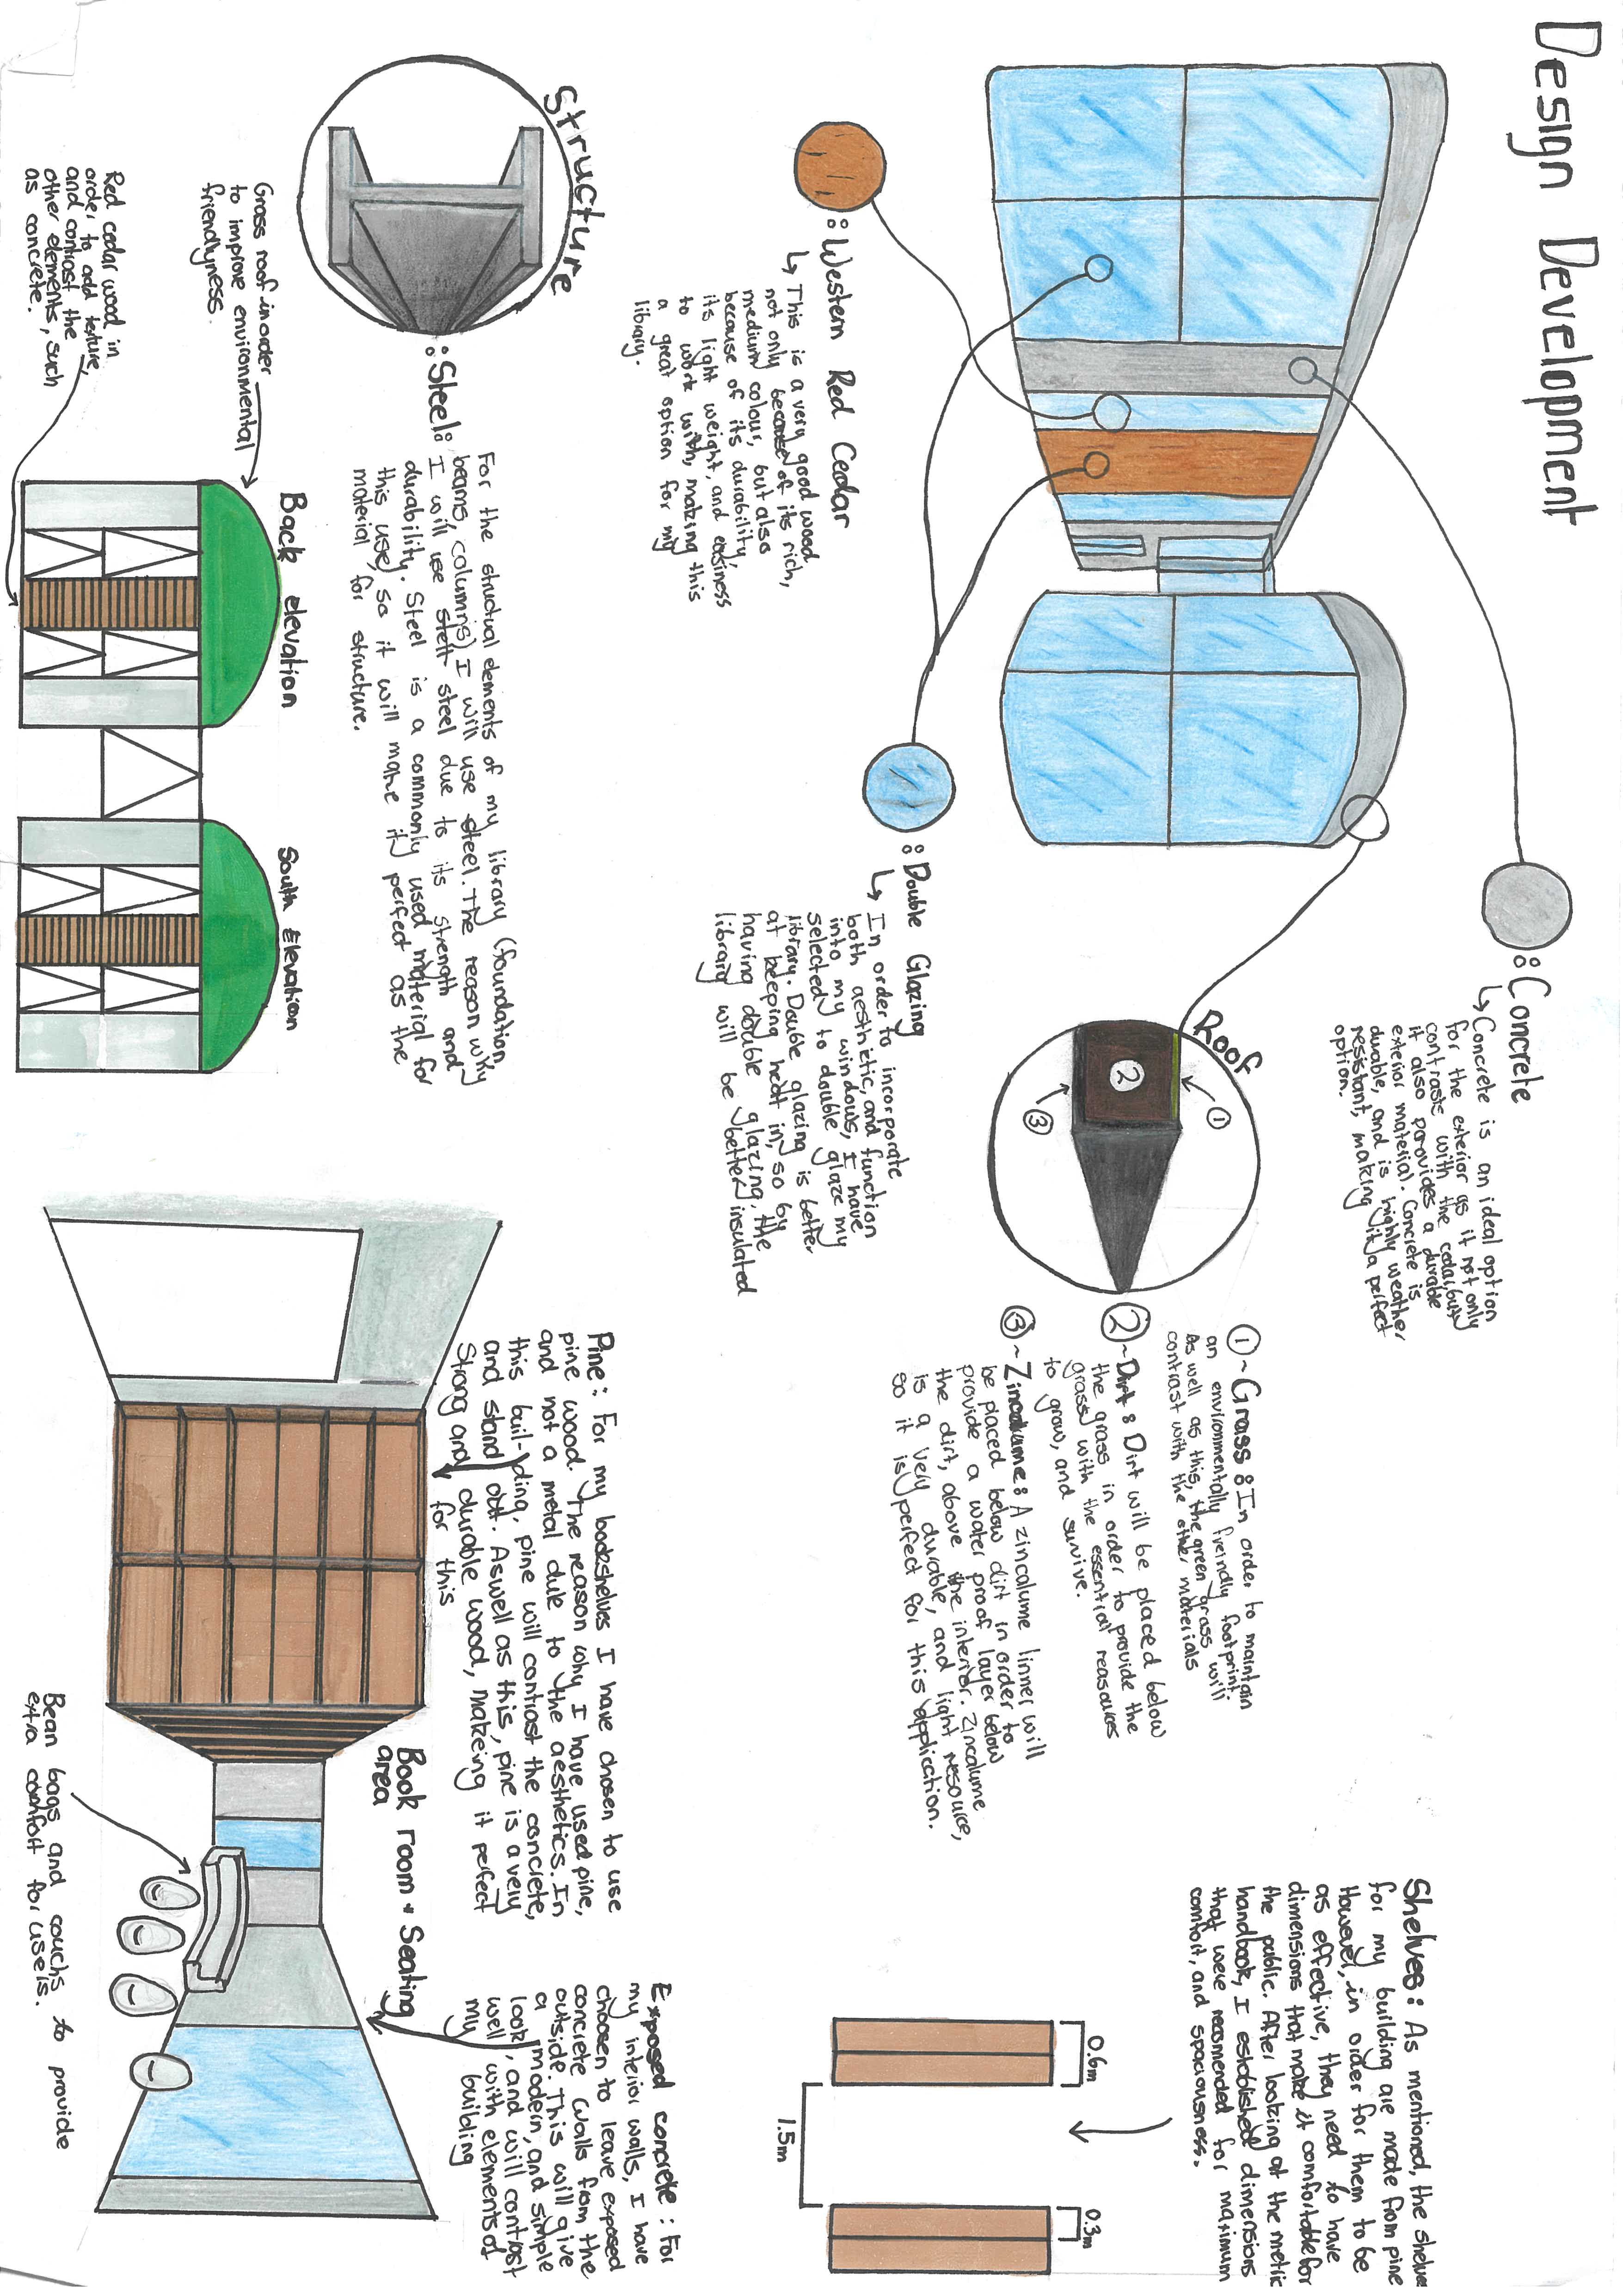
1 Select materials |
Annotate material choices, like using medium wood to contrast with a concrete exterior, or adding an eco-roof with grass and solar panels to benefit the environment. |
2 Justify your materials |
Write clear reasons for choosing specific structural and finish materials. For example, explain using Native Hard Woods for durability, concrete for weather resistance, and double glazing to keep heat in. |
3 Detail construction methods |
Sketch close-ups of specific construction elements, such as the layers of a green roof (grass, dirt, zincalume) or the exact ergonomic dimensions for bookshelves (e.g., 0.6m, 0.3m, 1.5m). |
22
23
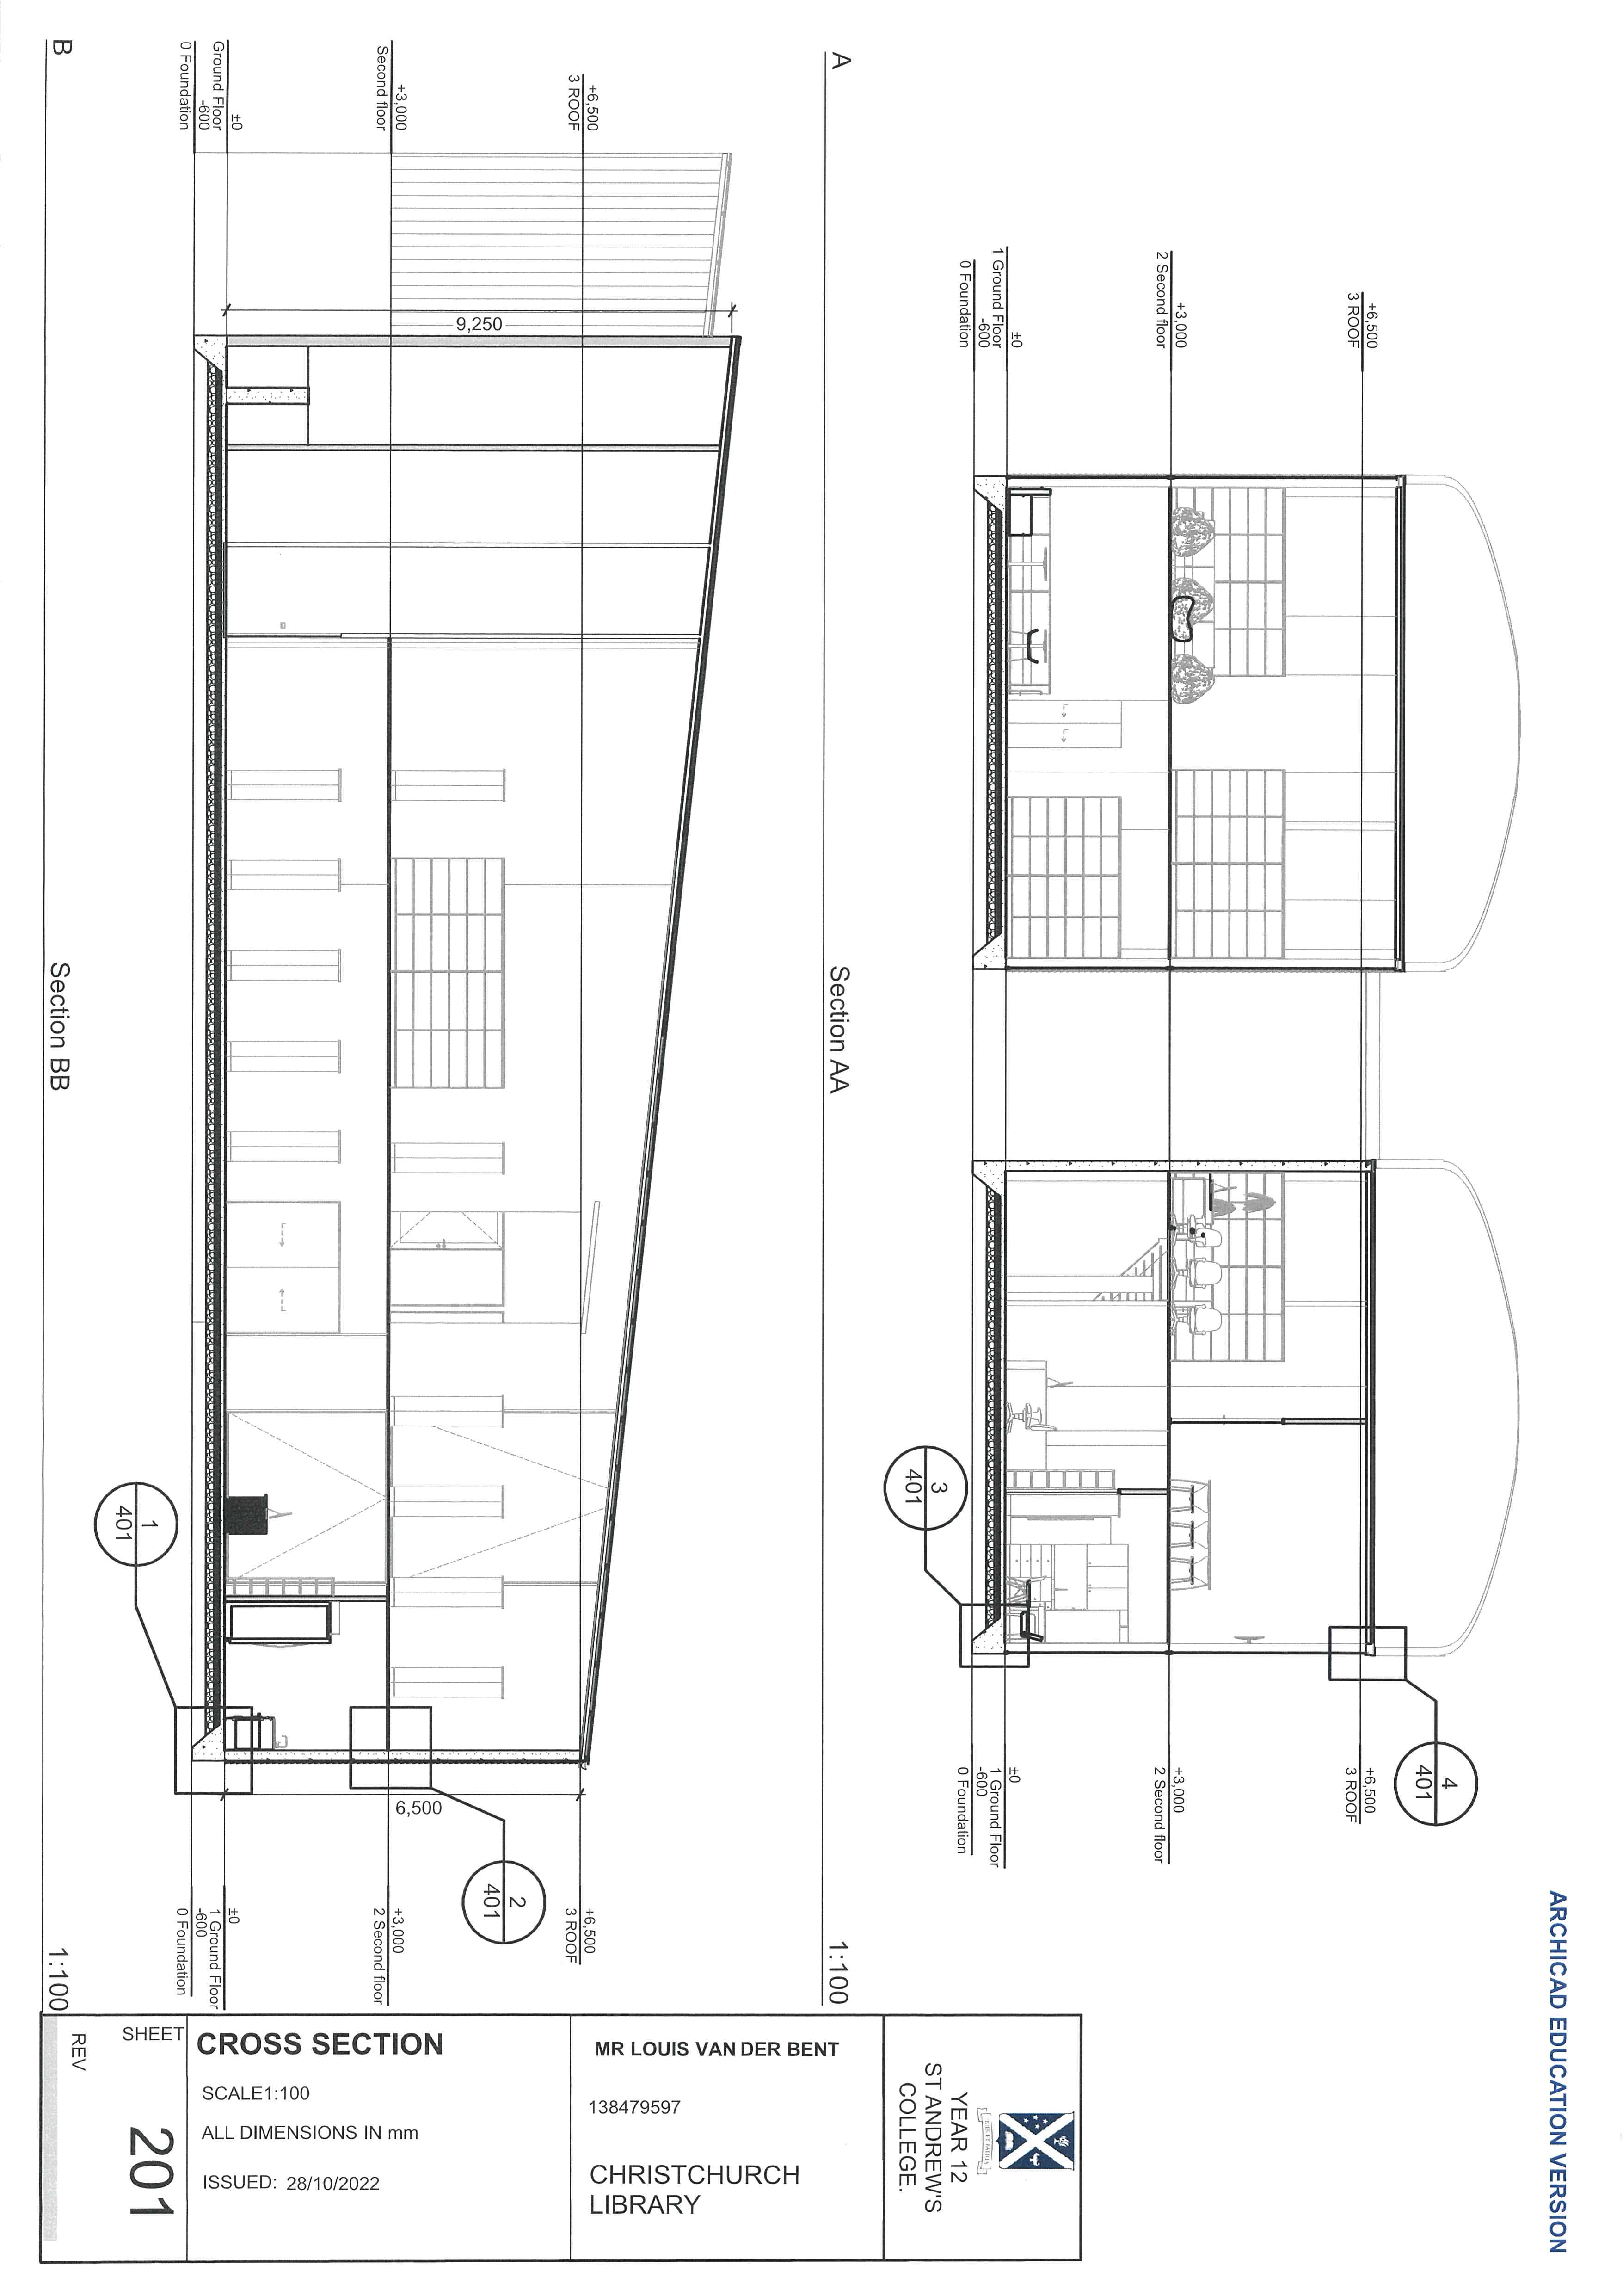
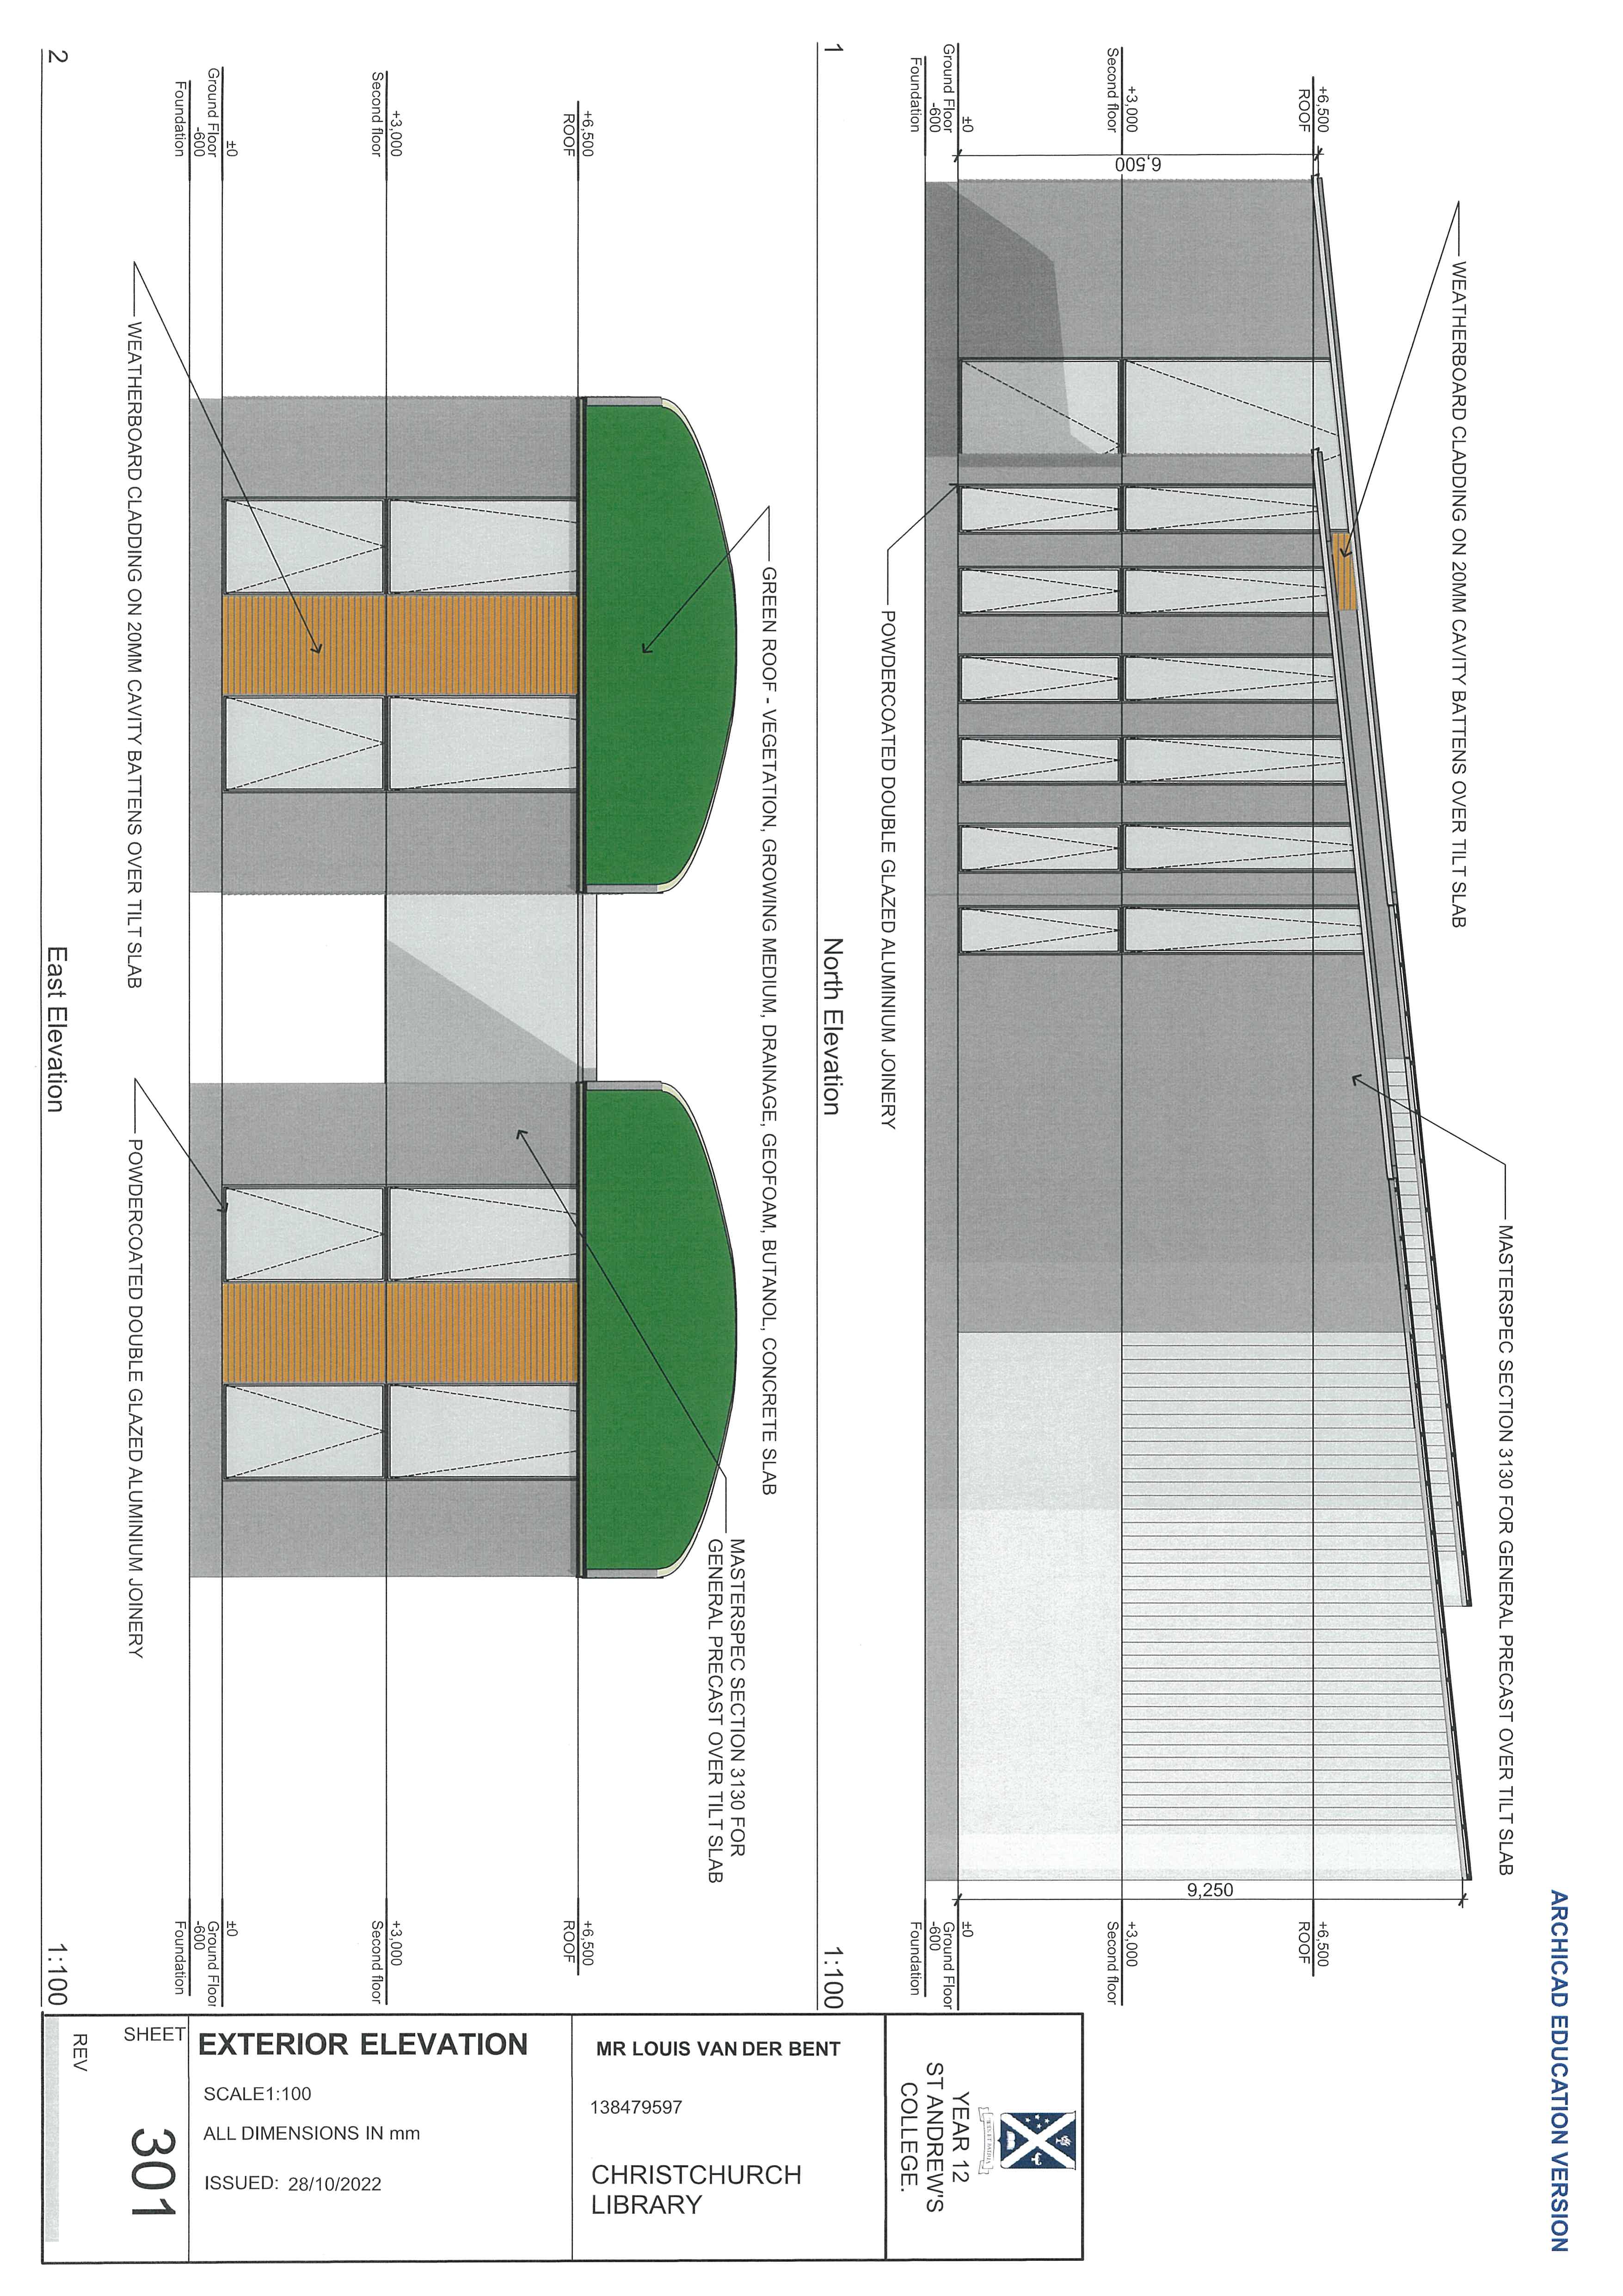
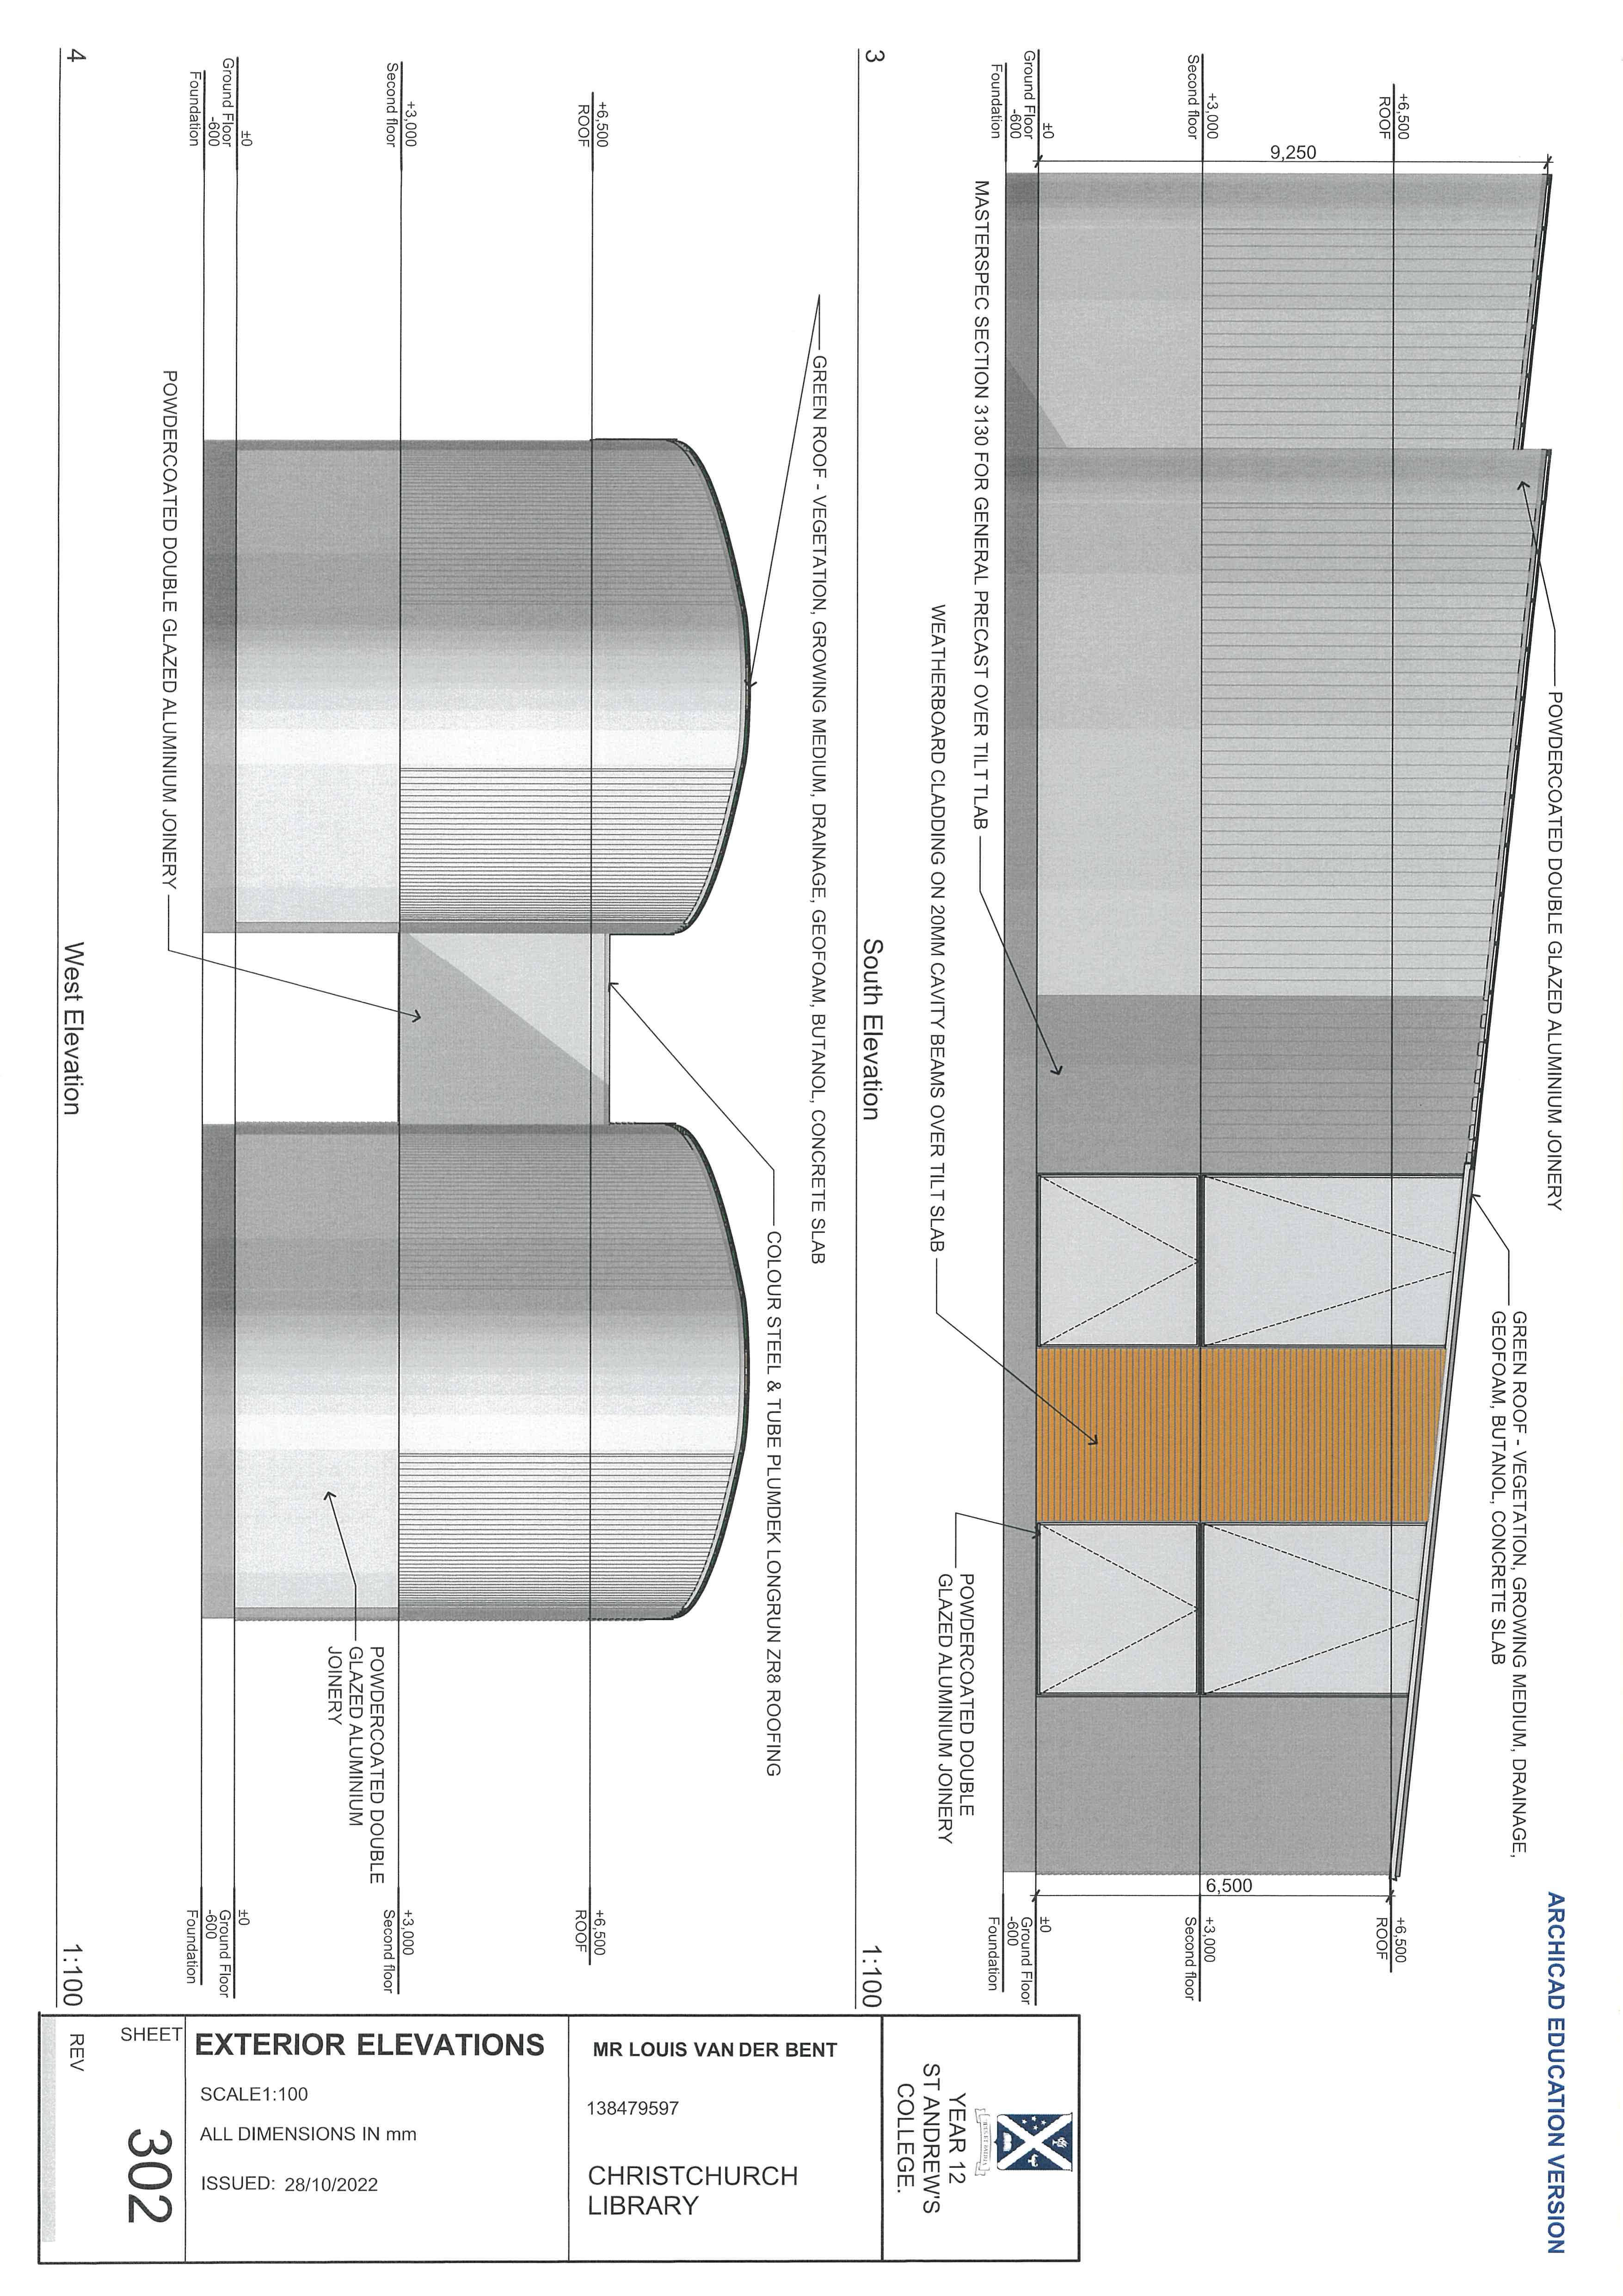
Formal CAD Drawing
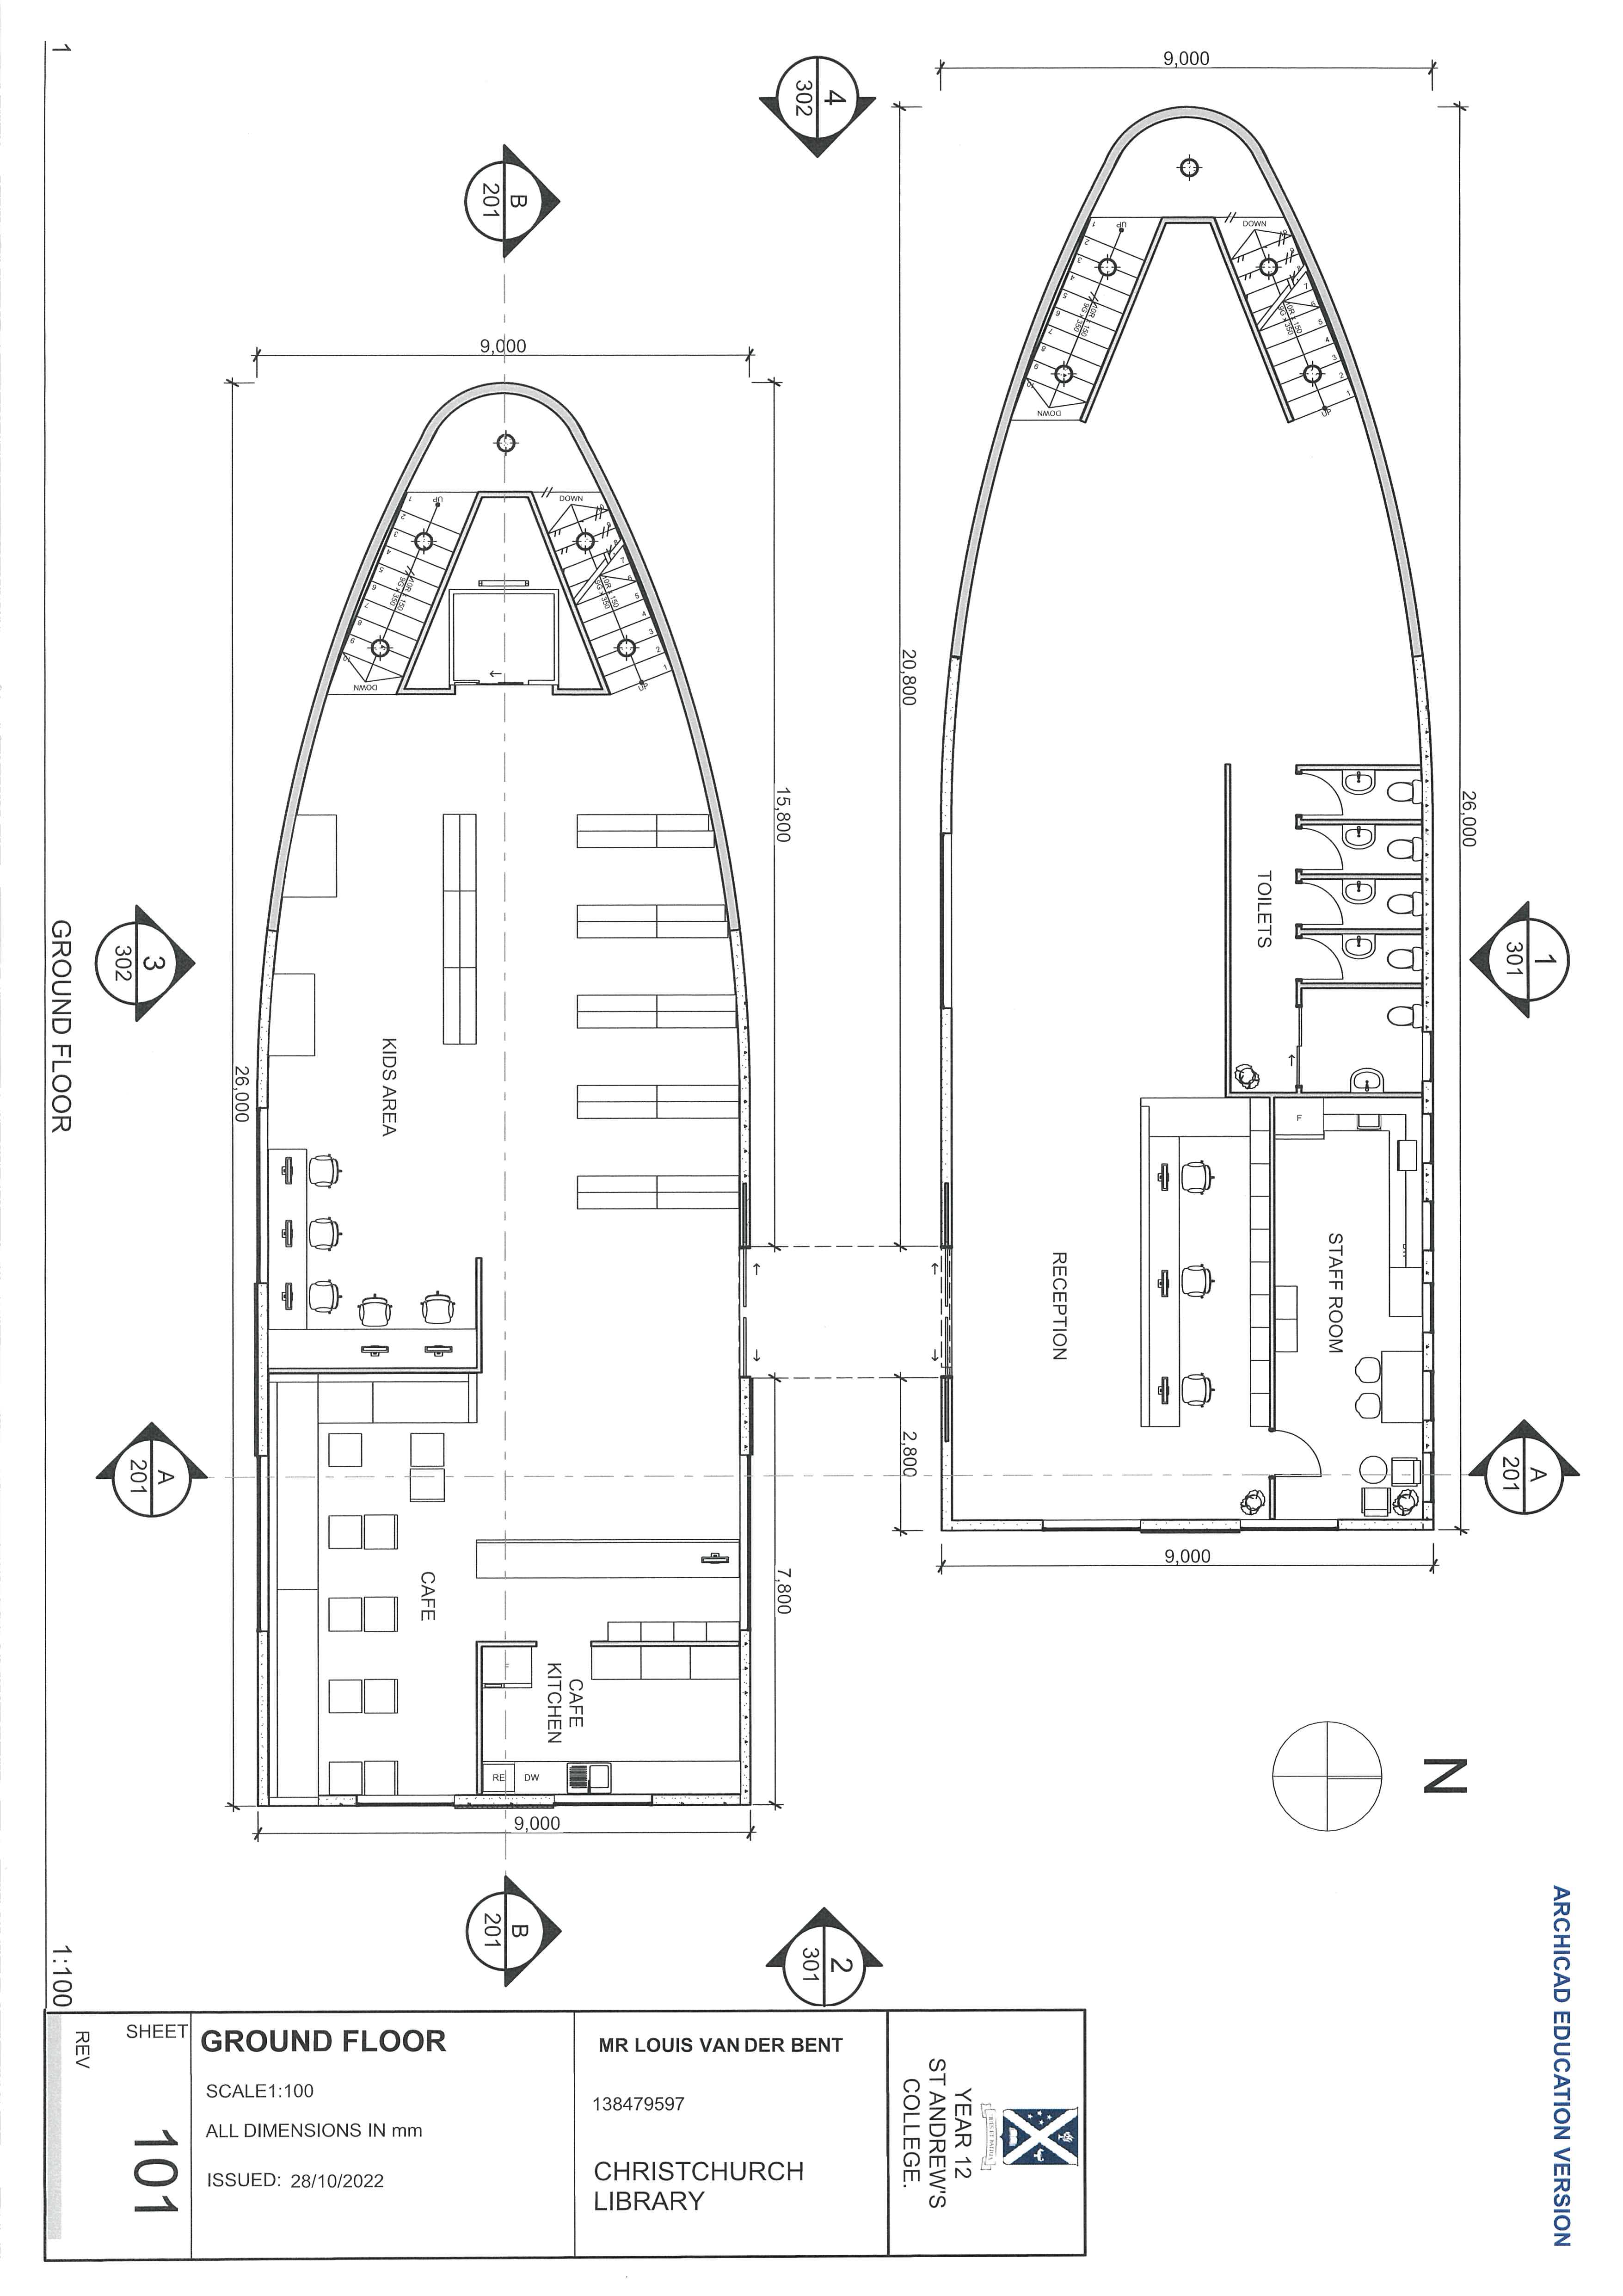
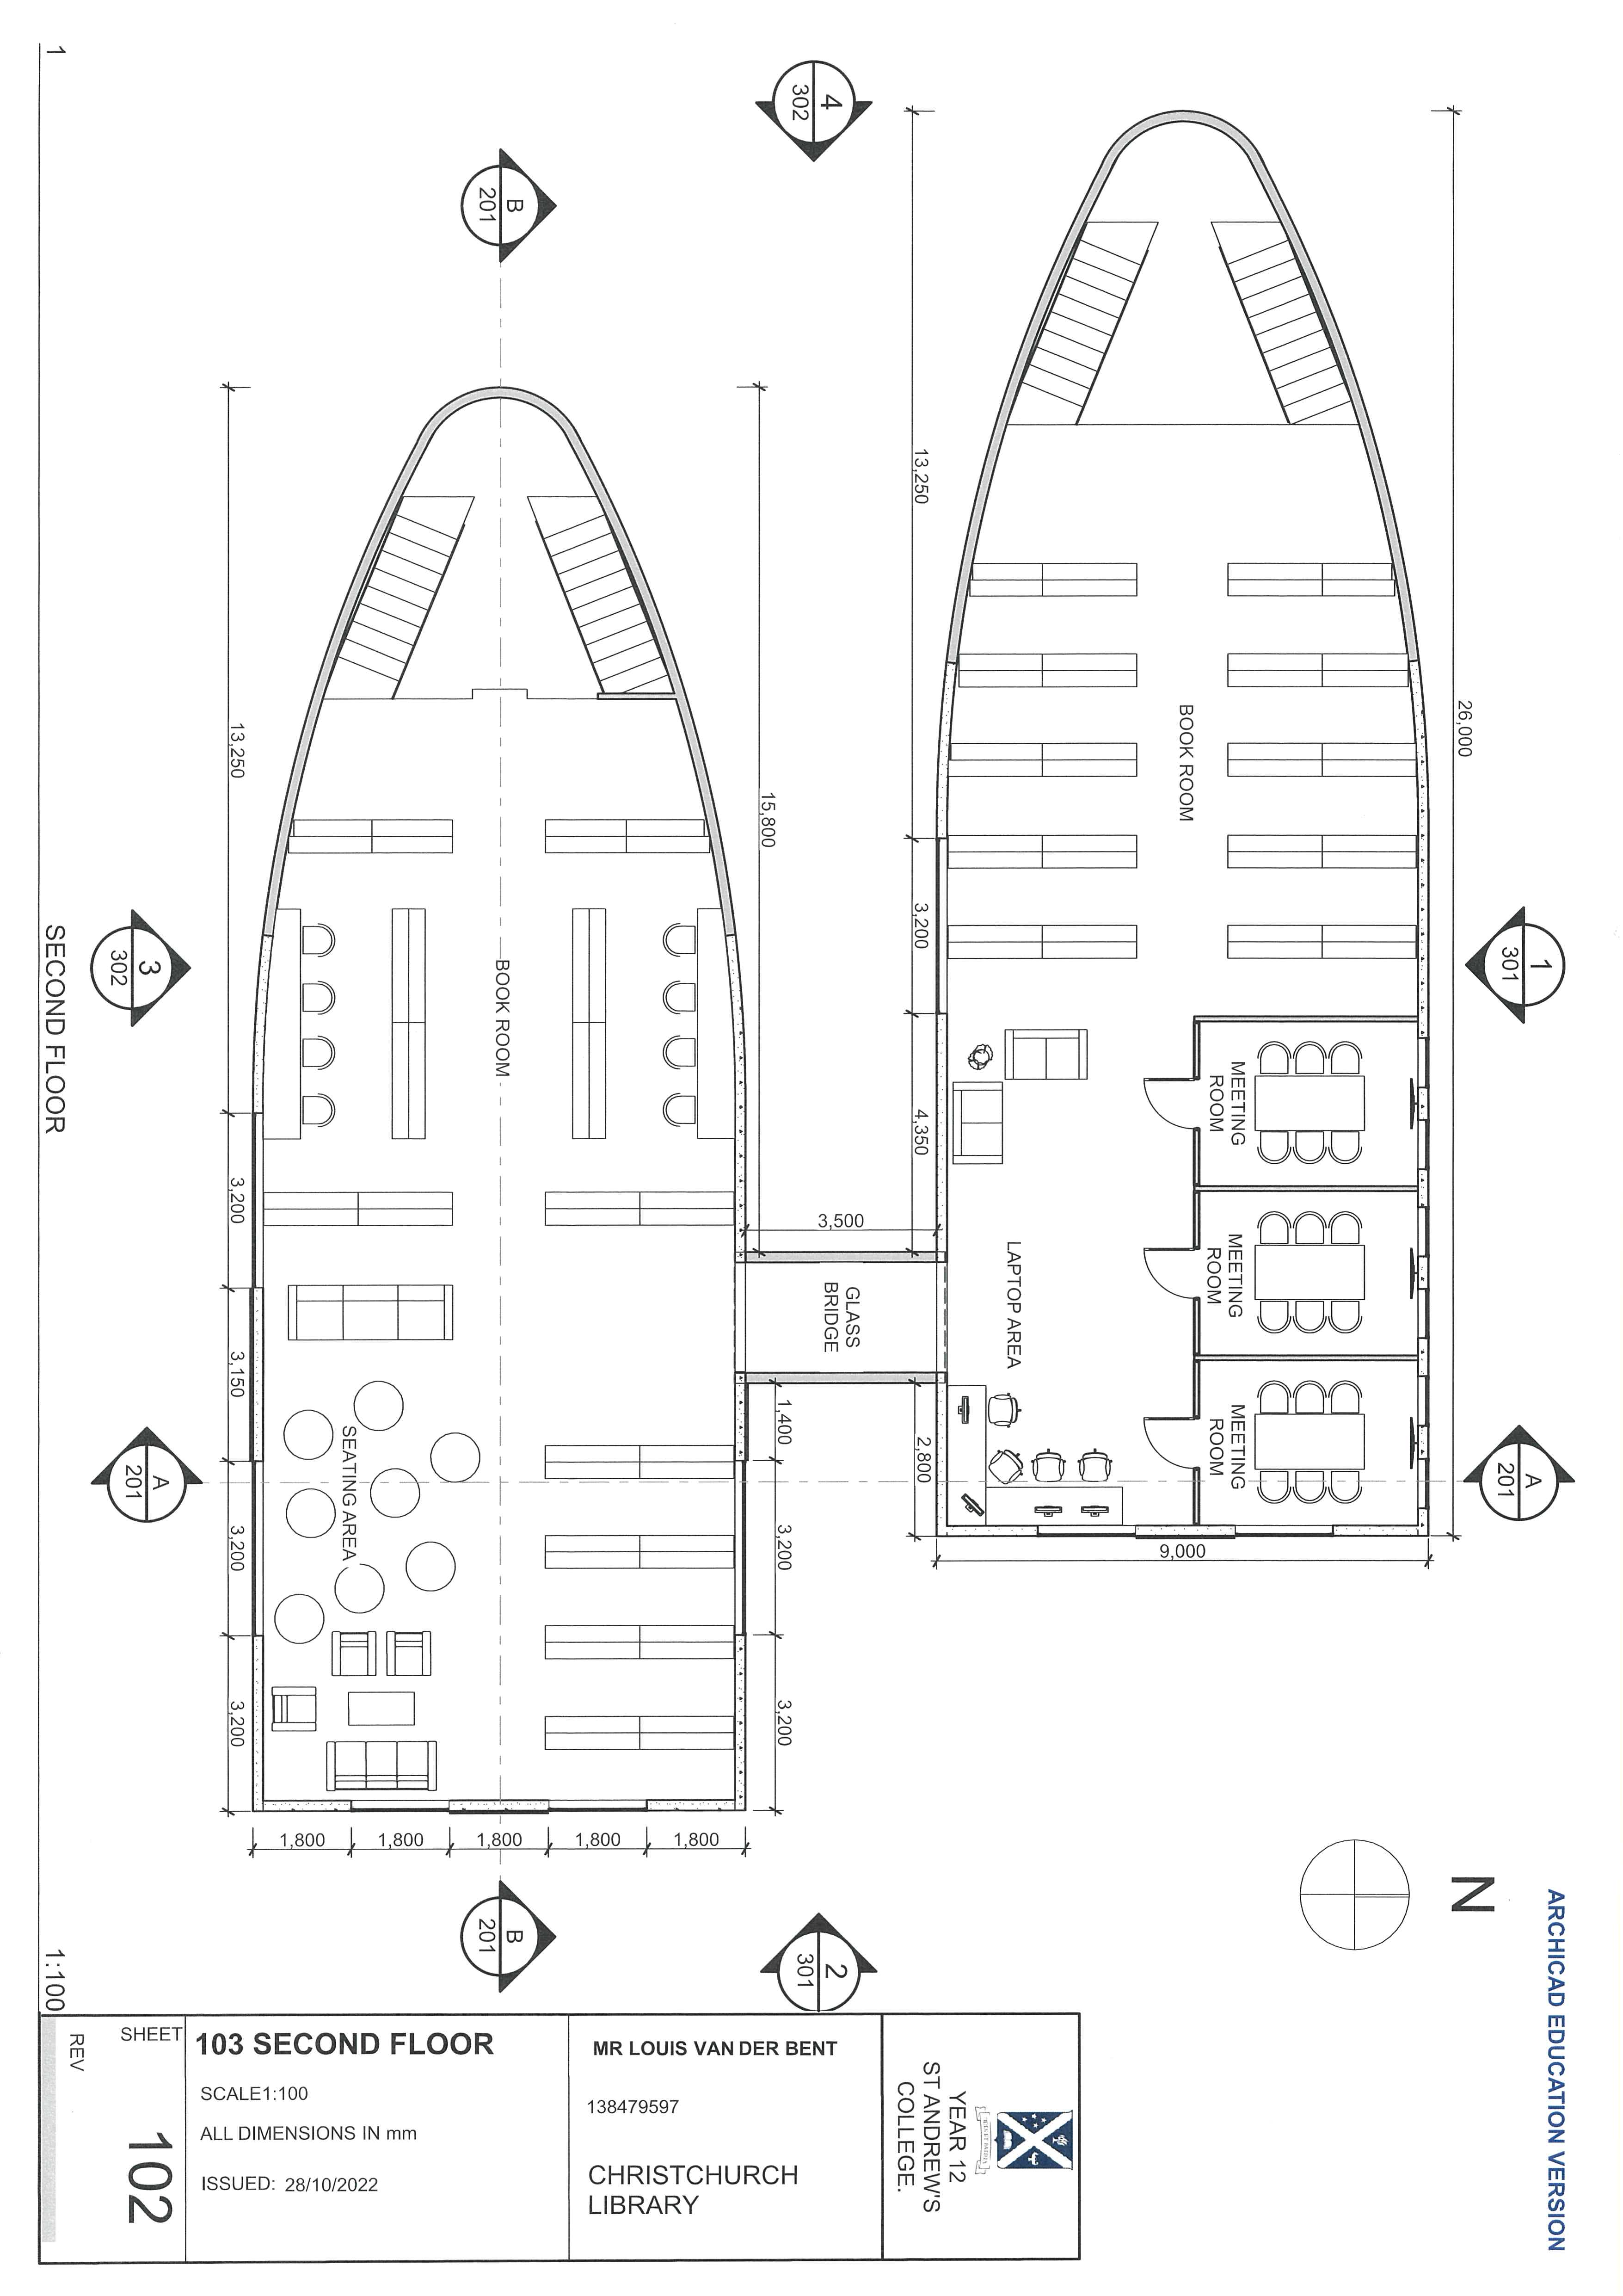
1 Start with the ground floor |
With ArchiCAD, draw a precise Ground Floor plan at a 1:100 scale. |
2 Add professional markings |
Include strict dimensions in millimeters, room labels (ie. Reception, Staff Room, Cafe, Kids Area), a North arrow, and section line markers. |
24
25
26
27
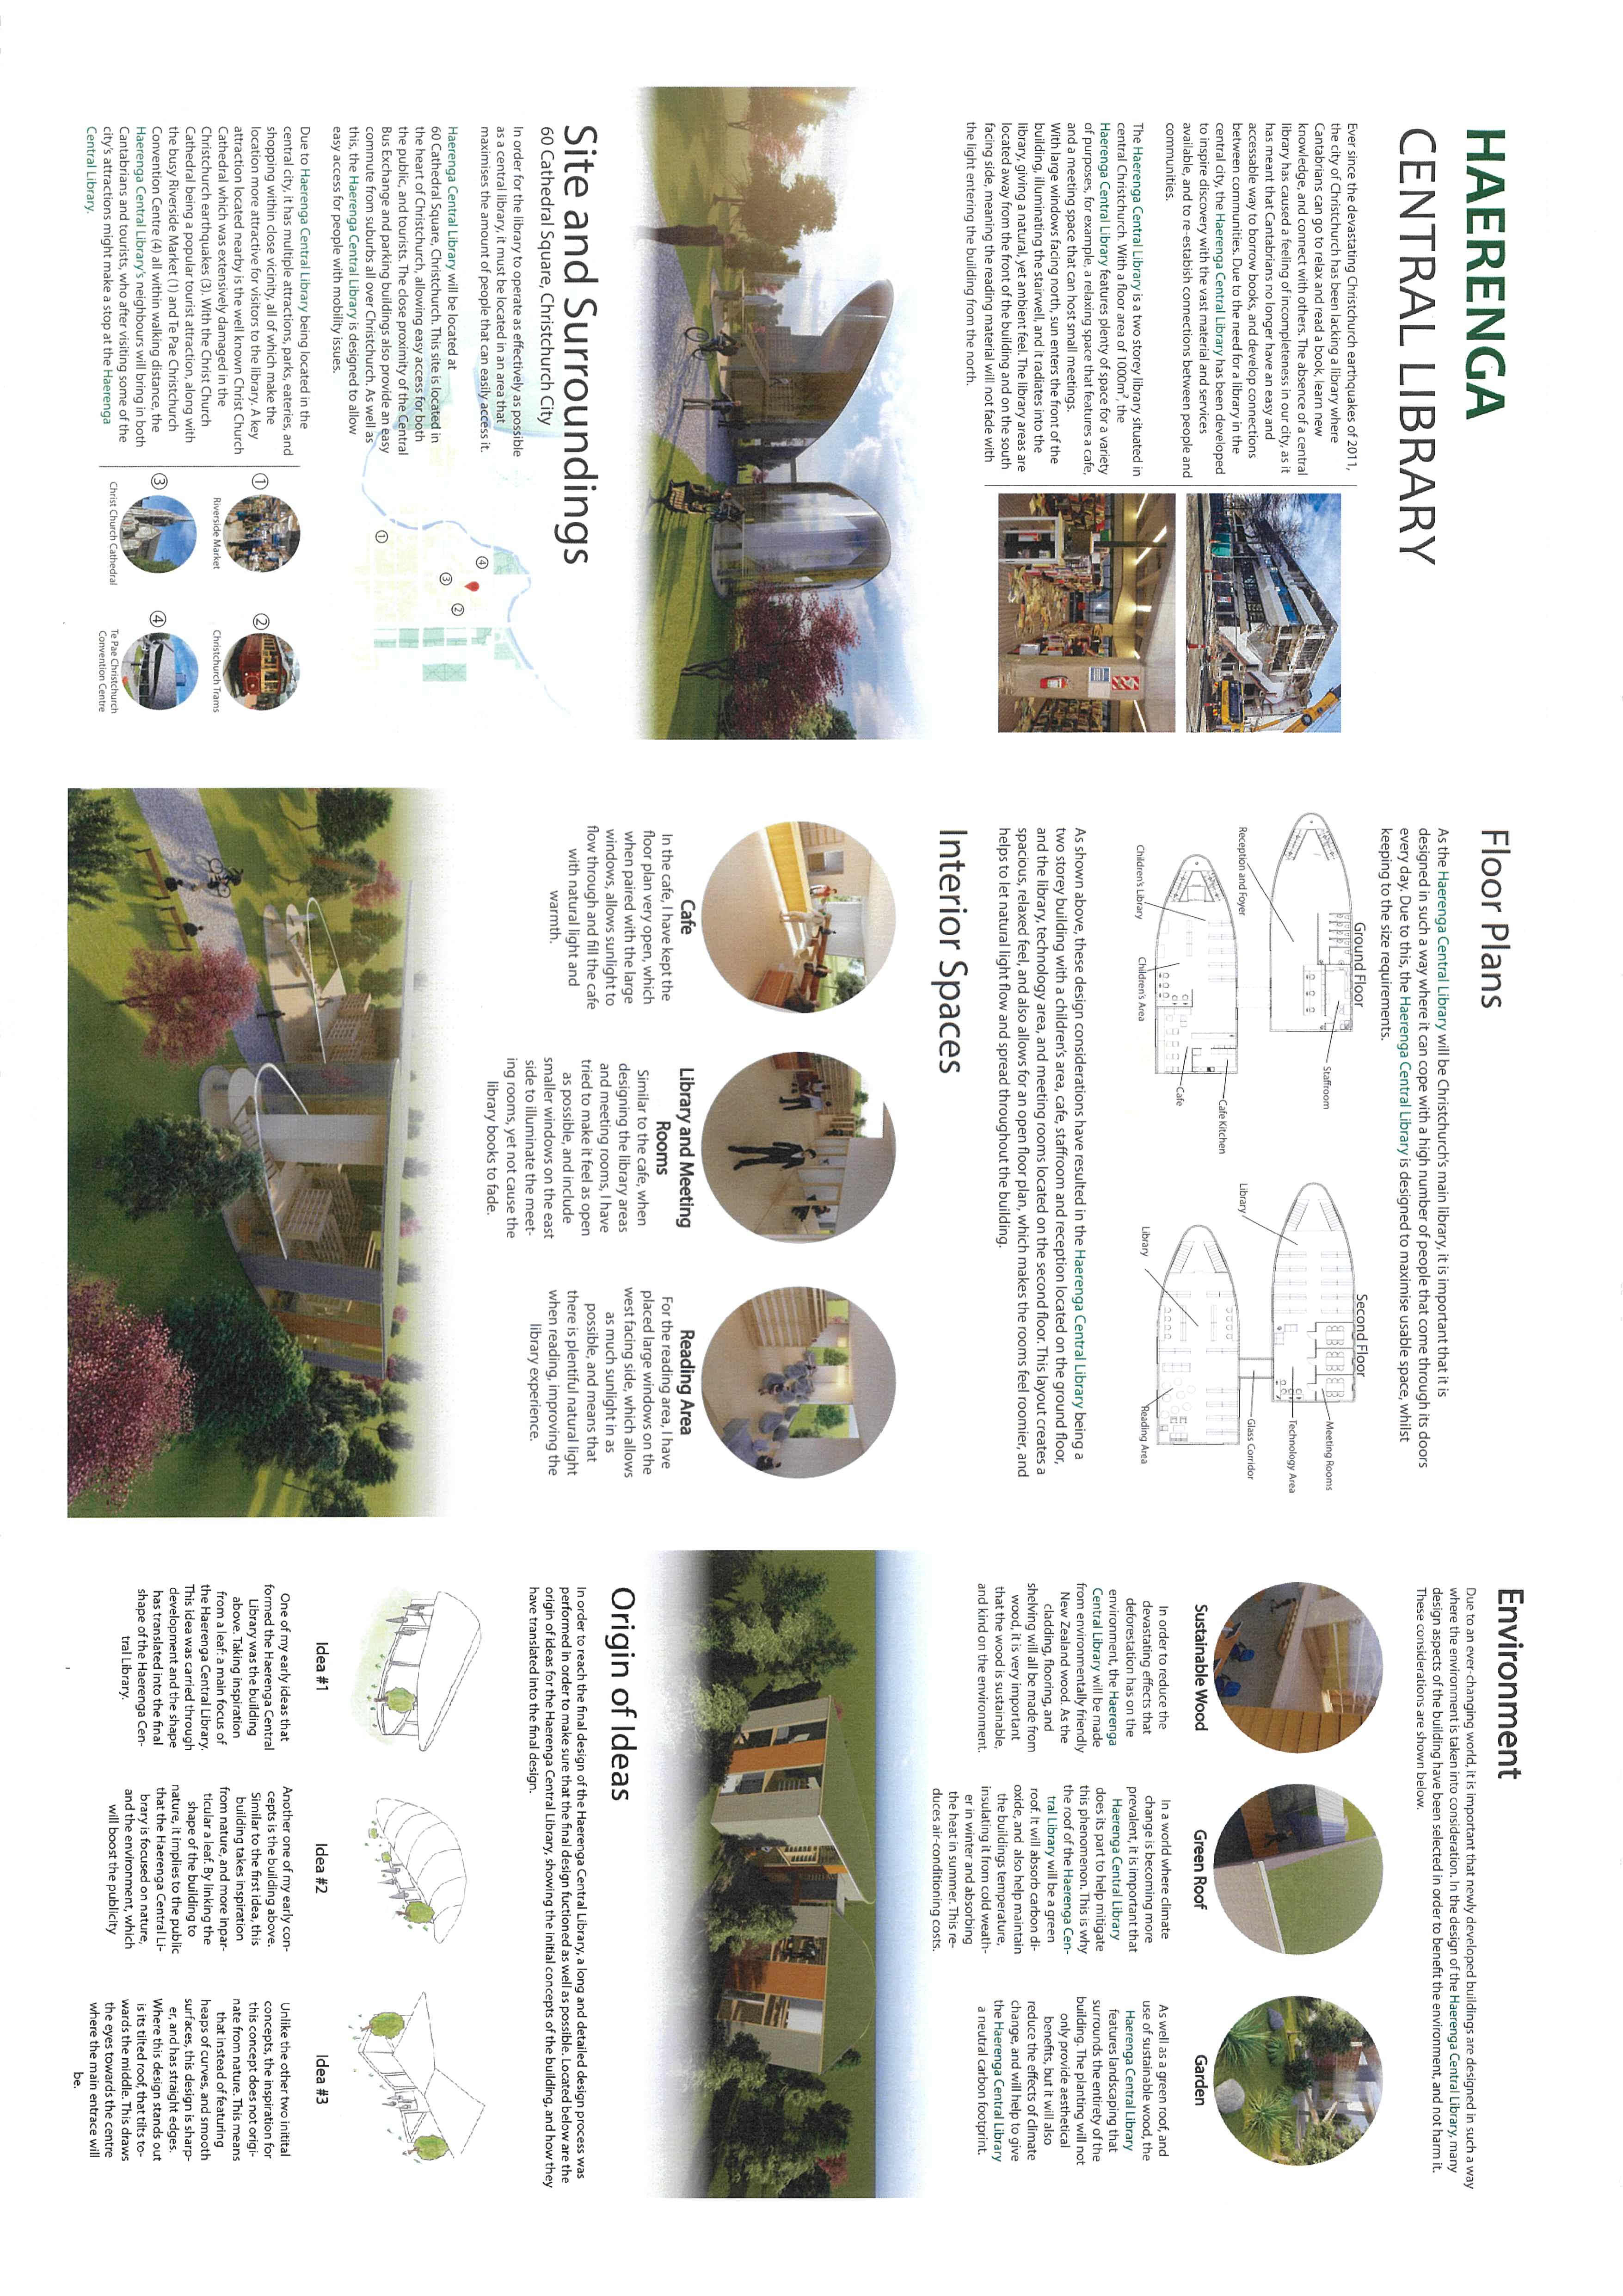
Evaluation
1 Write a compelling summary (Context & Purpose) |
Start by giving your project a name. |
2 Write a paragraph explaining the 'why' behind your design |
Mention local historical context (like Cyclone Gabrielle), the community need your building fills, and its overall size and purpose. |
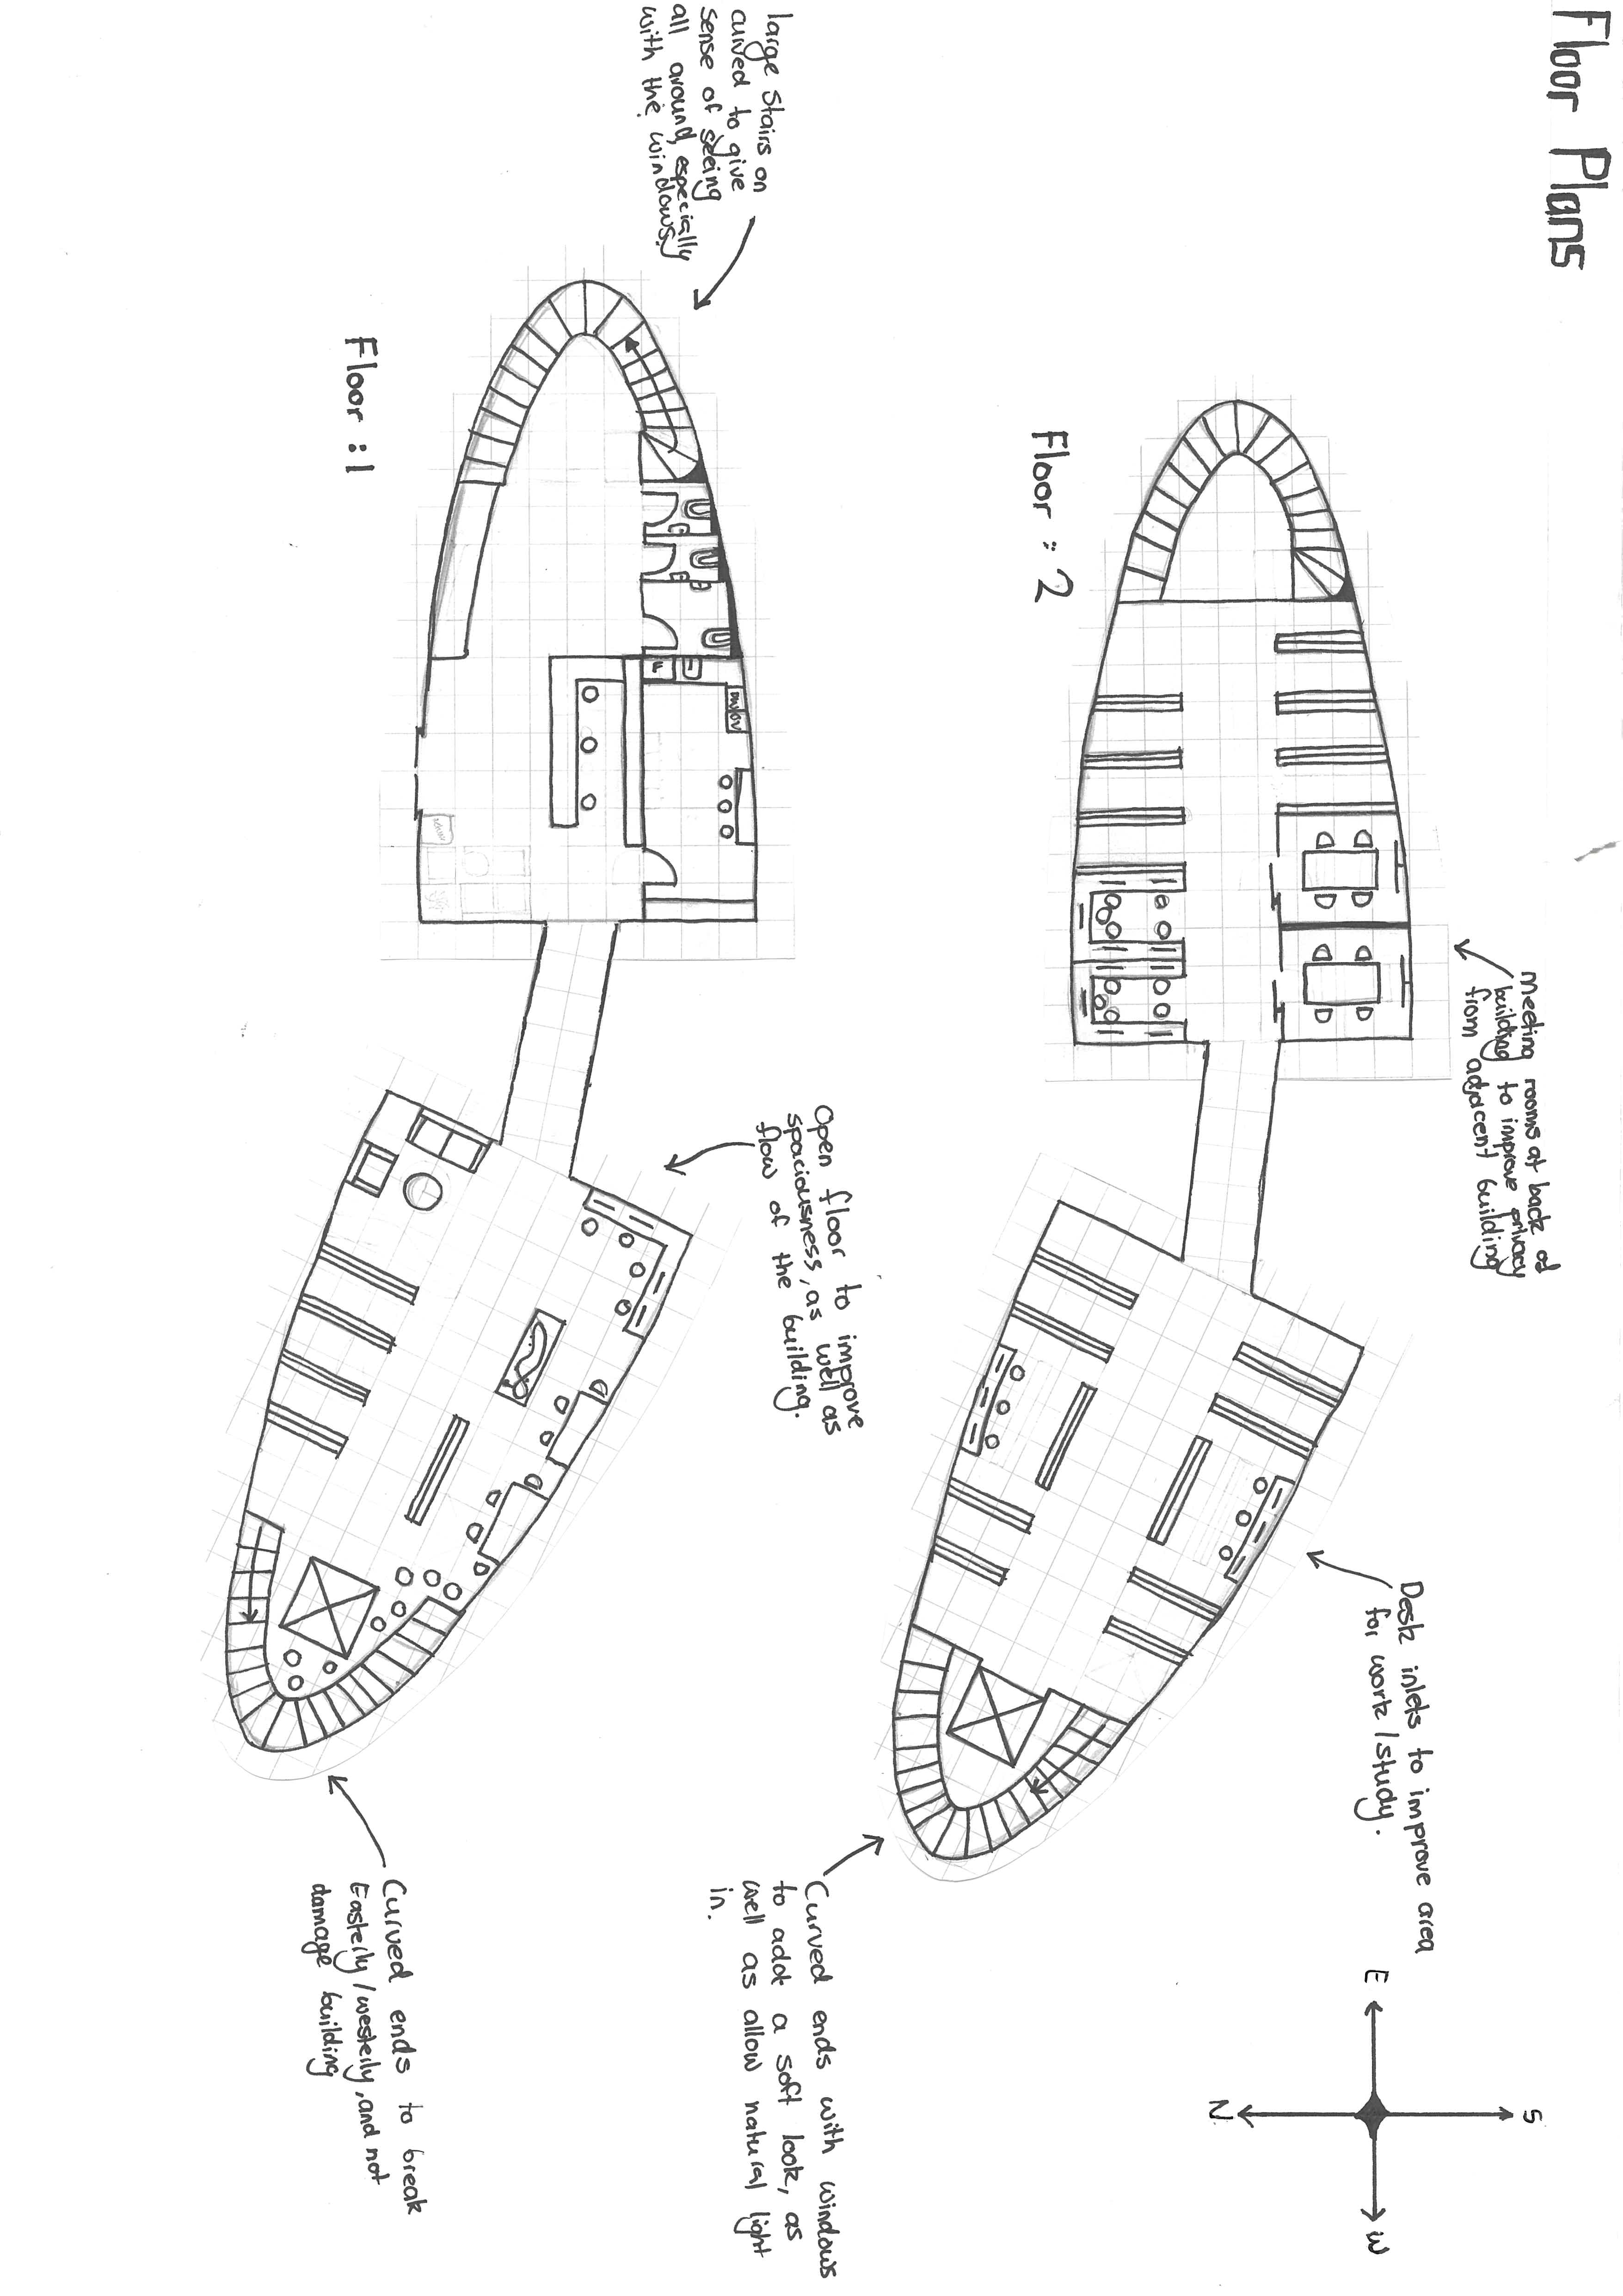
3 Present simplified floor plans |
Include clean, labeled line drawings of your final Ground Floor and Second Floor layouts. Write a brief explanation of how this layout maximizes usable space, handles a high volume of people, and creates an open, flowing atmosphere. |
4 Highlight environmental and sustainable features |
Create a dedicated section explaining how your building helps the environment. Detail specific choices, such as using sustainable local wood to reduce deforestation, including a green roof to absorb carbon dioxide and insulate the building, and adding landscaping to neutralize the carbon footprint. |
5 Analyze the site and surroundings |
State your exact location (e.g., Waikanai Beach) and justify why it is the best spot. Discuss accessibility (like nearby bus exchanges and parking) and how proximity to local attractions will draw visitors to your building. Include a small site map for reference. |
6 Describe the interior user experience |
Break down specific spaces (like the covered spaces, water supply, parking) and explain how the architectural design improves them. For example, explain how large west-facing windows provide light, while smaller east-facing windows prevent glare. |
7 Trace the "Origin of Ideas" |
Show the evolution of your design by displaying 2 or 3 of your initial concept designs (e.g., shapes inspired by leaves or slanted roofs). Write a brief note under each explaining how that early idea translated into the final building shape. |
8 Showcase final 3D renders |
Insert high-quality, realistic 3D digital renders of your exterior to show exactly what the finished building looks like in its actual environment, complete with people, trees, and lighting. |
28
Evaluation
29
30
31
32
33
34
35
36
37
38
39
40
41
42
43
44
45
46
47
48
49
50
51
52
53
54
55
56
57
58
59
60
61
62
63
64
65
66
67
68
69
70
71
72